HP NetServer LP 2000r Installing IBM OS/2 on an HP Netserver - Page 17
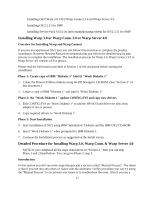
Installing Warp 3.0 or Warp Conn. 3.0 or Warp Server 4.0, Detailed Procedure for Installing Warp 3.0
 |
View all HP NetServer LP 2000r manuals
Add to My Manuals
Save this manual to your list of manuals |
Page 17 highlights
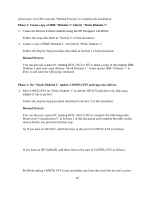
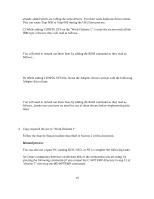
• Installing OS/2 Warp 3.0, OS/2 Warp Connect 3.0 and Warp Server 4.0 • Installing OS/2 2.11 for SMP • Installing Service Pack S.631 (or later) manufacturing refresh for OS/2 2.11 for SMP Installing Warp 3.0 or Warp Conn. 3.0 or Warp Server 4.0 Overview for Installing Warp and Warp Connect If you are an experienced OS/2 user you can follow this overview to complete the product installation. However Hewlett-Packard recommends that you follow the detailed step by step process to complete the installation. The installation process for Warp 3.0, Warp Connect 3.0 or Warp Server 4.0 consists of five phases. Please read the information provided in Section 1 of this document before starting the installation. Phase 1: Create copy of IBM "Diskette 1" label it "Work Diskette 1" 1. Create the Drivers/Utilities diskette using the HP Navigator CD-ROM. (See "Section 2" of this document.) 2. Create a copy of IBM "Diskette 1" and label it "Work Diskette 1". Phase 2: On "Work Diskette 1" update CONFIG.SYS and copy new drivers 3. Edit CONFIG.SYS on "Work Diskette 1" to add the HP SCSI and driver for disk array adapter if one is present. 4. Copy required drivers to "Work Diskette 1". Phase 3: Start Installation 5. Start installation of OS/2 using IBM "Installation" Diskette and the IBM OS/2 CD-ROM. 6. Insert "Work Diskette 1" when prompted for IBM Diskette 1. 7. Continue the Installation process as suggested on the Install screen. Detailed Procedure for Installing Warp 3.0, Warp Conn. & Warp Server 4.0 NOTE: If you completed all the steps listed above in "Section 2," then you can skip Phase 1 and 2 listed below. You can go to Phase 3, step 5. Introduction In this section you will see some steps that precede a section called "Manual Process". The intent is that if you run into any errors or issues with the automatic / utility procedure you can try using the "Manual Process" to circumvent any issues or to troubleshoot the error. Also if you are a 17
-
 1
1 -
2
-
3
-
4
-
5
-
6
-
7
-
8
-
9
-
10
-
11
-
 12
12 -
 13
13 -
 14
14 -
 15
15 -
 16
16 -
 17
17 -
 18
18 -
 19
19 -
 20
20 -
 21
21 -
 22
22 -
23
-
24
-
25
-
26
-
27
-
28
-
29
-
30
-
31
-
32
-
33
-
34
-
35
-
36
-
37
-
38
 |
 |
