HP NetServer LP 2000r Installing IBM OS/2 on an HP Netserver - Page 32
Installing Hewlett-Packard NIC's
 |
View all HP NetServer LP 2000r manuals
Add to My Manuals
Save this manual to your list of manuals |
Page 32 highlights
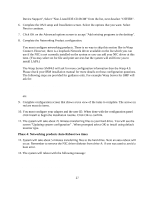
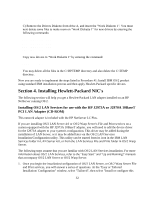
COPY A:\UPDATE.EXE C) Remove the Drivers Diskette from drive A, and insert the "Work Diskette 1". You must next delete some files to make room on "Work Diskette 1" for new drivers by entering the following commands: DEL IBM2FLPY.ADD DEL IBM2ADSK.ADD DEL IBM2SCSI.ADD DEL AHA*.ADD Copy new drivers to "Work Diskette 1" by entering the command: COPY *.* A:\ You may delete all the files in the C:\HPTEMP directory and also delete the C:\TEMP directory. Now you are ready to implement the steps listed in Procedure #1: Install IBM OS/2 product using standard IBM installation process and then apply Hewlett-Packard specific drivers. Section 4. Installing Hewlett-Packard NIC's The following section will help you get a Hewlett-Packard LAN adapter installed on an HP NetServer running OS/2. Installing OS/2 LAN Services for use with the HP J2973A or J2970A 10BaseT PCI LAN Adapter (CD-ROM) This network adapter is included with the HP NetServer LC Plus. If you are installing OS/2 LAN Server 4.0 or OS/2 Warp Server's File and Print services on a system equipped with the HP J2973A 10BaseT adapter, you will need to add the device driver for the J2973A adapter to your system's configuration. This driver may be added during the installation of LAN Server, or it may be added later via the OS/2 LAN Services Installation/Configuration utility. This utility can be started from its icon in the IBM LAN Services folder in LAN Server 4.0, or from the LAN Services File and Print folder in OS/2 Warp Server. The following steps assume that you are familiar with OS/2 LAN Services installation. For more information about OS/2 LAN Services, refer to the "Easy Start" and "Up and Running!" manuals that accompany OS/2 LAN Server or OS/2 Warp Server. 1. Once you begin the installation/configuration of OS/2 LAN Server, or OS/2 Warp Server File and Print services, you will answer a series of questions. At the "Easy or Tailored Installation/ Configuration" window, select "Tailored", then select "Install or configure this 32
-
 1
1 -
2
-
3
-
4
-
5
-
6
-
7
-
8
-
9
-
10
-
11
-
12
-
13
-
14
-
15
-
16
-
17
-
18
-
19
-
20
-
21
-
22
-
23
-
24
-
25
-
26
-
 27
27 -
 28
28 -
 29
29 -
 30
30 -
 31
31 -
 32
32 -
 33
33 -
 34
34 -
 35
35 -
 36
36 -
 37
37 -
38
 |
 |