HP Officejet 4500 User Guide - Page 13
Get started, Accessibility - user guide
 |
View all HP Officejet 4500 manuals
Add to My Manuals
Save this manual to your list of manuals |
Page 13 highlights
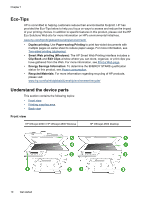
1 Get started This guide provides details about how to use the device and to resolve problems. • Accessibility • Eco-Tips • Understand the device parts • Use the product control panel • Finding the device model number • Select print media • Load an original on the scanner glass • Load an original in the automatic document feeder (ADF) • Load media • Maintain the device • Turn off the device NOTE: If you are using the device with a computer running Windows XP Starter Edition, Windows Vista Starter Edition, or Windows 7 Starter Edition, some features might not be available. For more information, see Operating system compatibility. Accessibility The device provides a number of features that make it accessible for people with disabilities. Visual The device software is accessible for users with visual impairments or low vision through the use of your operating system's accessibility options and features. It also supports most assistive technology such as screen readers, Braille readers, and voice-to-text applications. For users who are color blind, colored buttons and tabs used in the software and on the device control panel have simple text or icon labels that convey the appropriate action. Mobility For users with mobility impairments, the device software functions can be executed through keyboard commands. The software also supports Windows accessibility options such as StickyKeys, ToggleKeys, FilterKeys, and MouseKeys. The device doors, buttons, paper trays, and paper guides can be operated by users with limited strength and reach. Support For more details about the accessibility of this product and HP's commitment to product accessibility, visit HP's Web site at www.hp.com/accessibility. For accessibility information for Mac OS X, visit the Apple Web site at www.apple.com/ accessibility. Get started 9
-
 1
1 -
2
-
3
-
4
-
5
-
6
-
7
-
 8
8 -
 9
9 -
 10
10 -
 11
11 -
 12
12 -
 13
13 -
 14
14 -
 15
15 -
 16
16 -
 17
17 -
 18
18 -
19
-
20
-
21
-
22
-
23
-
24
-
25
-
26
-
27
-
28
-
29
-
30
-
31
-
32
-
33
-
34
-
35
-
36
-
37
-
38
-
39
-
40
-
41
-
42
-
43
-
44
-
45
-
46
-
47
-
48
-
49
-
50
-
51
-
52
-
53
-
54
-
55
-
56
-
57
-
58
-
59
-
60
-
61
-
62
-
63
-
64
-
65
-
66
-
67
-
68
-
69
-
70
-
71
-
72
-
73
-
74
-
75
-
76
-
77
-
78
-
79
-
80
-
81
-
82
-
83
-
84
-
85
-
86
-
87
-
88
-
89
-
90
-
91
-
92
-
93
-
94
-
95
-
96
-
97
-
98
-
99
-
100
-
101
-
102
-
103
-
104
-
105
-
106
-
107
-
108
-
109
-
110
-
111
-
112
-
113
-
114
-
115
-
116
-
117
-
118
-
119
-
120
-
121
-
122
-
123
-
124
-
125
-
126
-
127
-
128
-
129
-
130
-
131
-
132
-
133
-
134
-
135
-
136
-
137
-
138
-
139
-
140
-
141
-
142
-
143
-
144
-
145
-
146
-
147
-
148
-
149
-
150
-
151
-
152
-
153
-
154
-
155
-
156
-
157
-
158
-
159
-
160
-
161
-
162
-
163
-
164
-
165
-
166
-
167
-
168
-
169
-
170
-
171
-
172
-
173
-
174
-
175
-
176
-
177
-
178
-
179
-
180
-
181
-
182
-
183
-
184
-
185
-
186
-
187
-
188
-
189
-
190
-
191
-
192
-
193
-
194
-
195
-
196
-
197
-
198
-
199
-
200
-
201
-
202
-
203
-
204
-
205
-
206
-
207
-
208
-
209
-
210
-
211
-
212
-
213
-
214
-
215
-
216
-
217
-
218
-
219
-
220
-
221
-
222
-
223
-
224
-
225
-
226
-
227
-
228
 |
 |