HP Pavilion 12-b000 Maintenance and Service Guide - Page 59
or a similar thin, plastic tool into the opening on the left end
 |
View all HP Pavilion 12-b000 manuals
Add to My Manuals
Save this manual to your list of manuals |
Page 59 highlights
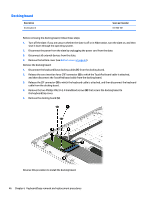
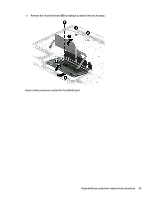
5. Remove the hinge assembly (5). 6. Insert a case utility tool (1) or a similar thin, plastic tool into the opening on the right end of the hinge assembly. 7. Separate the right end of the hinge bezel (2) from the right end of the hinge cover. 8. Insert a case utility tool (3) or a similar thin, plastic tool into the opening on the left end of the hinge assembly. 9. Separate the left end of the hinge bezel (4) from the left end of the hinge cover. 10. Remove the hinge bezel (5). Keyboard/base component replacement procedures 51
-
 1
1 -
2
-
3
-
4
-
5
-
6
-
7
-
8
-
9
-
10
-
11
-
12
-
13
-
14
-
15
-
16
-
17
-
18
-
19
-
20
-
21
-
22
-
23
-
24
-
25
-
26
-
27
-
28
-
29
-
30
-
31
-
32
-
33
-
34
-
35
-
36
-
37
-
38
-
39
-
40
-
41
-
42
-
43
-
44
-
45
-
46
-
47
-
48
-
49
-
50
-
51
-
52
-
53
-
 54
54 -
 55
55 -
 56
56 -
 57
57 -
 58
58 -
 59
59 -
 60
60 -
 61
61 -
 62
62 -
 63
63 -
 64
64 -
65
-
66
-
67
-
68
-
69
-
70
-
71
-
72
-
73
-
74
-
75
-
76
-
77
-
78
 |
 |
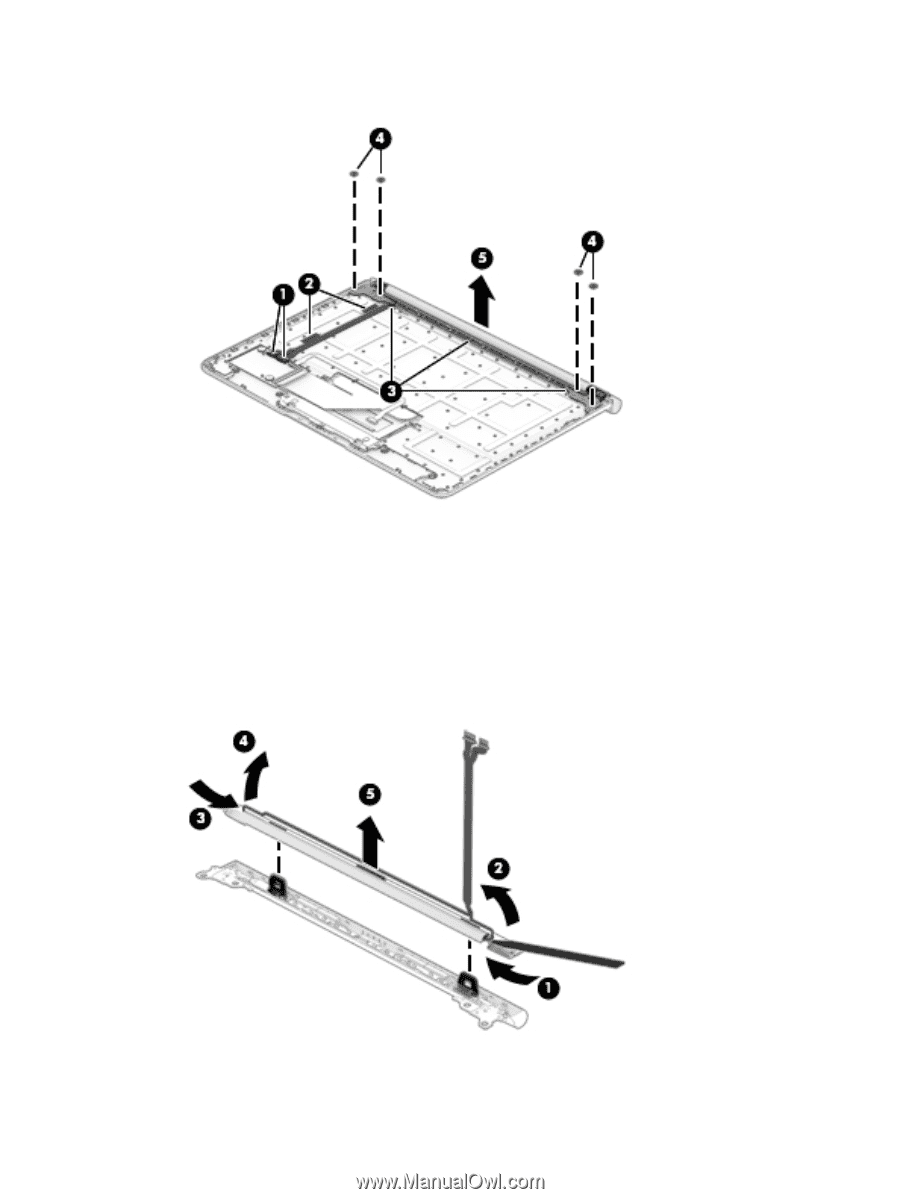
5.
Remove the hinge assembly
(5)
.
6.
Insert a case utility tool
(1)
or a similar thin, plastic tool into the opening on the right end of
the hinge assembly.
7.
Separate the right end of the hinge bezel
(2)
from the right end of the hinge cover.
8.
Insert a case utility tool
(3)
or a similar thin, plastic tool into the opening on the left end of
the hinge assembly.
9.
Separate the left end of the hinge bezel
(4)
from the left end of the hinge cover.
10.
Remove the hinge bezel
(5)
.
Keyboard/base component replacement procedures
51