HP Pavilion 14-ab000 ab000 through 14 - ab099 Maintenance and Service Guide - Page 45
Hard drive
 |
View all HP Pavilion 14-ab000 manuals
Add to My Manuals
Save this manual to your list of manuals |
Page 45 highlights
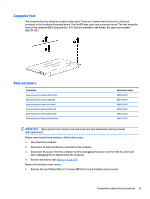
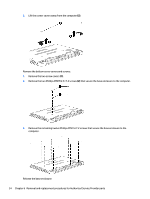
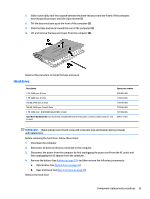
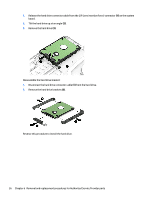
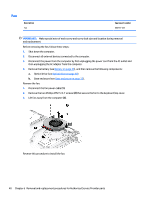
1. Slide a case utility tool into a space between the base enclosure and the frame of the computer, exerting gentle pressure until the clips release (1). 2. Tilt the base enclosure up at the front of the computer (2). 3. Slide the base enclosure toward the rear of the computer (3). 4. Lift and remove the base enclosure from the computer (4). Reverse this procedure to install the base enclosure. Hard drive Description 2 TB, 5400 rpm, 9.5mm 1 TB, 5400 rpm, 9.5mm 750 GB, 5400 rpm, 9.5mm 500 GB, 5400 rpm, 7mm/9.5mm 1 TB, 5400 rpm + 8 GB NAND Hybrid HDD, 9.5mm Hard Drive Hardware Kit (not illustrated, includes the hard drive bracket, connector cable, isolators, and screws) Spare part number 801808-005 778192-005 778190-005 778188-005 731999-005 806751-001 IMPORTANT: Make special note of each screw and screw lock size and location during removal and replacement. Before removing the hard drive, follow these steps: 1. Shut down the computer. 2. Disconnect all external devices connected to the computer. 3. Disconnect the power from the computer by first unplugging the power cord from the AC outlet and then unplugging the AC adapter from the computer. 4. Remove the battery (see Battery on page 29), and then remove the following components: a. Optical drive (see Optical drive on page 30). b. Base enclosure (see Base enclosure on page 33). Remove the hard drive: Component replacement procedures 35
-
 1
1 -
2
-
3
-
4
-
5
-
6
-
7
-
8
-
9
-
10
-
11
-
12
-
13
-
14
-
15
-
16
-
17
-
18
-
19
-
20
-
21
-
22
-
23
-
24
-
25
-
26
-
27
-
28
-
29
-
30
-
31
-
32
-
33
-
34
-
35
-
36
-
37
-
38
-
39
-
 40
40 -
 41
41 -
 42
42 -
 43
43 -
 44
44 -
 45
45 -
 46
46 -
 47
47 -
 48
48 -
 49
49 -
 50
50 -
51
-
52
-
53
-
54
-
55
-
56
-
57
-
58
-
59
-
60
-
61
-
62
-
63
-
64
-
65
-
66
-
67
-
68
-
69
-
70
-
71
-
72
-
73
-
74
-
75
-
76
-
77
-
78
-
79
-
80
-
81
-
82
-
83
-
84
-
85
-
86
-
87
-
88
-
89
-
90
-
91
-
92
-
93
-
94
-
95
-
96
-
97
-
98
-
99
 |
 |
