HP Photosmart 1115 HP PhotoSmart 1215/1115 - (English) Basics Guide - Page 24
photo, cropping, brightness
 |
View all HP Photosmart 1115 manuals
Add to My Manuals
Save this manual to your list of manuals |
Page 24 highlights
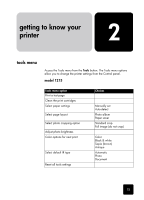
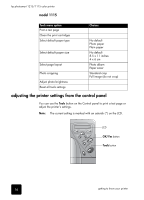
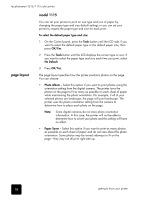
hp photosmart 1215/1115 color printer photo cropping The printer automatically crops a photo exactly to the size you select. For example, if you select a 4 x 6 inch (102 x 152 mm) photo size, the printer will crop the photo to that size by measuring from the center of the photo. This is called Standard Crop. If you want to print the entire photo, select Full Image. Selecting Full Image may result in a print that does not exactly match the standard dimensions in that it may be slightly wider or shorter. photo brightness Standard Crop Full Image To select the full image: 1 On the Control panel, press the Tools button until the LCD asks if you want to select a photo cropping option, then press OK/Yes. 2 Press the right side of the Tools button to select Full Image. 3 Press OK/Yes. An asterisk (*) will appear on the LCD beside the photo size to indicate that Full Image has been selected. If you want your photos to print lighter or darker than the originals, adjust the photo brightness. To adjust the photo brightness: 1 On the Control panel, press the Tools button until the LCD asks if you want to adjust the photo brightness, then press OK/Yes. 2 Press the right side of the Tools button to lighten your photos or the left side of the Tools button to darken your photos. 3 Press OK/Yes. 20 getting to know your printer
-
 1
1 -
2
-
3
-
4
-
5
-
6
-
7
-
8
-
9
-
10
-
11
-
12
-
13
-
14
-
15
-
16
-
17
-
18
-
 19
19 -
 20
20 -
 21
21 -
 22
22 -
 23
23 -
 24
24 -
 25
25 -
 26
26 -
 27
27 -
 28
28 -
 29
29 -
30
-
31
-
32
-
33
-
34
-
35
-
36
-
37
-
38
-
39
-
40
-
41
-
42
-
43
-
44
-
45
-
46
-
47
-
48
 |
 |
