HP Photosmart 215 HP Photosmart 215 digital camera - (English) User Guide - Page 11
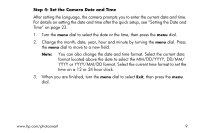
Step 4: Set the Camera Date and Time, format located above the date to select the MM/DD/YYYY, DD/MM
 |
View all HP Photosmart 215 manuals
Add to My Manuals
Save this manual to your list of manuals |
Page 11 highlights
Step 4: Set the Camera Date and Time After setting the Language, the camera prompts you to enter the current date and time. For details on setting the date and time after the quick setup, see "Setting the Date and Time" on page 23. 1. Turn the menu dial to select the date or the time, then press the menu dial. 2. Change the month, date, year, hour and minute by turning the menu dial. Press the menu dial to move to a new field. Note: You can also change the date and time format. Select the current date format located above the date to select the MM/DD/YYYY, DD/MM/ YYYY or YYYY/MM/DD format. Select the current time format to set the time on a 12 or 24 hour clock. 3. When you are finished, turn the menu dial to select Exit, then press the menu dial. www.hp.com/photosmart 9
-
 1
1 -
2
-
3
-
4
-
5
-
 6
6 -
 7
7 -
 8
8 -
 9
9 -
 10
10 -
 11
11 -
 12
12 -
 13
13 -
 14
14 -
 15
15 -
 16
16 -
17
-
18
-
19
-
20
-
21
-
22
-
23
-
24
-
25
-
26
-
27
-
28
-
29
-
30
-
31
-
32
-
33
-
34
-
35
-
36
-
37
-
38
-
39
-
40
-
41
-
42
-
43
-
44
-
45
-
46
-
47
-
48
-
49
-
50
-
51
-
52
-
53
-
54
-
55
-
56
-
57
-
58
-
59
-
60
-
61
-
62
-
63
-
64
-
65
-
66
-
67
-
68
-
69
-
70
-
71
-
72
-
73
-
74
-
75
-
76
-
77
-
78
-
79
-
80
-
81
 |
 |
