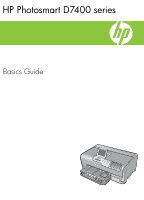
HP Photosmart D7400 Basics Guide
HP Photosmart D7400 Manual
 |
View all HP Photosmart D7400 manuals
Add to My Manuals
Save this manual to your list of manuals |
HP Photosmart D7400 manual content summary:
- HP Photosmart D7400 | Basics Guide - Page 1
HP Photosmart D7400 series Basics Guide - HP Photosmart D7400 | Basics Guide - Page 2
is prohibited without prior written permission of Hewlett-Packard, except as allowed under copyright laws. The only warranties for HP products and services are set forth in the express warranty statements accompanying such products and services. Nothing herein should be construed as constituting - HP Photosmart D7400 | Basics Guide - Page 3
settings 16 3 Use the HP Photosmart features Load paper...19 Avoid paper jams...21 View, select, and print photos 21 Check the estimated ink levels 23 Replace the ink cartridges...23 4 Troubleshooting and support Uninstall and reinstall the software 26 Hardware setup troubleshooting 26 Network - HP Photosmart D7400 | Basics Guide - Page 4
such as printing photos from a memory card or storage device. You can access many HP Photosmart functions directly from the control panel, without turning on your computer. NOTE: This guide introduces basic operations and troubleshooting, as well as provides information for contacting HP support and - HP Photosmart D7400 | Basics Guide - Page 5
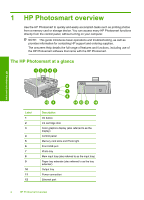
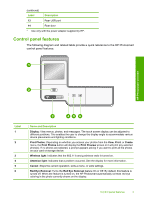
Use only with the power adapter supplied by HP. Control panel features The following diagram and related table provide a quick reference to the HP Photosmart control panel features. HP Photosmart overview Label 1 2 3 4 5 6 Name and Description Display: View menus, photos, and messages. The touch - HP Photosmart D7400 | Basics Guide - Page 6
• Setup Guide The Setup Guide provides instructions for setting up the HP Photosmart and installing software. Make sure you follow the steps in the Setup Guide in order. If you have problems during setup, see Troubleshooting in the last section of the Setup Guide, or see "Troubleshooting and support - HP Photosmart D7400 | Basics Guide - Page 7
a wireless "Integrated wireless WLAN 802.11 network router (infrastructure). setup" on page 8 Connect directly to a wireless-capable computer without a wireless router (ad hoc). "Wireless ad hoc network setup" on page 11 Install the HP Photosmart software for use in a "Install the software for - HP Photosmart D7400 | Basics Guide - Page 8
Network setup To set up the HP Photosmart on a wired network, you need to do the following: First, collect all of the required materials. Next, connect to a wired network. Finally, install the software. See this section: "What you need for a wired network" on page 6 "Connect the HP Photosmart to - HP Photosmart D7400 | Basics Guide - Page 9
. Network setup 3. Connect the other end of the Ethernet cable to an available port on your Ethernet router, switch, or wireless router. 4. Once you have connected the HP Photosmart to the network, install the software as described in "Install the software for a network connection" on page 14 - HP Photosmart D7400 | Basics Guide - Page 10
connect the HP Photosmart to the wireless router, and run the Wireless Setup Wizard. Finally, install the software. See this section: "What you need for an integrated wireless WLAN 802.11 network" on page 8 "Connect to an integrated wireless WLAN 802.11 network" on page 9 "Install the software for - HP Photosmart D7400 | Basics Guide - Page 11
the HP Photosmart to your network. You can also use SecureEasySetup, if your wireless router or access point supports this feature. See the documentation that came with your wireless router or access point to find out if it supports using EasySetup and for additional setup instructions. CAUTION - HP Photosmart D7400 | Basics Guide - Page 12
again. 7. When the HP Photosmart connects successfully to the network, install the software on each computer that will use the device over the network. To connect the HP Photosmart with SecureEasySetup 1. Activate SecureEasySetup on your wireless router or access point. 2. Touch Setup on the display - HP Photosmart D7400 | Basics Guide - Page 13
to install the software on each computer that will use the network. NOTE: If the connection fails, the wireless router or access point might have timed out after you activated SecureEasySetup. Repeat the above task, ensuring that you complete the steps on the control panel of the HP Photosmart - HP Photosmart D7400 | Basics Guide - Page 14
the HP Photosmart to a wireless network, you will need a Windows computer with a wireless HP recommends you create a new network profile on your computer as described here. 1. In the Control Panel, double-click Network Connections. 2. On the Network Connections window, right-click the Wireless - HP Photosmart D7400 | Basics Guide - Page 15
. • Communication mode: Ad Hoc • Encryption: enabled Connect to a wireless ad hoc network You can use the Wireless Setup Wizard to connect the HP Photosmart to a wireless ad hoc network. To connect to a wireless ad hoc network 1. Touch Setup on the display. 2. Touch Network. NOTE: If the menu option - HP Photosmart D7400 | Basics Guide - Page 16
the software. Otherwise, HP Photosmart installation software might try to use one of the reserved drive letters, and you will not be able to access that network drive on your computer. NOTE: Installation time can range from 20 to 45 minutes depending on your operating system, the amount of - HP Photosmart D7400 | Basics Guide - Page 17
the installation, the software will discover the HP Photosmart on the network for each of the computers. Once you have set up the HP Photosmart on the network you will not need to configure it again when you add additional computers. NOTE: You can connect the HP Photosmart to either a wireless or - HP Photosmart D7400 | Basics Guide - Page 18
the Control Panel and delete the printers from the previous USB installation. For more detailed instructions on connecting the HP Photosmart to a network, see: • "Wired network setup" on page 5 • "Integrated wireless WLAN 802.11 network setup" on page 8 • "Wireless ad hoc network setup" on page 11 - HP Photosmart D7400 | Basics Guide - Page 19
summary of the network settings on the HP Photosmart control panel, or you can print a more detailed configuration page. The network configuration page lists all of the important network settings such as the IP address, link speed, DNS, and mDNS. 1. Touch Setup on the display. 2. Touch Network. NOTE - HP Photosmart D7400 | Basics Guide - Page 20
through all the menu options. 3. Touch Wireless Network Test. The Wireless Network Test prints. Change advanced network settings from the control panel settings The advanced network settings are provided for your convenience. However, unless you are an advanced user, you should not change any of - HP Photosmart D7400 | Basics Guide - Page 21
In addition, it provides instructions about how to load paper, view, select, and print photos, and replace the ink cartridges. Load paper This section describes the procedure for loading different types and sizes of paper into the HP Photosmart for your printouts. TIP: To help prevent rips, wrinkles - HP Photosmart D7400 | Basics Guide - Page 22
ink cartridges or otherwise engaged in a task, the paper stop inside the device might not be in place. You could push the paper too far forward, causing the HP Photosmart to eject blank pages. TIP: If you are using letterhead, insert the top of the page first with the print side down. For more help - HP Photosmart D7400 | Basics Guide - Page 23
paper. Make sure the paper-width guide does not bend the paper in the input tray. • Do not force paper too far forward in the input tray. • Use paper types that are recommended for the HP Photosmart. View, select, and print photos You can view and select photos on your memory card or storage device - HP Photosmart D7400 | Basics Guide - Page 24
any of your print settings, touch Settings. 9. To print the photo(s), touch Print or press the Print Photos button on the control panel. A print status screen displays the number of pages to print and the estimated time to complete. 22 Use the HP Photosmart features Use the HP Photosmart features - HP Photosmart D7400 | Basics Guide - Page 25
levels from the control panel 1. Touch Setup on the display. 2. Touch Tools. 3. Touch Display Ink Gauge. The HP Photosmart displays a gauge that shows the estimated ink levels of all cartridges installed. Use the HP Photosmart features Replace the ink cartridges Follow these instructions when you - HP Photosmart D7400 | Basics Guide - Page 26
), or magenta, lift the appropriate latch in the center area. 1 Ink cartridge latch for the black ink cartridge 2 Ink cartridge latches for the color ink cartridges 4. Pull the ink cartridge toward you out of its slot to remove it. Use the HP Photosmart features 24 Use the HP Photosmart features - HP Photosmart D7400 | Basics Guide - Page 27
color and pattern of the ink cartridge to the color and pattern on the print carriage. 6. Close the latch and make sure it is secure. 7. Repeat steps 3 through 6 for each ink cartridge you are replacing. 8. Close the ink cartridge door. Use the HP Photosmart features Replace the ink cartridges 25 - HP Photosmart D7400 | Basics Guide - Page 28
have reinstalled the software. 6. Insert the HP Photosmart CD-ROM into your computer's CD-ROM drive and then start the Setup program. 7. Follow the onscreen instructions and the instructions provided in the Setup Guide that came with the HP Photosmart. Hardware setup troubleshooting Use this section - HP Photosmart D7400 | Basics Guide - Page 29
Make sure the power cord is firmly connected to both the HP Photosmart and the power adapter. Plug the power cord into a power outlet, surge protector, or power strip. Troubleshooting and support 1 Power connection 2 Power cord and adapter 3 Power outlet • If you are using a power strip, make sure - HP Photosmart D7400 | Basics Guide - Page 30
Chapter 4 Troubleshooting and support For more information on installing the software and connecting the USB cable, see the Setup Guide that came with the HP Photosmart. The HP Photosmart does not print Cause: The HP Photosmart and computer are not communicating with each other. Solution: Check - HP Photosmart D7400 | Basics Guide - Page 31
on the HP Photosmart. To find the IP address, print a network configuration page. The Printer not Found screen appears during installation Cause: The HP Photosmart is not turned on. Solution: Turn on the HP Photosmart. Cause: You do not have an active network connection. Network troubleshooting 29 - HP Photosmart D7400 | Basics Guide - Page 32
Troubleshooting and support Chapter 4 Solution: Make sure you have an active network connection. To make sure your network connection is active 1. If the connections are secure, turn off the power on the HP Photosmart, and then turn it on again. Press the On button on the control panel to turn the - HP Photosmart D7400 | Basics Guide - Page 33
your wireless router. Cause: The HP Photosmart is not receiving a signal. Solution: Move the wireless router and the HP Photosmart closer together. Then run the wireless setup again. For more information, see: "Integrated wireless WLAN 802.11 network setup" on page 8 Cause: If you manually entered - HP Photosmart D7400 | Basics Guide - Page 34
. Solution: Run the wireless setup process again and enter the correct passphrase. The passphrase is case-sensitive. The Printer Not Found screen appears during installation Cause: A firewall, anti-virus, or anti-spyware application is preventing the HP Photosmart from accessing your computer - HP Photosmart D7400 | Basics Guide - Page 35
snaps into place. 5. Turn on the HP Photosmart, and then touch OK to continue the current job. To clear a paper jam from the top door 1. Turn off the HP Photosmart. 2. Open the ink cartridge door. 3. Lift the top door that is located behind the ink cartridges and print head assembly. Clear paper - HP Photosmart D7400 | Basics Guide - Page 36
the HP Photosmart make sure you turn off the device by pressing the On button to power it down properly. Also, make sure you leave the ink cartridges installed. Doing these actions will prevent ink leaking from the print head assembly. • Clean the print head (via the Printer Toolbox Software - HP Photosmart D7400 | Basics Guide - Page 37
online support specialists • Software and driver updates for the HP Photosmart • Valuable HP Photosmart and troubleshooting information for common problems • Proactive device updates, support alerts, and HP newsgrams that are available when you register the HP Photosmart 3. Call HP support. Support - HP Photosmart D7400 | Basics Guide - Page 38
of supported media sizes, see the printer software. Physical specifications • Height: 17.2 cm (6.8 inches) • Width: 46 cm (18.1 inches) • Depth: 38.7 cm (15.2 inches) • Weight: 7.8 kg (17.1 pounds) with supplies installed Power specifications • Power consumption: 25 watts maximum (average printing - HP Photosmart D7400 | Basics Guide - Page 39
assigned a Regulatory Model Number. The Regulatory Model Number for your product is SDGOB-0711. This regulatory number should not be confused with the marketing name (HP Photosmart D7400 series, etc.) or product numbers (CC247A, etc.). Technical information Ink cartridge yield 37 - HP Photosmart D7400 | Basics Guide - Page 40
Chapter 5 Warranty Technical information 38 Technical information - HP Photosmart D7400 | Basics Guide - Page 41
-
 1
1 -
 2
2 -
 3
3 -
 4
4 -
 5
5 -
 6
6 -
 7
7 -
8
-
9
-
10
-
11
-
12
-
13
-
14
-
15
-
16
-
17
-
18
-
19
-
20
-
21
-
22
-
23
-
24
-
25
-
26
-
27
-
28
-
29
-
30
-
31
-
32
-
33
-
34
-
35
-
36
-
37
-
38
-
39
-
40
-
41
 |
 |

HP Photosmart D7400 series
Basics Guide