HP ScanJet 7800 Setup and Support Guide - Page 15
Assign profile numbers with the Button Settings Utility
 |
View all HP ScanJet 7800 manuals
Add to My Manuals
Save this manual to your list of manuals |
Page 15 highlights
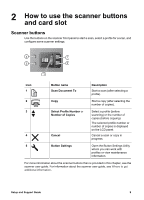
For more information, see the HP Smart Document Scan Software help. Double-click the HP Smart Document Scan Software icon on the computer desktop, and then click Help in the toolbar menu. Assign profile numbers with the Button Settings Utility Use the Button Settings Utility to assign each profile to a number. Profiles represented as numbers are easily selected from the LCD. Note Because the profile number in the LCD panel returns to 01 after being idle for 20 seconds, it is a good idea to assign commonly used profiles to lower numbers. 1. To open the Button Settings Utility, do one of the following: - Double-click the Button Settings Utility icon on the computer desktop. - Press the Button Settings ( ) button on the front panel of the scanner. - Click Start, point to Programs or All Programs, point to HP, point to Scanjet, point to 7800, and then click Button Settings Utility. 2. Select the button number in the Select button to configure area of the dialog box. 3. Click a profile name in the Choose profile for selected button list. 4. Click OK. Modify a profile with HP Smart Document Scan Software To modify a profile, follow these steps: 1. To open HP Smart Document Scan Software, do one of the following: - Double-click the HP Smart Document Scan Software icon on the computer desktop. - Click Start, point to Programs or All Programs, point to HP, point to Scanjet, point to 7800, and then click HP Smart Document Scan Software. 2. Select the profile that you want to modify from the Select a scan profile list. 3. Click Edit. For more information, see the HP Smart Document Software help. Double-click the HP Smart Document Scan Software icon on the computer desktop, and then click Help in the toolbar menu. Import and export profiles Profiles can be exported into and imported from an XML file so that administrators can set up profiles for a workgroup, users can transfer their profiles from one machine to another, and users can share custom profiles with each other. Setup and Support Guide 13
-
 1
1 -
2
-
3
-
4
-
5
-
6
-
7
-
8
-
9
-
 10
10 -
 11
11 -
 12
12 -
 13
13 -
 14
14 -
 15
15 -
 16
16 -
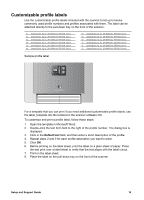 17
17 -
 18
18 -
 19
19 -
 20
20 -
21
-
22
-
23
-
24
-
25
-
26
-
27
-
28
-
29
-
30
-
31
-
32
-
33
-
34
 |
 |
