HP ScanJet Enterprise Flow 5000 User Guide - Page 45
Press the roller pin backward until it touches the pin clip 3, and then press firmly until
 |
View all HP ScanJet Enterprise Flow 5000 manuals
Add to My Manuals
Save this manual to your list of manuals |
Page 45 highlights
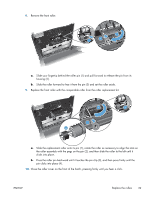
8. Remove the front roller. 2 3 1 a. Slide your fingertip behind the roller pin (1) and pull forward to release the pin from its housing (2). b. Slide the roller forward to free it from the pin (3) and set the roller aside. 9. Replace the front roller with the comparable roller from the roller replacement kit. 3 4 1 2 a. Slide the replacement roller onto its pin (1), rotate the roller as necessary to align the slots on the roller assembly with the pegs on the pin (2), and then slide the roller to the left until it clicks into place. b. Press the roller pin backward until it touches the pin clip (3), and then press firmly until the pin clicks into place (4). 10. Close the roller cover on the front of the hatch, pressing firmly until you hear a click. ENWW Replace the rollers 39
-
 1
1 -
2
-
3
-
4
-
5
-
6
-
7
-
8
-
9
-
10
-
11
-
12
-
13
-
14
-
15
-
16
-
17
-
18
-
19
-
20
-
21
-
22
-
23
-
24
-
25
-
26
-
27
-
28
-
29
-
30
-
31
-
32
-
33
-
34
-
35
-
36
-
37
-
38
-
39
-
 40
40 -
 41
41 -
 42
42 -
 43
43 -
 44
44 -
 45
45 -
 46
46 -
 47
47 -
 48
48 -
 49
49 -
 50
50 -
51
-
52
-
53
-
54
-
55
-
56
-
57
-
58
-
59
-
60
-
61
-
62
-
63
-
64
-
65
-
66
-
67
-
68
-
69
-
70
-
71
-
72
-
73
-
74
-
75
-
76
-
77
-
78
 |
 |
