HP ScanJet Enterprise Flow 5000 User Guide - Page 58
The scan is completely black or completely white, Scanned images are not straight, Straighten Content
 |
View all HP ScanJet Enterprise Flow 5000 manuals
Add to My Manuals
Save this manual to your list of manuals |
Page 58 highlights
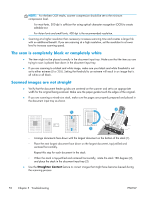
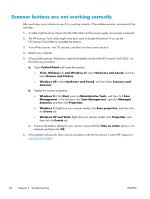
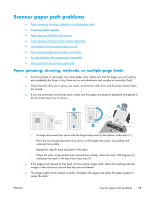
NOTE: For the best OCR results, scanner compression should be set to the minimum compression level. For most fonts, 300 dpi is sufficient for using optical character recognition (OCR) to create editable text. For Asian fonts and small fonts, 400 dpi is the recommended resolution. ● Scanning at a higher resolution than necessary increases scanning time and creates a larger file with no additional benefit. If you are scanning at a high resolution, set the resolution to a lower level to increase scanning speed. The scan is completely black or completely white ● The item might not be placed correctly in the document input tray. Make sure that the item you are trying to scan is placed face down in the document input tray. ● If you are scanning to a black and white image, make sure your black and white threshold is not set to either extreme (0 or 255). Setting the threshold to an extreme will result in an image that is all white or all black. Scanned images are not straight ● Verify that the document feeder guides are centered on the scanner and set to an appropriate width for the original being scanned. Make sure the paper guides touch the edges of the original. ● If you are scanning a mixed-size stack, make sure the pages are properly prepared and placed in the document input tray as shown 3 1 2 ◦ Arrange documents face down with the largest document on the bottom of the stack (1). ◦ Place the next largest document face down on the largest document, top-justified and centered horizontally. Repeat this step for each document in the stack. ◦ When the stack is top-justified and centered horizontally, rotate the stack 180 degrees (2), and place the stack in the document input tray (3). ● Use the Straighten Content feature to correct images that might have become skewed during the scanning process. 52 Chapter 5 Troubleshooting ENWW
-
 1
1 -
2
-
3
-
4
-
5
-
6
-
7
-
8
-
9
-
10
-
11
-
12
-
13
-
14
-
15
-
16
-
17
-
18
-
19
-
20
-
21
-
22
-
23
-
24
-
25
-
26
-
27
-
28
-
29
-
30
-
31
-
32
-
33
-
34
-
35
-
36
-
37
-
38
-
39
-
40
-
41
-
42
-
43
-
44
-
45
-
46
-
47
-
48
-
49
-
50
-
51
-
52
-
 53
53 -
 54
54 -
 55
55 -
 56
56 -
 57
57 -
 58
58 -
 59
59 -
 60
60 -
 61
61 -
 62
62 -
 63
63 -
64
-
65
-
66
-
67
-
68
-
69
-
70
-
71
-
72
-
73
-
74
-
75
-
76
-
77
-
78
 |
 |
