HP Split 13-m001xx HP Split 13 x2 PC Maintenance and Service Guide - Page 17
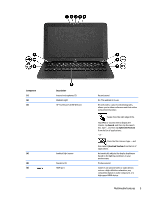
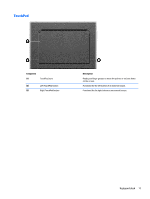
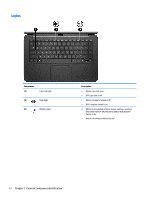
External component identification, Components, Description
 |
View all HP Split 13-m001xx manuals
Add to My Manuals
Save this manual to your list of manuals |
Page 17 highlights
Components (5) Docking port (6) Audio-out (headphone) jack/Audio-in (microphone) jack (7) Micro SD memory card reader (8) Vent (9) Volume button (10) Vent Description ● Blinking white: The battery has reached a low battery level. ● Amber: The AC adapter is connected and the battery is charging. ● Off: The computer is using DC power. Connects the tablet to the keyboard dock. Connects optional powered stereo speakers, headphones, earbuds, a headset, or a television audio cable. WARNING! To reduce the risk of personal injury, adjust the volume before using headphones, earbuds, or a headset. For additional safety information, see the Regulatory, Safety and Environmental Notices. NOTE: When a device is connected to the jack, the computer speakers are disabled. NOTE: Be sure that the device cable has a 4-conductor connector that supports both audio-out (headphone) and audio-in (microphone). NOTE: Stand-alone microphones and headphones with separate microphone jacks are not supported. Supports micro Secure Digital (SD) memory cards. Enables airflow to cool internal components. NOTE: The computer fan starts up automatically to cool internal components and prevent overheating. It is normal for the internal fan to cycle on and off during routine operation. Controls speaker volume on the tablet. ● To increase speaker volume, press the + edge of the button. ● To decrease speaker volume, press the - edge of the button. Enables airflow to cool internal components. NOTE: The computer fan starts up automatically to cool internal components and prevent overheating. It is normal for the internal fan to cycle on and off during routine operation. 8 Chapter 2 External component identification
-
 1
1 -
2
-
3
-
4
-
5
-
6
-
7
-
8
-
9
-
10
-
11
-
 12
12 -
 13
13 -
 14
14 -
 15
15 -
 16
16 -
 17
17 -
 18
18 -
 19
19 -
 20
20 -
 21
21 -
 22
22 -
23
-
24
-
25
-
26
-
27
-
28
-
29
-
30
-
31
-
32
-
33
-
34
-
35
-
36
-
37
-
38
-
39
-
40
-
41
-
42
-
43
-
44
-
45
-
46
-
47
-
48
-
49
-
50
-
51
-
52
-
53
-
54
-
55
-
56
-
57
-
58
-
59
-
60
-
61
-
62
-
63
-
64
-
65
-
66
-
67
-
68
-
69
-
70
-
71
-
72
-
73
-
74
-
75
-
76
-
77
-
78
-
79
-
80
-
81
-
82
-
83
-
84
-
85
-
86
-
87
-
88
-
89
-
90
-
91
-
92
-
93
-
94
-
95
-
96
-
97
-
98
-
99
-
100
-
101
 |
 |
