HP Vectra VE 5/xx hp business pcs, remote software deployment, setup guide for - Page 23
Add/Remove Boot Server Types
 |
View all HP Vectra VE 5/xx manuals
Add to My Manuals
Save this manual to your list of manuals |
Page 23 highlights
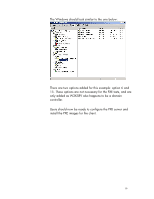
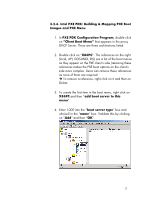
5. Go in to "Configure DHCP proxy" and then the "Client Options" tab (how to do this?). Click on "Add to boot server discovery list". 6. Enter 1000 in the "Bootserver type" box and the IP address of the PXE server in the "IP Address" box (in this document, this is 192.168.1.1). 7. Click on "add to discovery list" and validate this by clicking on "OK". 8. Right click on the Boot Server (the green icon) and then on "Add/Remove Boot Server Types". 9. In the "Boot Server Type" box, enter 1000. In the "Boot Server Name" box, type BOOT. Validate this by clicking on "Install new Boot Server" and then "OK". A yellow "boot" icon/folder appears under the Boot Server (green icon). 10. Next, right click on it and then on the "add client support". In the Architecture menu select X86PC and in the Client NIC types menu select UNDI. These are the default settings. 11. In the "Boot file base Name" box, enter MyBoot Clear Vendor option in the DLL box. Select Min layer=0, max layer=1 and carefully check the path given below (this path is where the PXE images will be stored). After validating this by clicking on OK, a warning message about the number of MTFTP files and restarting the PXE service may appear. It can be disregarded (a fix for this minor issue is provided below). 12. The system now expects two files called Myboot.0 and Myboot.1 in [...]\x86pc\undi\boot 23
-
 1
1 -
2
-
3
-
4
-
5
-
6
-
7
-
8
-
9
-
10
-
11
-
12
-
13
-
14
-
15
-
16
-
17
-
 18
18 -
 19
19 -
 20
20 -
 21
21 -
 22
22 -
 23
23 -
 24
24 -
 25
25 -
 26
26 -
 27
27 -
 28
28 -
29
-
30
-
31
-
32
-
33
 |
 |
