HP Visualize c3000 hp Visualize b1000 and c3000 workstations owner's guide (a5 - Page 127
Removing the Floppy Disk Drive Bay's Rear Cover
 |
View all HP Visualize c3000 manuals
Add to My Manuals
Save this manual to your list of manuals |
Page 127 highlights
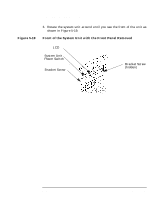
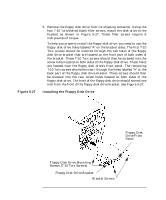
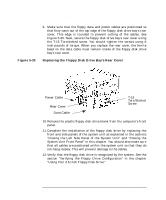
Changing Your Computer Hardware Configuration Removable Media Devices Figure 5-24 2. Remove the floppy disk drive bay's rear cover by unscrewing the T-15 Torx screw as shown in Figure 5-24. Note that the floppy disk drive bay's rear cover is located on the rear of the removable media chassis inside the system unit. Push the cover handle away from the rear of the removable media chassis approximately one inch. Next pull the cover handle toward you. The floppy data cable and power cable are now accessible to you. Removing the Floppy Disk Drive Bay's Rear Cover Rear Cover Handle Power Cable Rear Cover Data Cable T-15 Torx/Slotted Screw Chapter 5 127
-
 1
1 -
2
-
3
-
4
-
5
-
6
-
7
-
8
-
9
-
10
-
11
-
12
-
13
-
14
-
15
-
16
-
17
-
18
-
19
-
20
-
21
-
22
-
23
-
24
-
25
-
26
-
27
-
28
-
29
-
30
-
31
-
32
-
33
-
34
-
35
-
36
-
37
-
38
-
39
-
40
-
41
-
42
-
43
-
44
-
45
-
46
-
47
-
48
-
49
-
50
-
51
-
52
-
53
-
54
-
55
-
56
-
57
-
58
-
59
-
60
-
61
-
62
-
63
-
64
-
65
-
66
-
67
-
68
-
69
-
70
-
71
-
72
-
73
-
74
-
75
-
76
-
77
-
78
-
79
-
80
-
81
-
82
-
83
-
84
-
85
-
86
-
87
-
88
-
89
-
90
-
91
-
92
-
93
-
94
-
95
-
96
-
97
-
98
-
99
-
100
-
101
-
102
-
103
-
104
-
105
-
106
-
107
-
108
-
109
-
110
-
111
-
112
-
113
-
114
-
115
-
116
-
117
-
118
-
119
-
120
-
121
-
 122
122 -
 123
123 -
 124
124 -
 125
125 -
 126
126 -
 127
127 -
 128
128 -
 129
129 -
 130
130 -
 131
131 -
 132
132 -
133
-
134
-
135
-
136
-
137
-
138
-
139
-
140
-
141
-
142
-
143
-
144
-
145
-
146
-
147
-
148
-
149
-
150
-
151
-
152
-
153
-
154
-
155
-
156
-
157
-
158
-
159
-
160
-
161
-
162
-
163
-
164
-
165
-
166
-
167
-
168
-
169
-
170
-
171
-
172
-
173
-
174
-
175
-
176
-
177
-
178
-
179
-
180
-
181
-
182
-
183
-
184
-
185
-
186
-
187
-
188
-
189
-
190
-
191
-
192
-
193
-
194
-
195
-
196
-
197
-
198
-
199
-
200
-
201
-
202
-
203
-
204
-
205
-
206
-
207
-
208
-
209
-
210
-
211
-
212
-
213
-
214
-
215
-
216
-
217
-
218
-
219
-
220
-
221
-
222
-
223
-
224
-
225
-
226
-
227
-
228
-
229
-
230
-
231
-
232
-
233
-
234
-
235
-
236
-
237
-
238
-
239
-
240
-
241
-
242
-
243
-
244
-
245
-
246
 |
 |

Chapter 5
127
Changing Your Computer Hardware Configuration
Removable Media Devices
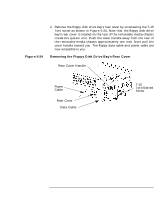
2.
Remove the floppy disk drive bay’s rear cover by unscrewing the T-15
Torx screw as shown in Figure 5-24. Note that the floppy disk drive
bay’s rear cover is located on the rear of the removable media chassis
inside the system unit. Push the cover handle away from the rear of
the removable media chassis approximately one inch. Next pull the
cover handle toward you. The floppy data cable and power cable are
now accessible to you.
Figure 5-24
Removing the Floppy Disk Drive Bay’s Rear Cover
T-15
Torx/Slotted
Screw
Power
Cable
Data Cable
Rear Cover
Rear Cover Handle