HP Visualize c3000 hp Visualize b1000 and c3000 workstations owner's guide (a5 - Page 130
Installing the Floppy Disk Drive
 |
View all HP Visualize c3000 manuals
Add to My Manuals
Save this manual to your list of manuals |
Page 130 highlights
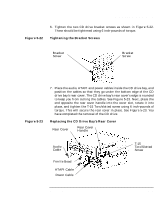
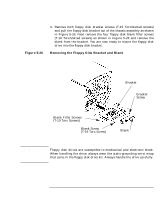
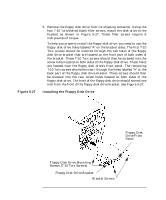
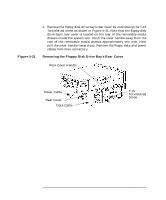
Changing Your Computer Hardware Configuration Removable Media Devices Figure 5-27 5. Remove the floppy disk drive from its shipping container. Using the four T-10 Torx/slotted blank filler screws, mount the disk drive to the bracket as shown in Figure 5-27. These filler screws require 6 inch-pounds of torque. To help you properly install the floppy disk drive, you need to use the floppy disk drive holes labeled "A" on the bracket sides. The first T-10 Torx screws should be inserted through the tab holes of the floppy disk drive bracket that are located on the front part of both sides of the bracket. These T-10 Torx screws should then be screwed into the screw holes located on both sides of the floppy disk drive. These holes are located near the floppy disk drive's front panel. The remaining T-10 Torx screws should be insert through the holes labeled "A" at the back part of the floppy disk drive bracket. These screws should then be screwed into the rear screw holes located on both sides of the floppy disk drive. The front of the floppy disk drive should extend one inch from the front of the floppy disk drive bracket. See Figure 5-27. Installing the Floppy Disk Drive Floppy Disk Drive Front Panel Floppy Disk Drive Mounting Screws (T-10 Torx Screws) Floppy Disk Drive Bracket Bracket Screws 130 Chapter 5
-
 1
1 -
2
-
3
-
4
-
5
-
6
-
7
-
8
-
9
-
10
-
11
-
12
-
13
-
14
-
15
-
16
-
17
-
18
-
19
-
20
-
21
-
22
-
23
-
24
-
25
-
26
-
27
-
28
-
29
-
30
-
31
-
32
-
33
-
34
-
35
-
36
-
37
-
38
-
39
-
40
-
41
-
42
-
43
-
44
-
45
-
46
-
47
-
48
-
49
-
50
-
51
-
52
-
53
-
54
-
55
-
56
-
57
-
58
-
59
-
60
-
61
-
62
-
63
-
64
-
65
-
66
-
67
-
68
-
69
-
70
-
71
-
72
-
73
-
74
-
75
-
76
-
77
-
78
-
79
-
80
-
81
-
82
-
83
-
84
-
85
-
86
-
87
-
88
-
89
-
90
-
91
-
92
-
93
-
94
-
95
-
96
-
97
-
98
-
99
-
100
-
101
-
102
-
103
-
104
-
105
-
106
-
107
-
108
-
109
-
110
-
111
-
112
-
113
-
114
-
115
-
116
-
117
-
118
-
119
-
120
-
121
-
122
-
123
-
124
-
 125
125 -
 126
126 -
 127
127 -
 128
128 -
 129
129 -
 130
130 -
 131
131 -
 132
132 -
 133
133 -
 134
134 -
 135
135 -
136
-
137
-
138
-
139
-
140
-
141
-
142
-
143
-
144
-
145
-
146
-
147
-
148
-
149
-
150
-
151
-
152
-
153
-
154
-
155
-
156
-
157
-
158
-
159
-
160
-
161
-
162
-
163
-
164
-
165
-
166
-
167
-
168
-
169
-
170
-
171
-
172
-
173
-
174
-
175
-
176
-
177
-
178
-
179
-
180
-
181
-
182
-
183
-
184
-
185
-
186
-
187
-
188
-
189
-
190
-
191
-
192
-
193
-
194
-
195
-
196
-
197
-
198
-
199
-
200
-
201
-
202
-
203
-
204
-
205
-
206
-
207
-
208
-
209
-
210
-
211
-
212
-
213
-
214
-
215
-
216
-
217
-
218
-
219
-
220
-
221
-
222
-
223
-
224
-
225
-
226
-
227
-
228
-
229
-
230
-
231
-
232
-
233
-
234
-
235
-
236
-
237
-
238
-
239
-
240
-
241
-
242
-
243
-
244
-
245
-
246
 |
 |
