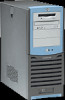
HP Workstation x1000 hp workstation x1000 - technical reference guide
HP Workstation x1000 Manual
 |
View all HP Workstation x1000 manuals
Add to My Manuals
Save this manual to your list of manuals |
HP Workstation x1000 manual content summary:
- HP Workstation x1000 | hp workstation x1000 - technical reference guide - Page 1
technical reference hp workstation x1000 Manufacturing Part Number: n.a. Edition E1001 © Copyright 2001 Hewlett-Packard Company. - HP Workstation x1000 | hp workstation x1000 - technical reference guide - Page 2
Corporation. WOL™ (Wake on LAN) is a trademark of IBM. HEWLETT-PACKARD COMPANY 3000 Hanover Street Palo Alto, California 94304 U.S.A. Printing History The manual printing date and part number indicate its current edition. The printing date will change when a new edition is printed. Minor changes may - HP Workstation x1000 | hp workstation x1000 - technical reference guide - Page 3
product changes. To ensure that you receive the updated or new editions, you should subscribe to the appropriate product support service. See your HP Sales Representative for details. First Edition: October 2001 Printing Division: Hewlett-Packard Co. Technical Computer Division 3404 E. Harmony Rd - HP Workstation x1000 | hp workstation x1000 - technical reference guide - Page 4
4 - HP Workstation x1000 | hp workstation x1000 - technical reference guide - Page 5
from space-bar 32 soft power down 32 documentation 33 access hp world wide web site 33 where to find the information 33 2. system board system board description 38 architectural view for the x1000 workstation 40 accessory board slots 41 accelerated graphics port slot 41 peripheral component - HP Workstation x1000 | hp workstation x1000 - technical reference guide - Page 6
device interrupts 73 i/o controller hub interrupts 73 interrupt controllers 73 PCI IRQ lines 75 3. hp BIOS overview 78 using the hp setup program 79 main screen 79 advanced screen 80 processors, memory, and cache 80 floppy options 81 IDE device configuration 81 IDE primary master device - HP Workstation x1000 | hp workstation x1000 - technical reference guide - Page 7
BIOS default settings 88 if you forgot the administrator password 89 clearing the CMOS 90 recovering the BIOS (crisis mode 91 BIOS addresses 92 system memory map 92 hp i/o port map (i/o addresses used by the system 93 DMA channel controllers 94 4. pre-boot diagnostics and BIOS errors - HP Workstation x1000 | hp workstation x1000 - technical reference guide - Page 8
support provider 102 troubleshooting the error yourself 103 e-Diagtools online troubleshooting 104 running e-Diagtools 105 running e-Diagtools from the utility partition on your hard disk . . 105 running e-Diagtools from a CD-ROM 106 hp 127 IDE drive connectors 127 battery pinouts 128 8 - HP Workstation x1000 | hp workstation x1000 - technical reference guide - Page 9
and replacing the cover and front bezel 142 removing the workstation's cover 142 removing the front bezel 143 replacing the cover and front bezel 144 removing, replacing and upgrading memory 146 removing and replacing a memory module 147 removing or replacing an accessory card 148 removing - HP Workstation x1000 | hp workstation x1000 - technical reference guide - Page 10
176 replacing a system speaker 177 removing and replacing a system fan 178 removing the system fan 178 replacing a system fan 180 removing and replacing the system battery 181 removing the system battery 181 replacing the system - HP Workstation x1000 | hp workstation x1000 - technical reference guide - Page 11
only 195 overview 195 general instructions 195 recovery process 196 recovering preloaded drivers 199 changing the hard disk 200 other sources of information 201 online support for troubleshooting 201 documentation set overview 201 hewlett-packard support and information services 202 11 - HP Workstation x1000 | hp workstation x1000 - technical reference guide - Page 12
Contents collecting information before contacting hp support 202 A. x1000 service information hp x1000 accessories 206 x1000 supported accessories 206 exploded view and part numbers 208 12 - HP Workstation x1000 | hp workstation x1000 - technical reference guide - Page 13
electrical shock, do not open the power supply. There are no user-serviceable parts inside. To avoid electrical shock and harm to your eyes by light, do not open the laser module. The laser module should be serviced by service personnel only. Do not attempt to make any adjustment to the laser unit - HP Workstation x1000 | hp workstation x1000 - technical reference guide - Page 14
the shop from which you bought them, to the dealer from whom you purchased your PC, or to HP so that they can either be recycled or disposed of in the correct way. Returned batteries will be accepted free of charge. if you have a modem: Do not attempt to connect this product - HP Workstation x1000 | hp workstation x1000 - technical reference guide - Page 15
upgrade your computer by installing accessories Find out about the different support options available Find out how to troubleshoot your PC Workstation Your computer Getting Started Guide Your computer This Technical Reference Manual www.hp.com/workst ations/support This Technical Reference Manual - HP Workstation x1000 | hp workstation x1000 - technical reference guide - Page 16
CD-ROM drive, excluding keyboard and display) Dimensions Footprint Acoustic noise emission (ISO 7779) Operating (idle): Power Supply Input voltage (input current, max.) Input frequency: Maximum output power: Storage Humidity Operating Temperature HP Workstation x1000 14.3 kg (31.5 pounds) Width: 20 - HP Workstation x1000 | hp workstation x1000 - technical reference guide - Page 17
1 system overview This chapter provides detailed system specifications for the HP workstation x1000: • Introduces the system's internal and external features • Lists the system's specifications and characteristic data • Provides a summary of the available documentation Chapter 1 17 - HP Workstation x1000 | hp workstation x1000 - technical reference guide - Page 18
and 256MB SDRAM memory modules. The order in which you install the memory modules is not important. You can install a minimum of 128MB of memory and a maximum of 768MB. The HP PC Accessories Web site, at: www.hp.com/workstation/support/software/diagnostics.html lists up-to-date memory upgrades. 18 - HP Workstation x1000 | hp workstation x1000 - technical reference guide - Page 19
system overview workstation description Feature Mass Storage Description Six shelves, supporting: • One front-access, third-height 3 1/2-inch drive (for the 16MB DDR graphics memory (maximum configuration) Accessory Card Slots LAN (internal) One AGP Universal 4X 32-bit slot supporting 1.5V AGP - HP Workstation x1000 | hp workstation x1000 - technical reference guide - Page 20
workstation description Feature System Board Connectors Rear Connectors (color coded) Front Connectors Description • One flexible disk drive connector • Two ATA-100 capable IDE connectors (they each support up to two IDE devices) • One CD-IN audio connector • Internal speaker connector • Battery - HP Workstation x1000 | hp workstation x1000 - technical reference guide - Page 21
of the HP workstation x1000. Figure 1-1 Workstation Power Supply Unit Front access shelves: Chassis Beam Intrusion Switch CPU and Turbo Fan One 3.5-inch shelf including a 1.44 MB floppy disk drive Three 5.25-inch drive shelves (can be used for optical drives) Main Fan Three Memory Card Slots - HP Workstation x1000 | hp workstation x1000 - technical reference guide - Page 22
system overview packaging Figure 1-2 Location of Rear Panel Connectors Power Connector Keyboard connector Serial port A Serial port B Line Out (headphone) connector Line In connector Microphone connector Dual USB connectors Cover lock Mouse connector Parallel port LAN connector Monitor - HP Workstation x1000 | hp workstation x1000 - technical reference guide - Page 23
problems Troubleshooting and Recovery Contacting support Refer to the chapter... system board hp BIOS tests and error messages hardware components removing and replacing hardware parts troubleshooting your workstation troubleshooting your workstation troubleshooting your workstation Chapter - HP Workstation x1000 | hp workstation x1000 - technical reference guide - Page 24
system overview front panel Figure 1-3 front panel The workstation's front panel has the following features: • The On/Off LED is green when the power is on, or the power button is pushed in. If - HP Workstation x1000 | hp workstation x1000 - technical reference guide - Page 25
specifications and characteristics physical characteristics System Processing Unit Weight: (Standard configuration as shipped, excluding keyboard and display) Dimensions Footprint 14.3 kilograms (31.5 pounds) 44.2cm max. (D) × 20.6cm (W) × 47.5cm (H) (17.4 inches × 8.1 inches × 18.7 inches) 0.09 - HP Workstation x1000 | hp workstation x1000 - technical reference guide - Page 26
power is immediately cut. To reset the power supply unit: 1. Disconnect the power cord. 2. Determine what caused the overload, and fix the problem. 3. Reconnect the power cord, and reboot the workstation. If an overload occurs twice, then there is an undetected short circuit somewhere. 26 Chapter 1 - HP Workstation x1000 | hp workstation x1000 - technical reference guide - Page 27
lifetime. To reach zero power consumption in "off" mode, either unplug the workstation or use a power block with a switch. power consumption and cooling The valid for a standard configuration as shipped (one processor, 256MB of memory, 250W power supply, one hard disk drive, graphics card, LAN card). - HP Workstation x1000 | hp workstation x1000 - technical reference guide - Page 28
ranges may vary depending on the installed mass storage devices. High humidity levels can cause improper disk operation. Low humidity levels can aggravate static electricity problems and cause excessive wear of the disk surface. 28 Chapter 1 - HP Workstation x1000 | hp workstation x1000 - technical reference guide - Page 29
, Hibernate, Off). Full On A P Suspend M Off Standby (S1 A or S3) C P I Hibernate (S4) Off (S5) Windows 2000 Windows NT 4.0 Not Supported by Windows 2000 Supported Not Supported by Windows NT 4.0 Supported Supported (implemented as S3, Suspend to RAM) Supported APM only Operating System - HP Workstation x1000 | hp workstation x1000 - technical reference guide - Page 30
Hard disk drive Power consumption Resume events Resume delay Normal speed On Normal speed 250W Halted - Halted - Keyboard, network (RWU), modem, USB A few seconds 1. Not supported by Windows NT 4.0. Off Halted - Halted - Space bar or power button, RPO Boot delay 30 Chapter 1 - HP Workstation x1000 | hp workstation x1000 - technical reference guide - Page 31
Delay Suspend (S1) Halted Blanked Halted VCC VCCAux - Power button, LAN, Modem, USB, Scheduler, HP Start Key Instantaneous Suspend to RAM (S3) Off Off Off Memory VCCAux - Power button, LAN, Modem, Scheduler, HP Start Key Instantaneous Suspend to Disk (S4) Off Off (S5) Off Off Off Off Off - HP Workstation x1000 | hp workstation x1000 - technical reference guide - Page 32
system overview power saving and ergonometry power-on from space-bar The ability to power-on from the space-bar is enabled if: • the computer is connected to a Power-On keyboard (recognizable by a Power-On icon on the space bar). • the function hasn't been disabled by setting switch 6 to off on the - HP Workstation x1000 | hp workstation x1000 - technical reference guide - Page 33
Started Guide Technical Reference Available at HP Web site Hard-copy? PDF file A7777-90003 PDF file (web based) No access hp world wide web site Additional online support documentation, BIOS upgrades, and drivers are available from HP's Web site at http://www.hp.com/workstations/support After - HP Workstation x1000 | hp workstation x1000 - technical reference guide - Page 34
and drivers. Upgrading the Workstation Opening the PC Supported accessories Installing accessories Configuring devices System board Repairing the Workstation Troubleshooting Basic. Diagnostic utility e-DiagTools, CD-ROM recovery. Full description. Full description Processor(s), memory - HP Workstation x1000 | hp workstation x1000 - technical reference guide - Page 35
Technical Reference1 Guide Peripheral Devices Audio Accessories LAN Accessories Refer to online version of Audio User's Guide for information about setting up and configuring audio accessories. Refer to online version (preloaded on hard disk) of LAN Administrator's Guide - HP Workstation x1000 | hp workstation x1000 - technical reference guide - Page 36
system overview documentation 36 Chapter 1 - HP Workstation x1000 | hp workstation x1000 - technical reference guide - Page 37
2 system board This chapter describes the components of the system board including: • Memory Controller Hub (MCH) • Input/Output Controller Hub (ICH2) • FirmWare Hub (FWH) • System Bus Chapter 2 37 - HP Workstation x1000 | hp workstation x1000 - technical reference guide - Page 38
system board system board description Figure 2-1 system board description Figure 2-1 shows the HP workstation x1000 system board dimensions. System Board Dimensions 9.5 inches or 24.1 cm 9.5 inches or 24.1 cm 38 Chapter 2 - HP Workstation x1000 | hp workstation x1000 - technical reference guide - Page 39
description Figure 2-2 shows where the different chips and connectors reside on the HP workstation x1000 system board. System Board Chips and Connectors MCH ATX 12V Pentium 4 Processor 3 Secondary IDE Flexible Disk System Board Switches System Battery ICH2 e-buzzer Flash BIOS Chapter 2 39 - HP Workstation x1000 | hp workstation x1000 - technical reference guide - Page 40
system board system board description architectural view for the x1000 workstation 40 Chapter 2 - HP Workstation x1000 | hp workstation x1000 - technical reference guide - Page 41
Board Slots One 1.5V AGP slot Three 32-bit 33 MHz PCI slots PCI Slot 1 PCI Slot 2 PCI Slot 3 Figure 2-4 accelerated graphics port slot This workstation has one Accelerated Graphics Port (AGP) graphics slot. AGP Slot AGP Card Slot Chapter 2 41 - HP Workstation x1000 | hp workstation x1000 - technical reference guide - Page 42
through 3.3V, 5V, or 12V power rails. AGP graphics cards that draw more than 25W and AGP 3.3V graphics cards cannot be used in the Workstation's AGP slot. The AGP Pro 1.5V slot is backward compatible with both AGP 1x and 2.x modes (using 1.5V signalling) and AGP 4x mode (where 1.5V - HP Workstation x1000 | hp workstation x1000 - technical reference guide - Page 43
, and Universal PCI cards (which are 3.3V or 5V compatible). Refer to the table on page 44 for the different PCI board installations. The maximum supported power consumption per slot is 25W, either from the 5V or the 3.3V supply. The power consumption must comply with the electrical specifications of - HP Workstation x1000 | hp workstation x1000 - technical reference guide - Page 44
install a 66Mhz card in a 33MHz slot. However, this card will only operate in 33MHz mode. The system board and BIOS support the PCI 2.2 specification. This specification supports PCI-to-PCI bridges and multifunction PCI devices, and each of the three PCI slots have master capabilities. The PCI slots - HP Workstation x1000 | hp workstation x1000 - technical reference guide - Page 45
system board system board switches Figure 2-6 system board switches There are 10 system board switches used for configuration. You should not modify the settings of reserved switches 1 - 4; modification of these switches can lead to system failure. System Board Switches Switch 1-4 5 6 7 Default - HP Workstation x1000 | hp workstation x1000 - technical reference guide - Page 46
is a bridge between the: - System bus - SDRAM bus (main memory) - AGP 4x (graphic) bus - Hub link 8-bit For detailed 32-bit, 33MHz PCI bus and the SMBus. Additionally, the ICH2 supports the: - Integrated IDE controller (Ultra ATA/100 capable) - Upstream the Workstation. For detailed information about the FWH, - HP Workstation x1000 | hp workstation x1000 - technical reference guide - Page 47
controller hub (82845) Figure 2-7 memory controller hub (82845) MCH Chip Location MCH Chip The MCH host bridge/controller is contained in a 593-pin FC-BGA package and is the bridge between the system bus, Single Channel SDRAM bus (main memory), AGP 4x (graphic), and Hub Link 8-bit. Chapter - HP Workstation x1000 | hp workstation x1000 - technical reference guide - Page 48
Bus runs at 4 x 100MHz, 3.2GB/s transfer rate) i845 Memory Controller Hub (MCH) 82845 Single Channel AGP Interface Memory Controller SDRAM Bus 1.0GB/s at 133MHz data transfer rate Three onboard DIMM sockets supporting SDRAM memory HUB LINK 8 (266MB/s data transfer rate) I/O Controller Hub2 - HP Workstation x1000 | hp workstation x1000 - technical reference guide - Page 49
identifies that data is coherent in cache memory) - Hierarchical PCI configuration mechanism - Delayed transaction support for AGP-to-DRAM reads that cannot be serviced immediately - ECC DIMM support - 133MHz SDRAM interface - 64-bit data interface - Supports only 3.3V DIMM DRAM configuration - No - HP Workstation x1000 | hp workstation x1000 - technical reference guide - Page 50
- APM 1.2 compliant power management • 593 FC-BGA MCH package Feature - • Arbitration: - Distributed arbitration model for concurrency support - Concurrent operations of system, hub interface, AGP, and memory buses supported through a dedicated arbitration and data-buffering logic • I/O device - HP Workstation x1000 | hp workstation x1000 - technical reference guide - Page 51
32-bit host addressing. This lets the processor address the entire 4GB space of the MCH's memory address space. The MCH also provides an eight-deep In-Order Queue that supports as many as eight outstanding pipelined address requests on the host bus. Host-initiated I/O signals are subtractively - HP Workstation x1000 | hp workstation x1000 - technical reference guide - Page 52
). It is assumed that the hub interface is always connected to an ICH2. SDRAM interface The MCH directly supports a single channel of SDRAM memory operating in lock-step. This channel runs at 133MHz and supports 64 Mb, 128 Mb, 256 Mb, and 512 Mb SDRAM technologies for 8× and 16× devices. These 64 Mb - HP Workstation x1000 | hp workstation x1000 - technical reference guide - Page 53
board memory controller hub (82845) DIMM memory slots The HP workstation x1000 has three DIMM memory slots for installing your SDRAM memory modules: • DIMM1 • DIMM2 • DIMM3 DIMM Memory Slot NOTE Memory can be loaded in any sequence in the three memory card slots. You can also mix the memory cards - HP Workstation x1000 | hp workstation x1000 - technical reference guide - Page 54
system board memory controller hub (82845) system clocking The MCH has the following clock input pins: • Differential BCLK0/BCLK1 for the host interface • 66 MHz clock input for - HP Workstation x1000 | hp workstation x1000 - technical reference guide - Page 55
(EBGA) package and resides on the system board just underneath the AGP connector. It provides the interface between the PCI bridge (PCI 2.2 compliant with support for 32-bit 33MHz PCI operations), PCI-to-Low Pin Count (LPC) bridge, IDE controller, USB controller, SMBus controller, and Audio Codec'97 - HP Workstation x1000 | hp workstation x1000 - technical reference guide - Page 56
/output controller hub 2 (82801BA) Figure 2-11 System Block Diagram Using ICH2 Address (36) Control Data (64) Intel Pentium 4 Processor i845 Memory Controller Hub (MCH) System Bus Keyboard, mouse, and floppy Parallel and serial ports 2 IDE connectors 4 USB connectors ATA/100 2 channels USB - HP Workstation x1000 | hp workstation x1000 - technical reference guide - Page 57
-bit buffer for IDE PCI burst transfers - Write ping-pong buffer for faster write performances • Real-time clock, supporting: - 256-byte battery-backed CMOS RAM - Hardware implementation to indicate century rollover • System TCO reduction circuits: - Timers to generate SMI# and reset upon - Timers - HP Workstation x1000 | hp workstation x1000 - technical reference guide - Page 58
I2C bus • GPIO: - TTL, Open-Drain, Inversion • 3.3V operation with 5V tolerant buffers for IDE and PCI signals • Alert-On-LAN (AOL) support ICH2 features ICH2 architecture The ICH2 interface architecture ensures that the I/O subsystems, both PCI and the integrated I/O features (for example, IDE, AC - HP Workstation x1000 | hp workstation x1000 - technical reference guide - Page 59
a USB-based keyboard and mouse. The USB supports four stacked connectors on the back panel. These ports are built into the ICH2, as standard USB ports. The ICH2 is USB 1.1 compliant. USB works only if you've enabled the USB interface within the HP Setup program. Currently, only Microsoft Windows 95 - HP Workstation x1000 | hp workstation x1000 - technical reference guide - Page 60
AD1885 audio controller that provides full audio features for the workstation. For information about the AD1885 audio solution, see hp BIOS.") You can program any two of the seven DMA channels to support fast Type-F transfers. The ICH2 DMA controller supports the LPC DMA. The LPC interface supports - HP Workstation x1000 | hp workstation x1000 - technical reference guide - Page 61
time • Stores system data The RTC operates on a 32.768KHz crystal and a separate 3V lithium battery that provides up to seven years of protection for an unplugged system. The RTC also supports two lockable memory ranges. By setting bits in the configuration space, you can lock two 8-byte ranges to - HP Workstation x1000 | hp workstation x1000 - technical reference guide - Page 62
two external sources • High quality CD input with ground sense • Stereo line-level outputs • Mono output for speakerphone or internal speaker • Power management support • 48-terminal LQFP package • Full-duplex variable sample rates from 7040Hz to 48kHz with 1Hz resolution • Up to three Codecs can be - HP Workstation x1000 | hp workstation x1000 - technical reference guide - Page 63
system board the input/output controller hub 2 (82801BA) • Software-enabled VREFOUT output for microphones and external power amplifier • Split power supplies (3.3V digital/5V analog) • Mobile low-power mixer mode • Extended 6-bit master volume control • Extended 6-bit headphone volume control • - HP Workstation x1000 | hp workstation x1000 - technical reference guide - Page 64
runs at a maximum speed of 100KHz. The SMBus monitors some of the system board's hardware functions (for example, voltage levels, temperature, fan speed, memory presence, and type), both at system boot and during normal run-time. The SMBus controller, located in the ICH2, controls the SMBus. Devices - HP Workstation x1000 | hp workstation x1000 - technical reference guide - Page 65
LPC bus Figure 2-13 illustrates the devices connected to the LPC bus. Devices on the LPC Bus Intel Pentium 4 Processor System Bus i845 Memory Controller Hub (MCH) 82845-QP HUB LINK 8 Keyboard, mouse, and floppy Parallel and serial ports I/IO/OCCoonntrolllleerrHHubub (I(CICHH)2)8822880011BAAA IDE - HP Workstation x1000 | hp workstation x1000 - technical reference guide - Page 66
, and PS/2 compatible). • Enhanced mode (enhanced parallel port, EPP, compatible). • High-speed mode (MS/HP extended capabilities port, ECP, compatible). FDC The integrated flexible disk controller (FDC) supports any combination of two of the following: tape drives, 3.5-inch flexible disk drives, 5.25 - HP Workstation x1000 | hp workstation x1000 - technical reference guide - Page 67
RNG) • Five General Purpose Inputs (GPI) • Register-based block locking • Hardware-based locking An integrated combination of logic features and nonvolatile memory: • Enables better protection for the storage and update of system code and data. • Adds flexibility through additional GPIs. • Allows for - HP Workstation x1000 | hp workstation x1000 - technical reference guide - Page 68
Operates with 33MHz PCI clock and 3.3V I/O • A/A Mux Interface/Mode, supporting: - 11-pin multiplexed address and 8-pin data I/O interface - Fast on-board Four or eight Mbits of flash memory for system code/data nonvolatile storage: - Symmetrically blocked, 64KB memory sections - Available in 8-Mbit - HP Workstation x1000 | hp workstation x1000 - technical reference guide - Page 69
preprogramming. An internal CUI serves as the control center between the FWH and A/A Mux interfaces, and internal operation of the nonvolatile memory. A valid command sequence written to the CUI initiates device automation. An internal WSM automatically executes the algorithms and timings necessary - HP Workstation x1000 | hp workstation x1000 - technical reference guide - Page 70
(AGTL)+ technology. This technology features open-drain signal drivers that are pulled up through resistors at bus extremities to at 4 x 100MHz, 3.2GB/s transfer rate) 3 onboard DIMM sockets supporting SDRAM memory The supported operating frequency of the AGTL+ bus for the Pentium 4 is 100MHz. - HP Workstation x1000 | hp workstation x1000 - technical reference guide - Page 71
its request (for example, for the contents of a given memory address) and release the bus, rather than waiting for the independent bus architecture, which combines a dedicated 64-bit Level 2 cache bus (supporting 256KB), plus a 64-bit system bus that enables multiple simultaneous transactions • - HP Workstation x1000 | hp workstation x1000 - technical reference guide - Page 72
system board, complying with VRM specification 9.0. The system supports high-current and low-voltage processors. The processor requires a to another. cache memory The Pentium 4 integrates the following cache memories on the same die as the processor cache: • A trace instruction and Level 1 data - HP Workstation x1000 | hp workstation x1000 - technical reference guide - Page 73
system board assigned device interrupts assigned device interrupts i/o controller hub interrupts Device AC'97 audio controller USB controller AGP slot PCI 32-bit slot #1 PCI 32-bit slot #2 PCI 32-bit slot #3 Extender Reference Name AD1885 - AGP PCI 1 PCI 2 PCI 3 REQ/ GNT Chip-set Interrupt - HP Workstation x1000 | hp workstation x1000 - technical reference guide - Page 74
the ICH2. Three major interrupt modes are available: • PIC mode: This mode uses only legacy interrupt controllers, so only one processor can be supported. Because this system has dual-processor capability, Windows 2000 and NT doesn't choose this mode as the default. However, during Windows 2000 and - HP Workstation x1000 | hp workstation x1000 - technical reference guide - Page 75
assigned device interrupts virtual wire mode allows the transition to the symmetric I/O mode. In the virtual wire mode, only one processor executes instructions. • Symmetric I/O mode: This mode is implemented with APIC controllers in the ICH2 and P64H and allows for multiple processor operations. In - HP Workstation x1000 | hp workstation x1000 - technical reference guide - Page 76
system board assigned device interrupts 76 Chapter 2 - HP Workstation x1000 | hp workstation x1000 - technical reference guide - Page 77
3 hp BIOS This chapter summarizes the workstation's Setup program and BIOS. Chapter 3 77 - HP Workstation x1000 | hp workstation x1000 - technical reference guide - Page 78
flash memory, support for PCI Specification 2.2, suspend to RAM, and DIMM memory modules. The BIOS includes a boot ROM for the 3COM 3C905C and HP LAN. xx.yyzQP, where: • JE - is a two-letter code indicating that it is for the x1000. • xx - is the major BIOS version. • yy - is the minor BIOS version. • - HP Workstation x1000 | hp workstation x1000 - technical reference guide - Page 79
setup program To run the Setup program, press F2 while the initial HP logo displays, immediately after restarting the Workstation. Alternatively, press Esc to view the summary configuration screen. By default, this screen displays for 15 seconds, but pressing any key stops this delay. - HP Workstation x1000 | hp workstation x1000 - technical reference guide - Page 80
hp BIOS overview advanced screen The Advanced Screen doesn't have the same structure as Screen to carry out special system configurations. Main Advanced Security Boot Power >> Processors, Memory, and Cache >> Floppy Options >> IDE Device Configuration >> Integrated USB Interface >> Peripheral - HP Workstation x1000 | hp workstation x1000 - technical reference guide - Page 81
LBA Mode Multi-Sector Transfers Fast Programmed I/O Modes 32-Bit Transfer Mode Ultra DMA Mode Auto 19166 16 255 40037 Mb On Auto 4 Off Auto hp BIOS overview [ Setup Help ] [ Setup Help ] [ Setup Help ] Chapter 3 81 - HP Workstation x1000 | hp workstation x1000 - technical reference guide - Page 82
hp BIOS overview integrated USB interface Advanced Integrated USB Interface USB Controller Legacy Keyboard Emulation Auto Auto peripheral configuration Advanced Peripheral Configuration Parallel Port - HP Workstation x1000 | hp workstation x1000 - technical reference guide - Page 83
LAN Integrated LAN MAC address Option ROM Scan Bus Master Bus Latency Timer Advanced Integrated LAN Auto 00306E1E0305 Enabled Disabled 20h hp BIOS overview [ Setup Help ] video configuration Advanced Video Configuration Graphic Aperture 64MB [ Setup Help ] PCI device, slot #1 Advanced PCI - HP Workstation x1000 | hp workstation x1000 - technical reference guide - Page 84
hp BIOS overview security screen Submenus let you change the characteristics and values of the: • systems administrator password • user password • power-on password • device start protection • - HP Workstation x1000 | hp workstation x1000 - technical reference guide - Page 85
Disk Boot Sector Serial Port A Serial Port B Parallel Port Security Hardware Protection Unlocked Unlocked Unlocked Unlocked Unlocked Unlocked Unlocked Unlocked Unlocked hp BIOS overview [ Setup Help ] boot screen This screen lets you select the order of the devices in which you want the BIOS - HP Workstation x1000 | hp workstation x1000 - technical reference guide - Page 86
hp BIOS overview power screen This screen lets you set the Standby Delay and Suspend Delay modes. Standby mode slows down the processor, whereas Suspend mode - HP Workstation x1000 | hp workstation x1000 - technical reference guide - Page 87
the system BIOS You can download the latest system BIOS (standard flash operation) from HP's Web site at www.hp.com/workstations/support. After accessing the site, select the appropriate workstation. Instructions for updating the BIOS accompany the downloaded BIOS files and a BIOS flash utility (flash - HP Workstation x1000 | hp workstation x1000 - technical reference guide - Page 88
hp BIOS restoring BIOS default settings restoring BIOS default settings BIOS confi to its default settings: 1. To access the Setup program, press F2 while the initial HP logo displays after restarting the workstation. 2. Press F9 to load the default settings from the Setup program. 3. Press Enter - HP Workstation x1000 | hp workstation x1000 - technical reference guide - Page 89
hp BIOS if you forgot the administrator password if you forgot the administrator password 1. Turn off the workstation, disconnect the power cord and all cables, then remove the cover. See the chapter "removing and replacing hardware parts." 2. Set switch 6 on the system board - HP Workstation x1000 | hp workstation x1000 - technical reference guide - Page 90
hp BIOS clearing the CMOS clearing the CMOS 1. Turn off the workstation, disconnect the power cord and all . 7. Replace the cover, and reconnect the power cord and all cables. 8. Turn on the workstation. Press F2 to run Setup, then press F9. The system automatically downloads and saves the CMOS - HP Workstation x1000 | hp workstation x1000 - technical reference guide - Page 91
hp BIOS recovering the BIOS (crisis mode) recovering the BIOS (crisis 4. Insert the floppy disk into the floppy disk drive. 5. Reconnect the power cord, and turn on the workstation. 6. The workstation will flash the BIOS. During the flash process, the screen remains blank. 7. When you hear a continuous - HP Workstation x1000 | hp workstation x1000 - technical reference guide - Page 92
000B_FFFF 000C 0000 - 000C 7FFF 000C 8000 - 000F FFFF Used by operating system Extended BIOS data area Video RAM or SMRAM (not visible unless in SMM) Video ROM (VGA ROM) Adapter ROM, RAM, memory-mapped registers, BIOS 000E 0000-000F FFFF 0001 0000-000F FFFF 0010 0000-001F FFFF 0020 0000-003F FFFF - HP Workstation x1000 | hp workstation x1000 - technical reference guide - Page 93
BIOS BIOS addresses hp i/o port map (i/o addresses used by the system1) You access peripheral devices, accessory devices, and system controllers through the system I/O space, which isn't located in system memory space. The 64KB of addressable I/O space comprises 8-bit and 16-bit registers (called - HP Workstation x1000 | hp workstation x1000 - technical reference guide - Page 94
hp BIOS BIOS addresses Default Values for I/O Address Ports 03F7 03F8 - 03FF 04D0 - 04D1 0778 The system permits only I/O-to-memory and memory-to-I/O transfers. The hardware configuration doesn't allow I/O-to-I/O or memory-to-memory transfers. The system controller supports seven DMA channels, each - HP Workstation x1000 | hp workstation x1000 - technical reference guide - Page 95
hp BIOS BIOS addresses connected to the APIC controller. The IRQs are numbered sequentially, starting modes are available: • PIC mode: This mode uses only legacy interrupt controllers, so the system can support only one processor. You can select this mode when you install Windows NT. Chapter 3 95 - HP Workstation x1000 | hp workstation x1000 - technical reference guide - Page 96
NOTE hp BIOS BIOS addresses • Virtual wire mode: This mode, which is implemented using the 82C59 interrupt and the I/O APIC controller, is used during boot time. The - HP Workstation x1000 | hp workstation x1000 - technical reference guide - Page 97
4 pre-boot diagnostics and BIOS errors This chapter describes e-Diagtools pre-boot diagnostics and BIOS errors, which help you troubleshoot hardware problems when your workstation cannot boot (start) properly. It also explains how to run e-Diagtools. Chapter 4 97 - HP Workstation x1000 | hp workstation x1000 - technical reference guide - Page 98
pre-boot diagnostics and BIOS errors hp e-Diagtools hp e-Diagtools The first step in solving a problem with a workstation is diagnosis. HP's e-Diagtools helps you diagnose hardware-related problems on a HP computer. It is a series of tools designed to help you to: • Distinguish between software and - HP Workstation x1000 | hp workstation x1000 - technical reference guide - Page 99
needs troubleshooting or replacement: • The modulated audio signal can be interpreted by a support provider equipped with the Virtual Call Assistant. (For more information about the Virtual Call Assistant, refer to the Virtual Call Assistant User's Guide, available on your HP workstation's support - HP Workstation x1000 | hp workstation x1000 - technical reference guide - Page 100
pre-boot audio signal and beeps Table 4-1 Pre-boot Beep Codes Problem Corrupted BIOS Defective system board Number of Beeps 6 7 If memorized code can also be used to diagnose an intermittent fault on a workstation that appears to be working again. Avoid disconnecting the computer's power cord - HP Workstation x1000 | hp workstation x1000 - technical reference guide - Page 101
recommendations (if provided) can be used to troubleshoot the problem. For many errors, some HP workstations can also emit the modulated audio signal that corresponds to the displayed error. This can be especially useful when you call your support provider (this feature is described in the section - HP Workstation x1000 | hp workstation x1000 - technical reference guide - Page 102
screen. The support provider can then decode the signal and provide a solution. For more information about the Virtual Call Assistant, refer to the Virtual Call Assistant User's Guide, available in PDF format on your HP workstation's support web site: www.hp.com/workstations/support 102 Chapter 4 - HP Workstation x1000 | hp workstation x1000 - technical reference guide - Page 103
then determine the problem by referring to Table 4-1. For extensive web-based troubleshooting, use e-Diagtools online troubleshooting, described in the section "e-Diagtools online troubleshooting" in this chapter. Ensure you are using the most recent BIOS version for your workstation. This will help - HP Workstation x1000 | hp workstation x1000 - technical reference guide - Page 104
Diagtools User's Guide. These web-based troubleshooting tools can provide valuable support information and help you solve your workstation problem. The tools are available for your HP workstation. You can access e-Diagtools online troubleshooting by connecting to your workstation's support web site - HP Workstation x1000 | hp workstation x1000 - technical reference guide - Page 105
on your hard disk (recommended). This does not apply to FastRaid models. • The HP Recovery CD-ROM that was supplied with your workstation. • The HP Diagtools CD-ROM. Only the Utility Partition version of e-Diagtools supports the full range of e-features. When you run e-Diagtools from a CD-ROM you - HP Workstation x1000 | hp workstation x1000 - technical reference guide - Page 106
www.hp.com/desktops/diagtools 4. Select the option to run e-Diagtools. Depending on your BIOS configuration, you may have to reboot the workstation. a CD-ROM Only the Utility Partition version of e-Diagtools supports the full range of e-features. When you run e-Diagtools from a CD-ROM you will - HP Workstation x1000 | hp workstation x1000 - technical reference guide - Page 107
enabled, and that the CD-ROM is configured to be the first device to boot from. 3. e-Diagtools will start automatically, or, depending on the HP CD-ROM used, a menu appears. In this last case, select the option to run the hardware diagnostics. e-Diagtools starts, and a welcome screen displays. running - HP Workstation x1000 | hp workstation x1000 - technical reference guide - Page 108
proposed options. If a test fails, you can produce a support ticket. for more information For more information about using HP e-Diagtools, consult the e-Diagtools User's Guide, available in PDF format on HP's web site: www.hp.com/workstations/support/software/diagnostics.html On this web site you - HP Workstation x1000 | hp workstation x1000 - technical reference guide - Page 109
5 hardware components This chapter describes: • Graphics cards • Network cards • SCSI adapter cards • IEEE-1394 (Firewire) card • Mass storage devices • Connectors and sockets • The rear panel Chapter 5 109 - HP Workstation x1000 | hp workstation x1000 - technical reference guide - Page 110
HP workstation x1000 comes with a graphics card supplied by a third party manufacturer. This graphics card is one of the following, depending on the workstation AGP graphics card has a total of 16MB of installed video memory (non-upgradeable). Main features include: • Powered by the 256-bit DualBus - HP Workstation x1000 | hp workstation x1000 - technical reference guide - Page 111
card. Matrox Millennium G450 Graphics Card Port 1 Port 2 NOTE If you use only one monitor, you must use Port 1. If you connect a second monitor, the driver detects it during startup. This means that you must connect both monitors to the graphics card before startup. If the - HP Workstation x1000 | hp workstation x1000 - technical reference guide - Page 112
The resolution/color/refresh-rate combination is limited by a combination of the display driver, the graphics device, and the video memory. If the resolution/refresh-rate combination is set higher than the display can support, you risk damaging the display. The following table summarizes the maximum - HP Workstation x1000 | hp workstation x1000 - technical reference guide - Page 113
hardware components graphics cards The following table summarizes the maximum supported refresh rates. The maximum refresh rates are always attainable with 8-bit or 16-bit color. They may not be attainable with 24-bit or 32- - HP Workstation x1000 | hp workstation x1000 - technical reference guide - Page 114
com/mga/home.htm nVIDIA Quadro2 MXR The nVIDIA Quadro2 MXR graphics card's main features include: • TwinView architecture, allowing two simultaneous displays • Support for both DVI-I (digital LCD) and VGA (analog CRT) monitors • AGP 4x with fast writes • 350MHz RAMDAC • Digital Vibrance Control (DVC - HP Workstation x1000 | hp workstation x1000 - technical reference guide - Page 115
transform and lighting engines • Dedicated graphics-specific GPU frees your Workstation's main processor for other tasks and provides faster transform and lighting high-resolution 32bpp textures • 32-bit Z/Stencil buffer eliminates polygon-popping problems in high-polygon 3D imaging Chapter 5 115 - HP Workstation x1000 | hp workstation x1000 - technical reference guide - Page 116
Figure 5-3 hardware components graphics cards nVIDIA Quadro2 Pro The nVIDIA Quadro2 Pro graphics card's main features include: • Hardware anti-aliased line engine. • 6.4 GB/sec. bandwidth enabling work in fully textured mode while achieving real-time frame rates. • 64 Mbyte unified frame buffer - HP Workstation x1000 | hp workstation x1000 - technical reference guide - Page 117
5-4 SCSI adapter cards Adaptec 29160 SCSI PCI adapter card Your workstation has an Ultra 160/m SCSI card. The Adaptec SCSI card has a system bus rate of 533MB/sec, a SCSI data transfer rate of 160MB/sec, and the capability to support as many as 15 peripheral devices. The Adaptec SCSI card can - HP Workstation x1000 | hp workstation x1000 - technical reference guide - Page 118
external SCSI devices, please read Chapter 6 "removing and replacing hardware parts." external SCSI cable information Cables for connecting external SCSI devices to you workstation can be found at the following web site: www.adaptec.com If you need to connect single-ended or slower SCSI devices to - HP Workstation x1000 | hp workstation x1000 - technical reference guide - Page 119
hardware components SCSI adapter cards additional SCSI card features The following table describes features of the Adaptec SCSI card. Feature Double Transition Clocking Cyclical Redundancy Check Domain Validation Description Changes the digital protocol to use both edges of the SCSI request/ - HP Workstation x1000 | hp workstation x1000 - technical reference guide - Page 120
hardware components IEEE-1394 (Firewire) card Figure 5-5 IEEE-1394 (Firewire) card This new IEEE standard allows you to connect your workstation to digital peripheral devices, such as set-top boxes, camcorders, DVCRs, DTV, DVDs/CD-ROMs, printers, scanners, hard disk drives and cameras. You no - HP Workstation x1000 | hp workstation x1000 - technical reference guide - Page 121
Figure 5-6 hardware components IEEE-1394 (Firewire) card IEEE-1394 cable The IEEE-1394 cable consists of six copper wires. Two of the cable's wires are used to carry power. The remaining four wires are signal wires. These wires are grouped into two sets of two twisted wires. These sets of twisted - HP Workstation x1000 | hp workstation x1000 - technical reference guide - Page 122
this document. You can find information about available accessories at: www.hp.com/pcaccessories flexible disk drives The front-access shelf has a 3.5- drives (which are subject to change) that may be supplied with the workstation (type and quantity depends on model) on internal shelves, connected to - HP Workstation x1000 | hp workstation x1000 - technical reference guide - Page 123
hardware components mass storage devices Table 5-2 SCSI Hard Disk Drives Capacity Interface Average seek time (read) Track-to-Track Seek Time Full Stroke Seek Time Number of disks/heads Buffer size Maxtor Atlas 10K III SCSI (10 krpm) Maxtor Atlas 10K III SCSI (10 krpm) Maxtor Atlas 10K III - HP Workstation x1000 | hp workstation x1000 - technical reference guide - Page 124
IDE CD-ROM drive in a 5.25-inch front-access shelf, supporting ATAPI commands and with audio playback capability. It can play any standard E-IDE/ATAPI. Data capacity Loading Type Data transfer rate Buffer memory size Access time Rotational speed Description 650MB Motorized tray Sustained transfer - HP Workstation x1000 | hp workstation x1000 - technical reference guide - Page 125
hardware components mass storage devices CD-RW drive The CD-RW features include: • CD-ROM data disk (Mode 1 and Mode 2) • Photo-CD Multisession • Video CD • CD-DA • CD-I FMW • CD-ROM XA Mode 2 (Form 1 & 2) • Enhanced CD (CD-Plus, CD-Extra, Pre-gap, Mixed) • MPC III compliant • Interface type: E- - HP Workstation x1000 | hp workstation x1000 - technical reference guide - Page 126
CD-ROM XA, CD-I, CD-Extra, CD-R, CD-RW • Supported DVD-ROM formats: - DVD-ROM - DVD-R (4.7GB/3.9GB) - DVD-RAM (4.7GB/2.6GB) - DVD-RW - DVD+RW • Interface: E-IDE/ATAPI, Support Ultra DMA 66. Data Capacity: Capacity DVD-ROM Capacity DVD-RAM Capacity DVD-R Capacity CD Data Transfer Rate Loading Type - HP Workstation x1000 | hp workstation x1000 - technical reference guide - Page 127
hardware components connectors and sockets connectors and sockets IDE drive connectors IDE Connectors Pin Signal 1 Reset# 3 HD7 5 HD6 7 HD5 9 HD4 11 HD3 13 HD2 15 HD1 17 HD0 19 Ground 7 21 DMARQ 23 DIOW# 25 DIOR# 27 IORDY 29 DMACK# 31 INTRQ 33 DA1 35 DA0 37 CS1FX# 39 DASP# Pin Signal 2 Ground 4 - HP Workstation x1000 | hp workstation x1000 - technical reference guide - Page 128
hardware components connectors and sockets battery pinouts Battery Connections Pin Signal 1 VBAT1 2 GROUND additional SCSI LED connector Additional SCSI LED Connector (4-pin) Pin Signal 1 Not used 2 LED out 3 LED out 4 Not used power - HP Workstation x1000 | hp workstation x1000 - technical reference guide - Page 129
hardware components connectors and sockets wake on LAN connector Wake On LAN (WOL) Pin Signal 1 5V STDBY 2 Ground 3 LAN_WAKE system fan connector 321 Vertical plastic latch for keying Fan Connector Pin Signal 1 Sense 2 +12V power 3 Ground (or more, depending on desired fan speed) - HP Workstation x1000 | hp workstation x1000 - technical reference guide - Page 130
hardware components connectors and sockets intrusion Intrusion Pin Signal 1 GND 2 Intruder 3 VBat AGP connector AGP Connector Pins Pin Standard VGA 1 Analog RED 2 Analog GREEN 3 Analog BLUE 4 Monitor ID2 5 n/c 6 Analog RED return 7 Analog GREEN return 8 Analog BLUE return - HP Workstation x1000 | hp workstation x1000 - technical reference guide - Page 131
IEEE-1394 connectors 5 3 1 hardware components connectors and sockets 1 3 5 6 4 2 2 4 6 IEEE-1394 Connector Pin Signal1 1 Power 2 Ground 3 -TPB 4 +TPB 5 -TPA 6 +TPA 1. The signal +TPA stands for positive twisted pair A. The other signal wires have a similar meaning. - HP Workstation x1000 | hp workstation x1000 - technical reference guide - Page 132
Figure 5-7 hardware components connectors and sockets Ethernet connector Ethernet UTP Connector 132 Chapter 5 - HP Workstation x1000 | hp workstation x1000 - technical reference guide - Page 133
Figure 5-8 rear panel Rear Panel Socket Pin Layouts Keyboard Connector 9-pin Serial Port Connectors Serial Port A Serial Port B Audio jacks Line Out Line In MIC USB Connectors (two) hardware components rear panel Mouse Connector 25-pin Parallel Port Connector LAN Connector Chapter 5 133 - HP Workstation x1000 | hp workstation x1000 - technical reference guide - Page 134
hardware components rear panel keyboard and mouse connectors 4 2 6 1 5 3 Keyboard and Mouse Connectors Pin Signal 1 Data 3 Ground 5 Clock Pin Signal 2 Not Used 4 +5V dc 6 Not Used USB stacked connector The USB graphic and pinout table for a USB connector. However, the information is also - HP Workstation x1000 | hp workstation x1000 - technical reference guide - Page 135
hardware components rear panel serial port connectors This pinout information is valid for both the Serial Port A and Serial Port B connectors. 1 6 2 7 3 8 4 9 5 9-pin Serial Port Connector Pin Signal 6 (DSR) CC 7 (RTS) CA 8 (CTS) CB 9 (R) CE Pin Signal 1 (DCD) CF 2 (RD) BB 3 (TD) BA 4 (DTR) CD - HP Workstation x1000 | hp workstation x1000 - technical reference guide - Page 136
hardware components rear panel 25-pin parallel connector 25 13 24 12 23 11 10 22 21 9 20 8 19 7 18 6 5 17 4 16 15 3 2 14 1 25-pin Parallel Connector Pin Signal 25 Ground 24 Ground 23 Ground 22 Ground 21 Ground 20 Ground 19 Ground 18 Ground 17 SLIN 16 INIT 15 ERROR 14 AUTO-FD - HP Workstation x1000 | hp workstation x1000 - technical reference guide - Page 137
hardware components rear panel external audio jacks The Line In jack, Line Out jack, and Mic In jack on the rear panel are standard connectors. Chapter 5 137 - HP Workstation x1000 | hp workstation x1000 - technical reference guide - Page 138
hardware components rear panel 138 Chapter 5 - HP Workstation x1000 | hp workstation x1000 - technical reference guide - Page 139
6 removing and replacing hardware parts This chapter provides information about installing accessories and replacing hardware parts in your workstation. Chapter 6 139 - HP Workstation x1000 | hp workstation x1000 - technical reference guide - Page 140
the x1000 workstation and the system board. Figure 6-1 Workstation Memory Card Slots Four I/O Card Slots Primary Hard Disk Drive Shelf Secondary Hard Disk Drive Shelf Contact your dealer for an up-to-date list of supported devices or check the HP web site: http://www.hp.com/workstations/support - HP Workstation x1000 | hp workstation x1000 - technical reference guide - Page 141
PCI Card Slot 1 PCI Card Slot 2 PCI Card Slot 3 removing and replacing hardware parts overview System Board Connectors and Slots Memory module slots supporting three SDRAM modules Processor connector (heatsink and processor not shown) Primary IDE Connector Secondary IDE Connector Floppy Disk Drive - HP Workstation x1000 | hp workstation x1000 - technical reference guide - Page 142
, then remove its power cord before removing the workstation's cover. Remove the Power Protection Device cables before any servicing operation. Always replace the cover before switching the workstation on again. removing the workstation's cover 1. Switch off the display and computer. Disconnect - HP Workstation x1000 | hp workstation x1000 - technical reference guide - Page 143
removing and replacing hardware parts removing and replacing the cover and front bezel WARNING Figure 6-4 Parts inside the computer may be hot, wait for them to cool before touching them. removing the front bezel The front bezel is divided into two sections: • The upper bezel gives access to three - HP Workstation x1000 | hp workstation x1000 - technical reference guide - Page 144
. Confirm that the bezel latches as shown in Figure 6-4 are seated flat against the chassis. Inserting the Bezel Hinges into their Slots on the Workstation Bezel Hinge Slots Bezel Hinges 144 Chapter 6 - HP Workstation x1000 | hp workstation x1000 - technical reference guide - Page 145
front bezel Figure 6-6 3. Insert the cover flanges located on the bottom edge of the cover into their cover slots on the bottom edge of the workstation. See Figure 6-6. Next, close the cover by rotating it upward in the direction of the arrow. You will hear the cover snap into place when - HP Workstation x1000 | hp workstation x1000 - technical reference guide - Page 146
removing and replacing hardware parts removing, replacing and upgrading memory Figure 6-7 removing, replacing and upgrading memory Your x1000 workstation has three memory slots for installing SDRAM memory modules. These memory modules can either be 128MB or 256MB, and you can arrange the in any - HP Workstation x1000 | hp workstation x1000 - technical reference guide - Page 147
parts removing, replacing and upgrading memory removing and replacing a memory module 1. Switch off the display and workstation. Disconnect all power cables and any LAN or telecommunications cables. 2. Remove the workstation's cover (refer to page 142 for instructions). To ease installation, place - HP Workstation x1000 | hp workstation x1000 - technical reference guide - Page 148
accessory card removing or replacing an accessory card Your x1000 workstation has three 32-bit 33 MHz PCI card slots and one AGP slot on the system board. The x1000 model supports the 1.5V AGP graphics cards (≤ 25W). The x1000 does not support high power (>25W) AGP and AGP 3.3 graphics cards. Static - HP Workstation x1000 | hp workstation x1000 - technical reference guide - Page 149
Figure 6-9 removing and replacing hardware parts removing or replacing an accessory card Retainer Clip for the Accessory Cards Removing the retainer clip screw. Removing the retainer clip. Figure 6-10 Retainer Clip Screw Retainer Clip 4. Unlatch the AGP graphics card's retainer latch by - HP Workstation x1000 | hp workstation x1000 - technical reference guide - Page 150
Figure 6-11 5. Lift the AGP accessory card out of its card slot. See Figure 6-11. Removing the AGP Accessory Card AGP Accessory Card 6. Replace the workstation's cover (refer to page 144). 150 Chapter 6 - HP Workstation x1000 | hp workstation x1000 - technical reference guide - Page 151
card, complete the following steps: 1. Switch off the display and workstation. Disconnect all power cables and any LAN or telecommunications cables. 2. Remove the workstation's cover (refer to page 142 for instructions). 3. Unscrew the retainer clip's mounting screw and remove the accessory - HP Workstation x1000 | hp workstation x1000 - technical reference guide - Page 152
Figure 6-13. Next, place the card in an anti-static package or on an anti-static surface. Removing the SCSI Card SCSI Card 6. Replace the workstation's cover (refer to page 144). 152 Chapter 6 - HP Workstation x1000 | hp workstation x1000 - technical reference guide - Page 153
cable (or SCSI connector through the remainder of this section) is an optional component that allows you to connect single-ended SCSI devices to your workstation. This external SCSI connector can be ordered from this web site: www.adaptec.com. Before you install this component, you need to read the - HP Workstation x1000 | hp workstation x1000 - technical reference guide - Page 154
external SCSI devices The following cables can be used to connect your external SCSI devices to your workstation. For a list of other cables you can order, see the products section at: www.adaptec.com. Supported SCSI Cables 50-Pin Ultra Low Density SCSI to 68-Pin Ultra Wide High Density SCSI Cable - HP Workstation x1000 | hp workstation x1000 - technical reference guide - Page 155
the SCSI connector, follow this procedure: 1. Switch off the display and workstation. Disconnect all power cables and any LAN or telecommunications cables. 2. Remove the workstation's cover (refer to page 142 for instructions). 3. Unscrew the retainer clip's mounting screw and remove the accessory - HP Workstation x1000 | hp workstation x1000 - technical reference guide - Page 156
. See Figure 6-18. You should also adjust the cables to that they are neatly placed within the system and free from possible damage by the workstation's edges or by other system components. Connecting the SCSI Connector Cable to the SCSI Card 7. Replace the - HP Workstation x1000 | hp workstation x1000 - technical reference guide - Page 157
. Figure 6-19 removing a hard disk drive 1. Switch off the display and workstation. Disconnect all power cables and any LAN or telecommunications cables. 2. Remove the workstation's cover (refer to page 142 for instructions). 3. Disconnect the power and data cables from the hard disk drive. See - HP Workstation x1000 | hp workstation x1000 - technical reference guide - Page 158
both hard disk drive mounting bracket guides to complete the removal of the hard disk drive. See Figure 6-21. Removing the Hard Disk Drive from Its Bracket Guides Bracket Mounting Screw Mounting Bracket Guides 6. Secure all cables neatly within the workstation and replace its cover. Refer to - HP Workstation x1000 | hp workstation x1000 - technical reference guide - Page 159
Disconnect all power cables and any LAN or telecommunications cables. 2. Remove the workstation's cover (refer to page 142 for instructions). 3. Remove the new hard disk drive from its package and install its mounting bracket guides. See Figure 6-21. 4. Release the hard disk drive retainer clips and - HP Workstation x1000 | hp workstation x1000 - technical reference guide - Page 160
22 removing an optical drive 1. Switch off the display and workstation. Disconnect all power cables and any LAN or telecommunications cables. 2. Remove the workstation's cover and front upper bezel (refer to page 142 for instructions). 3. Disconnect the power and data cables from the optical drive - HP Workstation x1000 | hp workstation x1000 - technical reference guide - Page 161
removing and replacing hardware parts removing and replacing an optical drives Figure 6-23 4. Remove the optical drive. To do this, press the two front clips inward and slide the optical drive out of its bay area. See Figure 6-23. Removing an Optical Drive Retainer Clip Retainer Clip Optical - HP Workstation x1000 | hp workstation x1000 - technical reference guide - Page 162
Optical Drive's Mounting Bracket Filler 7. Secure all lose cables and replace the workstation's bezel and cover (refer to page 144 for instructions). replacing an optical drive 1. Switch off the display and workstation. Disconnect all power cables and any LAN or telecommunications cables. 2. Remove - HP Workstation x1000 | hp workstation x1000 - technical reference guide - Page 163
. Disconnect all power cables and any LAN or telecommunications cables. 2. Remove the workstation's cover and front upper bezel (refer to page 142 for these instructions). 3. Disconnect the power and data cables from the old drive. See Figure 6-26. Disconnecting a Flexible Disk Drive's Power - HP Workstation x1000 | hp workstation x1000 - technical reference guide - Page 164
27. Removing the Flexible Disk Drive Retainer Clip Retainer Clip Flexible Disk Drive Figure 6-28 5. Unscrew both flexible disk drive mounting bracket guides to complete the removal of the flexible disk drive. See Figure 6-28. Removing the Flexible Drive from Its Mounting Bracket Bracket Mounting - HP Workstation x1000 | hp workstation x1000 - technical reference guide - Page 165
. Disconnect all power cables and any LAN or telecommunications cables. 2. Remove the workstation's cover and front upper bezel (refer to page 142 for these instructions). 3. Replace the flexible disk drive in its mounting bracket. See Figure 6-28. 4. Insert the flexible disk drive and mounting - HP Workstation x1000 | hp workstation x1000 - technical reference guide - Page 166
unit provided by HP support services. Figure 6-29 removing a power supply unit 1. Switch off the display and workstation. Disconnect all power cables and any LAN or telecommunications cables. 2. Remove the workstation's cover (refer to page 142 for instructions). 3. Lay the workstation on its - HP Workstation x1000 | hp workstation x1000 - technical reference guide - Page 167
removing and replacing hardware parts removing and replacing a power supply unit Figure 6-30 4. Unscrew the power supply's internal mounting screw. See Figure 6-30. Unscrew the Power Supply's Internal Mounting Screw Power Supply Power Supply's Internal Mounting Screw Figure 6-31 5. Unscrew the - HP Workstation x1000 | hp workstation x1000 - technical reference guide - Page 168
. Disconnect all power cables and any LAN or telecommunications cables. 2. Remove the workstation's cover (refer to page 142 for these instructions). 3. Replace the power supply in the workstation. See Figure 6-32. 4. Screw in the four external power supply mounting screws. See Figure 6-31 - HP Workstation x1000 | hp workstation x1000 - technical reference guide - Page 169
may become too hot to touch. Switch off the display and workstation. Disconnect all power cables and any LAN or telecommunications cables. 2. Remove the workstation's cover (refer to page 142 for instructions). 3. Place the workstation on its side for better access. Note that you should place - HP Workstation x1000 | hp workstation x1000 - technical reference guide - Page 170
Figure 6-34 removing and replacing hardware parts removing and replacing the processor 5. Unscrew the four heatsink spring tension shoulder screws and lift it off of the processor. See Figure 6-34. The small amount of heat created during the 3 to 5 minute warm-up should aid in separating the - HP Workstation x1000 | hp workstation x1000 - technical reference guide - Page 171
Connect the heatsink power cable to the system board. See Figure 6-33. 7. Replace the workstation's cover (refer to page 144 for instructions). Reconnect all the power and telecommunications cables. When the workstation is started, you should check that the processor has been correctly identified by - HP Workstation x1000 | hp workstation x1000 - technical reference guide - Page 172
's cover (refer to page 142 for instructions). 3. Place your workstation on its side with the system board facing upwards. 4. Complete these tasks before removing the system board: • Disconnect all cables from the system board. • Remove all memory cards from the system board. See page 146. • Remove - HP Workstation x1000 | hp workstation x1000 - technical reference guide - Page 173
a system board 1. Remove the workstation's cover (refer to page 142 for instructions). 2. Place your workstation on its side with the system board all memory cards from the system board. See page 146. • Connect all cables to the system board. 6. Secure all cables neatly within the workstation and - HP Workstation x1000 | hp workstation x1000 - technical reference guide - Page 174
board 7. After installing the system board, you need to update your BIOS. The latest BIOS for your Workstation and instructions on updating the BIOS are available from: www.hp.com/workstation/support. 8. Verify that you have properly replaced the system board by turning the system on and seeing if - HP Workstation x1000 | hp workstation x1000 - technical reference guide - Page 175
removing and replacing hardware parts setting system board switches setting system board switches There are ten system board switches used for configuration, numbered from 1 to 10. Some switch positions are reserved and should not be modified, otherwise it could lead to a system failure. Switch 1-4 - HP Workstation x1000 | hp workstation x1000 - technical reference guide - Page 176
Figure 6-40 removing a system speaker 1. Switch off the display and workstation. Disconnect all power cables and any LAN or telecommunications cables. 2. Remove the workstation's cover (refer to page 142 for instructions). 3. Disconnect the speaker cable from the system board. See Figure 6-40 - HP Workstation x1000 | hp workstation x1000 - technical reference guide - Page 177
's cover (refer to page 142 for instructions). 3. Unpack the replacement speaker and slide it into place on the workstation's chassis. You will also need to press gently down on the retainer clips with your screw driver blade to secure the speaker assembly. See Figure 6-41. 4. Connect the audio - HP Workstation x1000 | hp workstation x1000 - technical reference guide - Page 178
fan Figure 6-42 removing the system fan 1. Switch off the display and workstation. Disconnect all power cables and any LAN or telecommunications cables. 2. Remove the workstation's cover (refer to page 142 for instructions). 3. Disconnect the fan's power cable from its connector on the system - HP Workstation x1000 | hp workstation x1000 - technical reference guide - Page 179
the System Fan Rivets Lift up on the four rivets with a screwdriver. Push the rivet's four collets toward the inside of the workstation. Figure 6-44 5. Remove the system fan from the workstation. See Figure 6-44. Removing the System Fan System Fan 6. Secure all cables neatly within the - HP Workstation x1000 | hp workstation x1000 - technical reference guide - Page 180
Switch off the display and workstation. Disconnect all power cables and any LAN or telecommunications cables. 2. Remove the workstation's cover (refer to page 142 for instructions). 3. Remove the new system fan still does not work, contact your local HP technical support person. 180 Chapter 6 - HP Workstation x1000 | hp workstation x1000 - technical reference guide - Page 181
. Nevertheless, in order to protect the environment, do not dispose of batteries in household waste. Please return used batteries to the shop from which you bought them, or to the dealer from whom you purchased your workstation, or to HP, so that they can be either recycled or disposed of in an - HP Workstation x1000 | hp workstation x1000 - technical reference guide - Page 182
supply cord and any connection to a telecommunications network. 2. Remove the workstation's cover (refer to page 142). 3. Insert the new battery in its battery holder on the system board. See Figure 6-45. 4. Replace the workstation's cover (refer to page 144). Reconnect all cables and power cords - HP Workstation x1000 | hp workstation x1000 - technical reference guide - Page 183
7 troubleshooting your workstation The following table outlines common problems that are explained in this chapter. Chapter 7 183 - HP Workstation x1000 | hp workstation x1000 - technical reference guide - Page 184
troubleshooting your workstation screen is blank because system failed to boot Figure 7-1 screen is blank because system failed to boot Your workstation's operating system will fail to boot if the line voltage switch is set to 230V and AC line voltage is 115V. To solve this problem: 1. Place the - HP Workstation x1000 | hp workstation x1000 - technical reference guide - Page 185
is corrupt. The monitor supports the resolution and selected refresh rate. This type of problem can occur if the workstation is configured using one your monitor. 1. Follow the instructions indicated in the above Note about removing the cover and switching off the workstation. 2. Remove the AGP - HP Workstation x1000 | hp workstation x1000 - technical reference guide - Page 186
Refer to the chapter "startup errors" in this document for instructions about troubleshooting using HP e-DiagTools. Install the latest driver for the video card. This can be downloaded from the Workstation Support web site: www.hp.com/workstations/support, then HP x1000 Workstation. 186 Chapter 7 - HP Workstation x1000 | hp workstation x1000 - technical reference guide - Page 187
the system setup. updating the BIOS The latest system BIOS (standard flash operation) for your workstation can be downloaded from HP's Support Web site at: www.hp.com/workstations/support Instructions on updating the BIOS are supplied with the downloaded BIOS files and a BIOS flash utility. restoring - HP Workstation x1000 | hp workstation x1000 - technical reference guide - Page 188
troubleshooting your workstation troubleshooting BIOS problems clearing the CMOS 1. Turn off the workstation, disconnect the Replace the cover, and reconnect the power cord and all cables. 8. Turn on the workstation. Press F2 to run Setup, then press F9. The system automatically downloads and saves - HP Workstation x1000 | hp workstation x1000 - technical reference guide - Page 189
troubleshooting your workstation troubleshooting BIOS problems recovering the BIOS (crisis mode) floppy disk into the floppy disk drive. 5. Reconnect the power cord, and turn on the workstation. 6. The workstation will flash the BIOS. During the flash process, the screen remains blank. 7. When you hear - HP Workstation x1000 | hp workstation x1000 - technical reference guide - Page 190
troubleshooting your workstation system board switches Switch 1-4 5 6 7 8 9 10 Figure 7-2 system board switches There are ten system board switches used for configuration, numbered from 1 to 10. A certain number - HP Workstation x1000 | hp workstation x1000 - technical reference guide - Page 191
troubleshooting your workstation using the hp setup program using the hp setup program The Setup program allows you to view and change the configuration of your workstation, such as the passwords and boot device order. Follow these instructions to check the configuration. first, turn on or restart your - HP Workstation x1000 | hp workstation x1000 - technical reference guide - Page 192
troubleshooting your workstation more troubleshooting for drives WARNING more troubleshooting for drives This section provides more information on how to solve problems be serviced by service personnel only. Refer to the label on the CD-ROM for power requirements and wavelength. This workstation is - HP Workstation x1000 | hp workstation x1000 - technical reference guide - Page 193
troubleshooting your workstation more troubleshooting for drives if the hard disk activity light does not work If the hard disk activity light does not flicker when the workstation the Boot Device Priority submenu in the Boot menu group of the HP Setup program). CD-ROM, DVD or CD-RW Drive is idle If - HP Workstation x1000 | hp workstation x1000 - technical reference guide - Page 194
Figure 7-3 troubleshooting your workstation more troubleshooting for drives CD-ROM, DVD or CD-RW door does not open If you have difficulty removing a disk from the drive (during a power failure for example), you can use the manual eject button.: 1. With a thin, solid rod, such as the end of a paper - HP Workstation x1000 | hp workstation x1000 - technical reference guide - Page 195
hardware has been removed you may have to remove the unnecessary drivers. general instructions 1. Back up any data on your hard disk drive that you want to keep. 1. Any drivers you need to reinstall can be downloaded from HP's Support Web site at: www.hp.com/workstations/support. Chapter 7 195 - HP Workstation x1000 | hp workstation x1000 - technical reference guide - Page 196
troubleshooting your workstation recovering hard disk drive contents (Windows 2000 only) 2. Ensure you have a CD drive installed on your workstation. 3. Verify that the HP x1000 Recovery CD-ROM matches your HP workstation. 4. Revert the system to its original hardware configuration by removing any - HP Workstation x1000 | hp workstation x1000 - technical reference guide - Page 197
Table 7-1 troubleshooting your workstation recovering hard disk drive contents (Windows 2000 only) The system, files, drivers AND Hard disk drive and hardware are good. 1. Insert the Recovery CD into the CD drive and restart the system. 2. Press F12 when the HP logo appears during startup - HP Workstation x1000 | hp workstation x1000 - technical reference guide - Page 198
Table 7-1 troubleshooting your workstation recovering hard disk drive contents (Windows 2000 only) Three Different Recovery Processes Condition Installing new hard disk drive or suspect corrupt partitions. Recovery Steps 1. Insert - HP Workstation x1000 | hp workstation x1000 - technical reference guide - Page 199
that the operation has been successfully completed. Remove the CD and store it securely. recovering preloaded drivers You can use the HP Recovery CD to reinstall individual drivers that were delivered with the workstation. To do this, insert the CD-ROM into the CD-ROM drive. Automatically an HTML - HP Workstation x1000 | hp workstation x1000 - technical reference guide - Page 200
troubleshooting your workstation recovering hard disk drive contents (Windows 2000 only) changing the hard disk If the hard disk is corrupted and you can no . If the replacement hard disk drive is new, you must partition and format the drive. This can be done using the HP Recovery CD. 200 Chapter 7 - HP Workstation x1000 | hp workstation x1000 - technical reference guide - Page 201
help you troubleshoot problems on your workstation: • Documentation for your workstation (described below) • BIOS updates (including the upgrade utility and instructions) • The latest drivers and software utilities For HP's support web site, connect to: www.hp.com/workstations/support. documentation - HP Workstation x1000 | hp workstation x1000 - technical reference guide - Page 202
troubleshooting your workstation hewlett-packard support and information services hewlett-packard support and information services collecting information before contacting hp support You can learn more about HP service and support from the support Web site: www.hp.com/workstation/support Before - HP Workstation x1000 | hp workstation x1000 - technical reference guide - Page 203
troubleshooting your workstation hewlett-packard support and information services Table 7-2 Collecting Information for Support Information needed Details Your information Hardware Configuration Which BIOS version is used? The BIOS version is displayed in the Setup program main menu, accessed - HP Workstation x1000 | hp workstation x1000 - technical reference guide - Page 204
troubleshooting your workstation hewlett-packard support and information services 204 Chapter 7 - HP Workstation x1000 | hp workstation x1000 - technical reference guide - Page 205
A x1000 service information This appendix contains an overview of system accessories, an exploded view of the workstation components and a components parts list. Appendix A 205 - HP Workstation x1000 | hp workstation x1000 - technical reference guide - Page 206
information hp x1000 accessories hp x1000 accessories This section provides a list of supported accessories for the workstation. Table A-1 x1000 supported accessories Processor Pentium 4, 1.7GHz Pentium 4, 1.9GHz Pentium 4, 2.0GHz A7800A OD1 A7813A OD1 A7801A OD1 Table A-2 Memory Upgrades - HP Workstation x1000 | hp workstation x1000 - technical reference guide - Page 207
x1000 service information hp x1000 accessories Table A-4 Removable Mass Storage 48× CD-ROM CD R/W 16×/10×/40× 16× DVD DVD+RW / CD-RW Ultra 160 SCSI Controller Card A7244A OD1 Table A-7 IEEE 1394/Firewire Card IEEE 1394 OHCI/ Firewire Card (Window 2000 support only) A7809A OD1 Appendix A 207 - HP Workstation x1000 | hp workstation x1000 - technical reference guide - Page 208
x1000 service information exploded view and part numbers Figure A-1 exploded view and part numbers This section provides an exploded view of the workstation's parts and a list of its part numbers. Exploded View of the HP Workstation x1000 Parts 25. 24. 23. 22. 21. 19. 20. 26. 27. 28. 1. - HP Workstation x1000 | hp workstation x1000 - technical reference guide - Page 209
x1000 service information exploded view and part numbers Table A-8 HP Workstation x1000 Parts List Item Description System Board 1 x1000 System Board N/A Control Cable kit 4 3 volt Lithium Battery 10K rpm 26 HDD Rail Kit 9 IDE Data Cable Memory 10 128MB PC133 ECC SDRAM 10 256MB PC133 ECC SDRAM - HP Workstation x1000 | hp workstation x1000 - technical reference guide - Page 210
x1000 service information exploded view and part numbers Table A-8 HP Workstation x1000 Parts List Item Description Power Scroll Mouse Audio 14 Audio cable Chassis and Bezels 17 HP workstation top bezel 16 HP workstation bottom bezel Exchange Part Replacement Number Part Number N/A 0950 - HP Workstation x1000 | hp workstation x1000 - technical reference guide - Page 211
x1000 service information exploded view and part numbers Table A-8 HP Workstation x1000 Parts List Item Description 19 HP workstation side cover 18 HP workstation chassis 23 Keylock assembly Exchange Part Replacement Number Part Number N/A A7777-62009 N/A A7777-62001 N/A 5064-9154 - HP Workstation x1000 | hp workstation x1000 - technical reference guide - Page 212
x1000 service information exploded view and part numbers 212 Appendix A
-
 1
1 -
 2
2 -
 3
3 -
 4
4 -
 5
5 -
 6
6 -
 7
7 -
8
-
9
-
10
-
11
-
12
-
13
-
14
-
15
-
16
-
17
-
18
-
19
-
20
-
21
-
22
-
23
-
24
-
25
-
26
-
27
-
28
-
29
-
30
-
31
-
32
-
33
-
34
-
35
-
36
-
37
-
38
-
39
-
40
-
41
-
42
-
43
-
44
-
45
-
46
-
47
-
48
-
49
-
50
-
51
-
52
-
53
-
54
-
55
-
56
-
57
-
58
-
59
-
60
-
61
-
62
-
63
-
64
-
65
-
66
-
67
-
68
-
69
-
70
-
71
-
72
-
73
-
74
-
75
-
76
-
77
-
78
-
79
-
80
-
81
-
82
-
83
-
84
-
85
-
86
-
87
-
88
-
89
-
90
-
91
-
92
-
93
-
94
-
95
-
96
-
97
-
98
-
99
-
100
-
101
-
102
-
103
-
104
-
105
-
106
-
107
-
108
-
109
-
110
-
111
-
112
-
113
-
114
-
115
-
116
-
117
-
118
-
119
-
120
-
121
-
122
-
123
-
124
-
125
-
126
-
127
-
128
-
129
-
130
-
131
-
132
-
133
-
134
-
135
-
136
-
137
-
138
-
139
-
140
-
141
-
142
-
143
-
144
-
145
-
146
-
147
-
148
-
149
-
150
-
151
-
152
-
153
-
154
-
155
-
156
-
157
-
158
-
159
-
160
-
161
-
162
-
163
-
164
-
165
-
166
-
167
-
168
-
169
-
170
-
171
-
172
-
173
-
174
-
175
-
176
-
177
-
178
-
179
-
180
-
181
-
182
-
183
-
184
-
185
-
186
-
187
-
188
-
189
-
190
-
191
-
192
-
193
-
194
-
195
-
196
-
197
-
198
-
199
-
200
-
201
-
202
-
203
-
204
-
205
-
206
-
207
-
208
-
209
-
210
-
211
-
212
 |
 |

technical reference
hp workstation x1000
Manufacturing Part Number: n.a.
Edition E1001
© Copyright 2001 Hewlett-Packard Company.