Hitachi DZ-BX35A Owners Guide - Page 141
During recording - repair manual
 |
View all Hitachi DZ-BX35A manuals
Add to My Manuals
Save this manual to your list of manuals |
Page 141 highlights
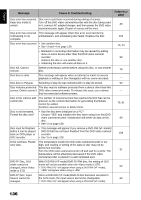
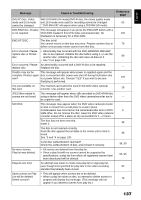
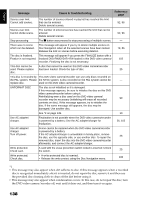
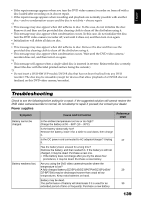
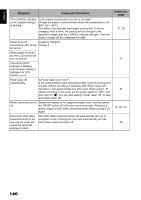
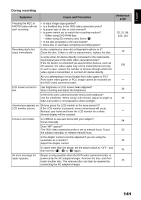
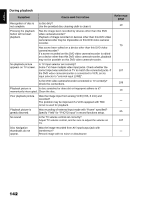
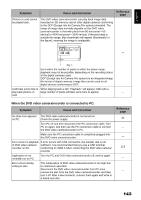
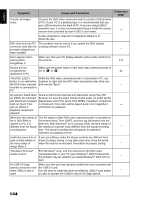
English During recording Symptom Cause and Correction Pressing the REC or PHOTO button will not start recording. • Is input image copy-guarded? • Is a finalized disc in the DVD video camera/recorder? • Is proper type of disc or card inserted? • Is power switch set to match the recording medium? − When using DVD-RAM disc. − When using SD memory card: Set to "P". • Is the disc protected or the card locked? • Does disc or card have remaining recording space? Recording starts but stops immediately. Is disc scratched or does dirt or fingerprint adhere to it? Clean the disc. If there is still no improvement, replace the disc. Is some other AV device directly connected to the video/audio input/output jack of this DVD video camera/recorder? If the AV device is connected via several other devices, such as AV selector, the video signal may not be transmitted incorrectly. In such a case, reduce the number of devices through which the video signal is transmitted, or connect AV device directly. Are you attempting to record image from video game or PC? From some video games or PCs, image cannot be recorded on this DVD video camera/recorder. LCD screen is hard to Has brightness of LCD screen been adjusted? see. Stop recording and adjust the brightness. Is the DVD video camera/recorder being used outdoors? Use the viewfinder. When using LCD monitor, adjust its angle so that LCD screen is not exposed to direct sunlight. Unevenness appears on Did you press the LCD monitor or the area around it? LCD monitor screen. If the LCD monitor is pressed, some unevenness will occur. Release your hand and leave the LCD monitor for a while: Normal display will be restored. Focus is not correct. Is it difficult to use auto focus with your subject? Focus manually. Does "MF" appear? The DVD video camera/recorder is set to manual focus. Focus the subject manually, or release manual focus. Is the diopter control correctly adjusted if you are using the viewfinder as a monitor? Adjust the diopter control. In cases other than the above, set the power switch to "OFF", and then set it to "O", "N" or "P" again. An error message for repair appears. Repair is only possible when the DVD video camera/recorder is powered by the AC adapter/charger. Remove the disc, and then insert another disc: The removed disc can later be repaired by connecting the AC adapter/charger. Reference page 25, 31, 86, 100, 110 10 109 - 36 32 - 54 53 32 31 26 141
-
 1
1 -
2
-
3
-
4
-
5
-
6
-
7
-
8
-
9
-
10
-
11
-
12
-
13
-
14
-
15
-
16
-
17
-
18
-
19
-
20
-
21
-
22
-
23
-
24
-
25
-
26
-
27
-
28
-
29
-
30
-
31
-
32
-
33
-
34
-
35
-
36
-
37
-
38
-
39
-
40
-
41
-
42
-
43
-
44
-
45
-
46
-
47
-
48
-
49
-
50
-
51
-
52
-
53
-
54
-
55
-
56
-
57
-
58
-
59
-
60
-
61
-
62
-
63
-
64
-
65
-
66
-
67
-
68
-
69
-
70
-
71
-
72
-
73
-
74
-
75
-
76
-
77
-
78
-
79
-
80
-
81
-
82
-
83
-
84
-
85
-
86
-
87
-
88
-
89
-
90
-
91
-
92
-
93
-
94
-
95
-
96
-
97
-
98
-
99
-
100
-
101
-
102
-
103
-
104
-
105
-
106
-
107
-
108
-
109
-
110
-
111
-
112
-
113
-
114
-
115
-
116
-
117
-
118
-
119
-
120
-
121
-
122
-
123
-
124
-
125
-
126
-
127
-
128
-
129
-
130
-
131
-
132
-
133
-
134
-
135
-
 136
136 -
 137
137 -
 138
138 -
 139
139 -
 140
140 -
 141
141 -
 142
142 -
 143
143 -
 144
144 -
 145
145 -
 146
146 -
147
-
148
-
149
-
150
-
151
-
152
-
153
-
154
-
155
-
156
-
157
-
158
-
159
-
160
-
161
-
162
-
163
-
164
-
165
-
166
 |
 |