Hitachi DZ-BX35A Owners Guide - Page 66
Using External Microphone - video cable
 |
View all Hitachi DZ-BX35A manuals
Add to My Manuals
Save this manual to your list of manuals |
Page 66 highlights
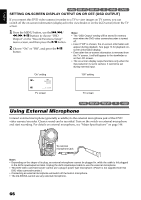
English 12/3 SETTING ON-SCREEN DISPLAY OUTPUT ON OR OFF (OSD OUTPUT) If you connect this DVD video camera/recorder to a TV to view images on TV screen, you can switch off the on-screen information (displayed in the viewfinder or on the LCD screen) from the TV screen. 1 Press the MENU button, use the f/e/ d/c/A buttons to choose "OSD Output" on the "Record Functions Setup" menu screen, and then press the A button. 2 Choose "On" or "Off", and press the A button. Note: • The "OSD Output" setting will be stored in memory even when the DVD video camera/recorder is turned off. • Even if "Off" is chosen, the on-screen information will appear during playback. See page 74 for playback onscreen information display. • Even after the on-screen information is removed from the TV screen, it will still appear in the viewfinder or on the LCD screen. • The on-screen display output functions only when the input selection is set to camera: It cannot be set during external input. "On" setting 0:00:00 REM 3 0 MIN FINE 8 : 0 0 AM 9/3 0 /2006 TV screen "Off" setting TV screen 12/ Using External Microphone Connect external microphone (generally available) to the external microphone jack of this DVD video camera/recorder. Clearer sound can be recorded. Turn on the switch on external microphone and start recording. For details on external microphone, see "Major Specifications" on page 148. To external microphone jack Note: • Depending on the shape of its plug, an external microphone cannot be plugged in, while the cable is left plugged in the AV/S input/output terminal. Unplug the AV/S input/output cable to use the external microphone. • This DVD video camera/recorder cannot use a plug-in power type microphone. (Power is not supplied from this DVD video camera/recorder.) • Connecting an external microphone will switch off the built-in microphone. • The DZ-BX35A cannot use any external microphone. 66
-
 1
1 -
2
-
3
-
4
-
5
-
6
-
7
-
8
-
9
-
10
-
11
-
12
-
13
-
14
-
15
-
16
-
17
-
18
-
19
-
20
-
21
-
22
-
23
-
24
-
25
-
26
-
27
-
28
-
29
-
30
-
31
-
32
-
33
-
34
-
35
-
36
-
37
-
38
-
39
-
40
-
41
-
42
-
43
-
44
-
45
-
46
-
47
-
48
-
49
-
50
-
51
-
52
-
53
-
54
-
55
-
56
-
57
-
58
-
59
-
60
-
 61
61 -
 62
62 -
 63
63 -
 64
64 -
 65
65 -
 66
66 -
 67
67 -
 68
68 -
 69
69 -
 70
70 -
 71
71 -
72
-
73
-
74
-
75
-
76
-
77
-
78
-
79
-
80
-
81
-
82
-
83
-
84
-
85
-
86
-
87
-
88
-
89
-
90
-
91
-
92
-
93
-
94
-
95
-
96
-
97
-
98
-
99
-
100
-
101
-
102
-
103
-
104
-
105
-
106
-
107
-
108
-
109
-
110
-
111
-
112
-
113
-
114
-
115
-
116
-
117
-
118
-
119
-
120
-
121
-
122
-
123
-
124
-
125
-
126
-
127
-
128
-
129
-
130
-
131
-
132
-
133
-
134
-
135
-
136
-
137
-
138
-
139
-
140
-
141
-
142
-
143
-
144
-
145
-
146
-
147
-
148
-
149
-
150
-
151
-
152
-
153
-
154
-
155
-
156
-
157
-
158
-
159
-
160
-
161
-
162
-
163
-
164
-
165
-
166
 |
 |
