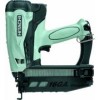
Hitachi NT65GS Instruction Manual - Page 22
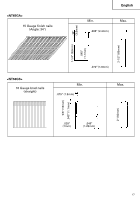
Preparing The Battery, Testing The Nailer - 2 1 2 gas powered
 |
UPC - 717709010864
View all Hitachi NT65GS manuals
Add to My Manuals
Save this manual to your list of manuals |
Page 22 highlights
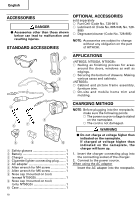
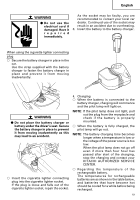
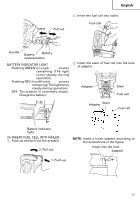
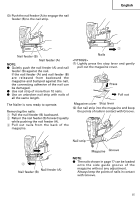
English (2) Press forward (stem side) and downward on the front side of the metering valve. The machine employs a preventive mechanism for unloaded operation. The machine enters a state where the push lever cannot be pushed up. This takes place when the magazine is not loaded with nails or when the remaining number of nails becomes less than 6 or 9. (3) Press downward on the rear of the metering valve until it seals. Check the metering valve: Press the metering valve stem on fuel cell two or three times against a stationary object and release. If gas is not dispersed, fuel cell is empty. Replace it. Observe Safety Regulations. The fuel cell is now ready to insert into the Nailer. PREPARING THE BATTERY Read section titled "SAFETY, IMPORTANT SAFETY INSTRUCTIONS FOR BATTERY CHARGER" (page 10). You must charge the battery before use. The charging method of battery is shown in page 18 - 20. CAUTION ⅷ Use caution not to throw the push lever tip onto wood. Before actually beginning the nailing work, test the Nailer by using the checklist below. Conduct the tests in the following order. If abnormal operation occurs, stop using the Nailer and contact a Hitachi authorized service center immediately. (1) REMOVE ALL NAILS, FUEL CELL AND BATTERY FROM NAILER. Ⅺ ALL SCREWS MUST BE TIGHTENED. Ⅺ THE PUSH LEVER AND TRIGGER MUST MOVE SMOOTHLY with pulling back the nail feeder (B). (NT50GS: Unnecessary to pulling back nail feeder) Trigger TESTING THE NAILER DANGER ⅷ Operators and others in work area MUST wear safety glasses with side shields which conforms to ANSI Z87.1 specifications. WARNING ⅷ Never use Nailer unless push lever is operating properly. 22 Push lever Nail feeder (B) (2) Installing the battery. Do not operate the push lever or trigger while installing the battery. Make sure the battery indicator light is flashing green. If the battery indicator light is flashing red, the battery doesn't have enough power and it needs to be charged.
-
 1
1 -
2
-
3
-
4
-
5
-
6
-
7
-
8
-
9
-
10
-
11
-
12
-
13
-
14
-
15
-
16
-
 17
17 -
 18
18 -
 19
19 -
 20
20 -
 21
21 -
 22
22 -
 23
23 -
 24
24 -
 25
25 -
 26
26 -
 27
27 -
28
-
29
-
30
-
31
-
32
-
33
-
34
-
35
-
36
-
37
-
38
-
39
-
40
-
41
-
42
-
43
-
44
-
45
-
46
-
47
-
48
-
49
-
50
-
51
-
52
-
53
-
54
-
55
-
56
-
57
-
58
-
59
-
60
-
61
-
62
-
63
-
64
-
65
-
66
-
67
-
68
-
69
-
70
-
71
-
72
-
73
-
74
-
75
-
76
-
77
-
78
-
79
-
80
-
81
-
82
-
83
-
84
-
85
-
86
-
87
-
88
-
89
-
90
-
91
-
92
-
93
-
94
-
95
-
96
-
97
-
98
-
99
-
100
-
101
-
102
-
103
-
104
-
105
-
106
-
107
-
108
-
109
-
110
-
111
-
112
 |
 |
