Honeywell HJK7000 User Guide - Page 36
Step 2: Set and Con for an Ethernet Connection,
 |
View all Honeywell HJK7000 manuals
Add to My Manuals
Save this manual to your list of manuals |
Page 36 highlights
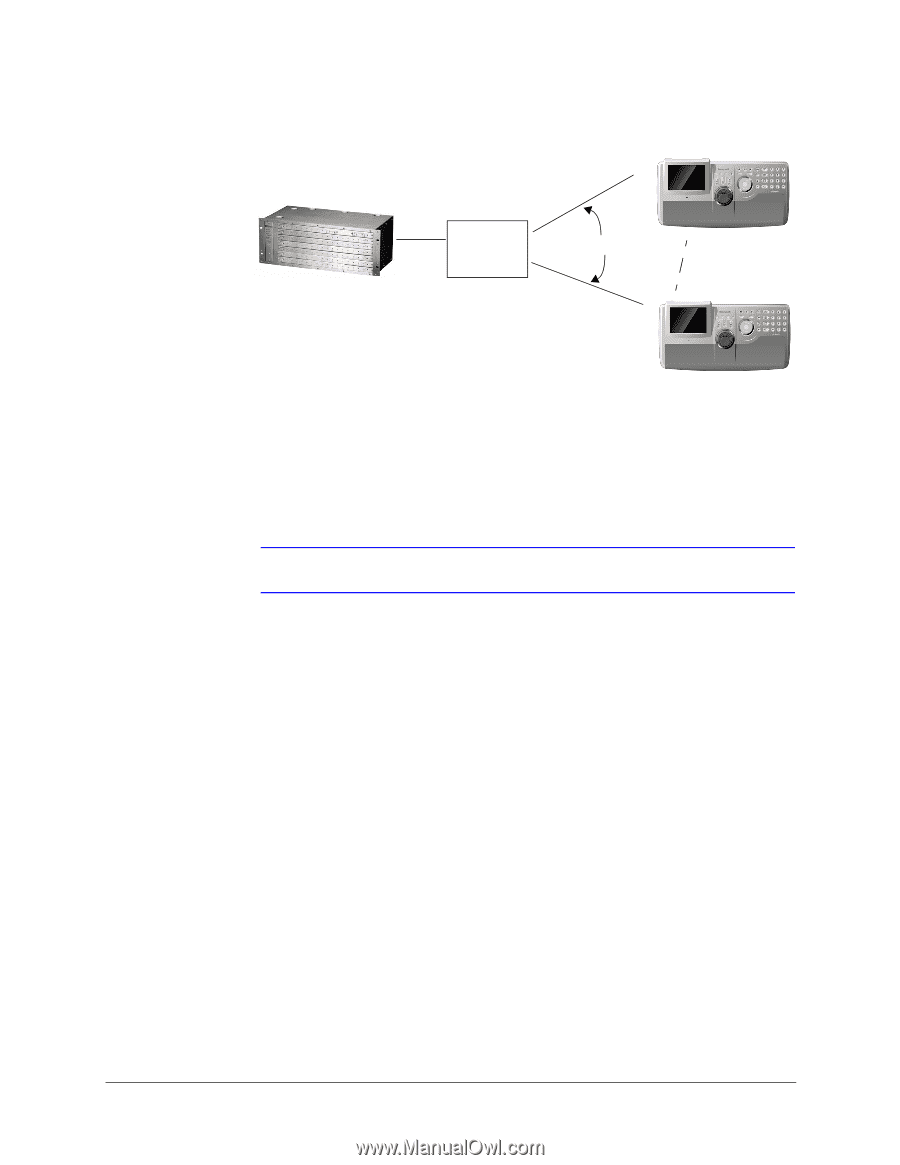
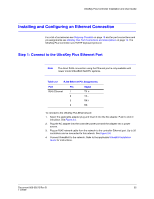
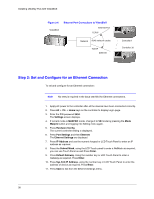
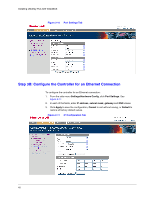
Installing UltraKey Plus with VideoBloX Figure 2-6 VideoBloX Ethernet Port Connections to VideoBloX Ethernet Port TCP/IP Network RJ45 network cables TCP/IP Ethernet Controller 1 Controller 32 Step 2: Set and Configure for an Ethernet Connection To set and configure for an Ethernet connection: Note No entry is required in the baud rate field for Ethernet connections. 1. Apply AC power to the controller after all the devices have been connected correctly. 2. Press Alt + Clr + Home keys on the controller to display Login page. 3. Enter the PIN password 3434. The Settings screen displays. 4. If current mode is MAXPRO mode, change it to VB mode by pressing the Mode Maxpro button and logging into Setting menu again. 5. Press Hardware Config. The current controller setting is displayed. 6. Press Port Settings and then Ethernet. The Ethernet Settings are displayed. 7. Press IP Address and use the numeric keypad or LCD Touch Panel to enter an IP address as required. 8. Press the Subnet Mask, using the LCD Touch panel to enter a NetMask as required, you can use Touch Panel as well.Press Enter. 9. Press Default Gateway. Using the number key or LCD Touch Panel to enter a Gateway as required. Press Enter. 10. Press Sys.Cntl.IP Address, using the number key or LCD Touch Panel to enter the address of device as required. Press Enter. 11. Press Save to exit from the Ethernet Settings menu. 36
-
 1
1 -
2
-
3
-
4
-
5
-
6
-
7
-
8
-
9
-
10
-
11
-
12
-
13
-
14
-
15
-
16
-
17
-
18
-
19
-
20
-
21
-
22
-
23
-
24
-
25
-
26
-
27
-
28
-
29
-
30
-
 31
31 -
 32
32 -
 33
33 -
 34
34 -
 35
35 -
 36
36 -
 37
37 -
 38
38 -
 39
39 -
 40
40 -
 41
41 -
42
-
43
-
44
-
45
-
46
-
47
-
48
-
49
-
50
-
51
-
52
-
53
-
54
-
55
-
56
-
57
-
58
-
59
-
60
-
61
-
62
-
63
-
64
-
65
-
66
-
67
-
68
-
69
-
70
-
71
-
72
-
73
-
74
 |
 |