Honeywell HJK7000 User Guide - Page 43
Installing and Configuring a Serial Connection, Step 1: Connect to the UltraKey Plus Using the Serial Port
 |
View all Honeywell HJK7000 manuals
Add to My Manuals
Save this manual to your list of manuals |
Page 43 highlights
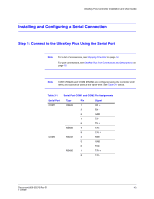
UltraKey Plus Controller Installation and User Guide Installing and Configuring a Serial Connection Step 1: Connect to the UltraKey Plus Using the Serial Port Note For a list of accessories, see Shipping Checklist on page 18. For port connections, see UltraKey Plus Port Connections and Descriptions on page 19. Note COM1 (RS422) and COM2 (RS232) are configured using the controller LCD menu and cannot be used at the same time. See Table 3-1 below. Table 3-1 Serial Port COM1 COM2 Serial Port COM1 and COM2 Pin Assignments Type Pin RS422 1 2 5 7 8 RS485 7 8 RS232 4 5 6 RS485 1 2 Signal RX + RX GND TX TX + T/R T/R + RXD GND TXD T/R + T/R - Document 800-02573 Rev B 43 11/2009
-
 1
1 -
2
-
3
-
4
-
5
-
6
-
7
-
8
-
9
-
10
-
11
-
12
-
13
-
14
-
15
-
16
-
17
-
18
-
19
-
20
-
21
-
22
-
23
-
24
-
25
-
26
-
27
-
28
-
29
-
30
-
31
-
32
-
33
-
34
-
35
-
36
-
37
-
 38
38 -
 39
39 -
 40
40 -
 41
41 -
 42
42 -
 43
43 -
 44
44 -
 45
45 -
 46
46 -
 47
47 -
 48
48 -
49
-
50
-
51
-
52
-
53
-
54
-
55
-
56
-
57
-
58
-
59
-
60
-
61
-
62
-
63
-
64
-
65
-
66
-
67
-
68
-
69
-
70
-
71
-
72
-
73
-
74
 |
 |

UltraKey Plus Controller Installation and User Guide
Document 800-02573 Rev B
43
11/2009
Installing and Configuring a Serial Connection
Step 1: Connect to the UltraKey Plus Using the Serial Port
Note
For a list of accessories, see
Shipping Checklist
on page
18
.
For port connections, see
UltraKey Plus Port Connections and Descriptions
on
page
19
.
Note
COM1 (RS422) and COM2 (RS232) are configured using the controller LCD
menu and cannot be used at the same time. See
Table 3-1
below.
Table 3-1
Serial Port COM1 and COM2 Pin Assignments
Serial Port
Type
Pin
Signal
COM1
RS422
1
RX +
2
RX -
5
GND
7
TX -
8
TX +
RS485
7
T/R -
8
T/R +
COM2
RS232
4
RXD
5
GND
6
TXD
RS485
1
T/R +
2
T/R -