Husqvarna AUTOMOWER 535 AWD Owner Manual - Page 22
To install the charging station, Risk of Electric Shock.
 |
View all Husqvarna AUTOMOWER 535 AWD manuals
Add to My Manuals
Save this manual to your list of manuals |
Page 22 highlights
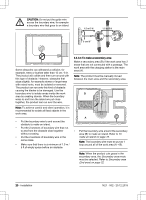
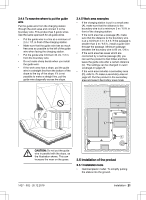
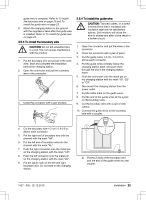
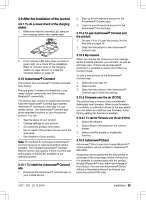
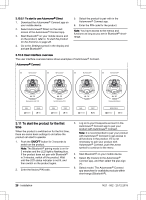
• Combination pliers: For cutting the boundary wire and pressing the connectors together. • Adjustable plier: For pressing the couplers together. • Edge cutter/straight spade: To bury the boundary wire. 3.5.2 To install the charging station WARNING: Obey national regulations about electrical safety. WARNING: The product is only to be used with the power supply unit supplied by Husqvarna. WARNING: Do not put the power supply at a height where there is a risk it can be put in water. Do not put the power supply on the ground. WARNING: Do not encapsulate the power supply. Condensed water can harm the power supply and increase the risk of electrical shock. CAUTION: The power supply cable and extension cable must be outside the work area to avoid damage to the cables. When connecting the power supply, only use a wall socket that is connected to an earth faultbreaker (RCD). 1. Read and understand the instructions about the charging station. Refer to To examine where to put the charging station on page 16. 2. Put the charging station in the selected area. Note: Do not attach the screws for the charging station to the ground until the guide wire is installed. Refer to To install the guide wire on page 23. 3. Connect the low-voltage cable to the charging station. 4. Put the power supply at a minimum height of 30 cm / 12 in. WARNING: Risk of Electric Shock. Install only to an earth fault breaker (RCD) when connecting the power supply to the wall socket. Applicable to USA/Canada. If power supply is installed outdoors: Risk of Electric Shock. Install only to a covered Class A GFCI receptacle (RCD) that has an enclosure that is weatherproof with the attachment plug cap inserted or removed. CAUTION: Do not make new holes in the charging station plate. CAUTION: Do not put your feet on the baseplate of the charging station. min 30 cm / 12" 5. Connect the power supply cable to a 100-240V power outlet. Note: When the charging station is connected, it is possible to charge the product. Place the product in the charging station while the boundary and guide wires are being laid. Switch on the product. Refer to To switch on the product on page 32. Do not continue with any product settings before the installation is complete. 6. Put the low-voltage cable in the ground with stakes or bury the cable. Refer to To put the wire into position with stakes on page 24 or To bury the boundary wire or the guide wire on page 24. 7. Connect the wires to the charging station after the installation of boundary wire and 22 - Installation 1427 - 002 - 20.12.2019
-
 1
1 -
2
-
3
-
4
-
5
-
6
-
7
-
8
-
9
-
10
-
11
-
12
-
13
-
14
-
15
-
16
-
 17
17 -
 18
18 -
 19
19 -
 20
20 -
 21
21 -
 22
22 -
 23
23 -
 24
24 -
 25
25 -
 26
26 -
 27
27 -
28
-
29
-
30
-
31
-
32
-
33
-
34
-
35
-
36
-
37
-
38
-
39
-
40
-
41
-
42
-
43
-
44
-
45
-
46
-
47
-
48
-
49
-
50
-
51
-
52
-
53
-
54
-
55
-
56
-
57
-
58
-
59
-
60
-
61
-
62
-
63
-
64
 |
 |
