Husqvarna XciteZ380 Owner Manual - Page 17
To operate the headlights, To operate the product, To start the engine on,
 |
View all Husqvarna XciteZ380 manuals
Add to My Manuals
Save this manual to your list of manuals |
Page 17 highlights
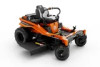
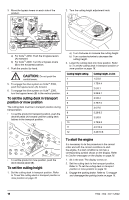
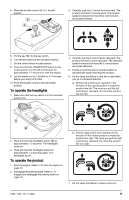
4. Move the throttle control (A) to ½ throttle position. B A 3. Carefully push the 2 control levers forward. The product will start to move forward. The forward speed increases the more the 2 control levers are pushed forward. 5. Put the key (B) into the key switch. 6. Turn the key switch to the unlocked position. 7. Set the control levers in park position. 8. Push and hold the START/STOP button on the control panel or on the left control lever for approximately 1-2 seconds to start the engine. 9. Let the engine run at ½ throttle for 3-5 minutes before you apply full throttle. 10. Push the throttle control to the full throttle position. To operate the headlights 1. Make sure that the key switch is in the unlocked position (A). 4. Carefully pull the 2 control levers rearward. The product will start to move rearward. The rearward speed increases the more the 2 control levers are pulled rearward. 5. Put the 2 control levers in neutral position to decrease the speed and stop the product. 6. Do the steps that follow to turn left or right when you go in a forward direction. a) Pull the left control lever rearward in the direction of the neutral position to make the product turn left. The more you pull the left control lever rearward, the more the product will turn left. A B 2. Push and hold the headlights button (B) for approximately 1-2 seconds. The headlights come on. 3. Push and hold the headlights button for approximately 1-2 seconds again. The headlights go off. To operate the product 1. Start the engine. Refer to To start the engine on page 16. 2. Disengage the parking brake. Refer to To engage and disengage the parking brake on page 15. b) Pull the right control lever rearward in the direction of the neutral position to make the product turn right. The more you pull the right control lever rearward, the more the product will turn right. 7. Do the steps that follow to make a zero turn. 1922 - 002 - 03.11.2022 17
-
 1
1 -
2
-
3
-
4
-
5
-
6
-
7
-
8
-
9
-
10
-
11
-
 12
12 -
 13
13 -
 14
14 -
 15
15 -
 16
16 -
 17
17 -
 18
18 -
 19
19 -
 20
20 -
 21
21 -
 22
22 -
23
-
24
-
25
-
26
-
27
-
28
-
29
-
30
-
31
-
32
-
33
-
34
-
35
-
36
-
37
-
38
-
39
-
40
-
41
-
42
-
43
-
44
-
45
-
46
-
47
-
48
-
49
-
50
-
51
-
52
-
53
-
54
-
55
-
56
-
57
-
58
-
59
-
60
-
61
-
62
-
63
-
64
-
65
-
66
-
67
-
68
-
69
-
70
-
71
-
72
-
73
-
74
-
75
-
76
-
77
-
78
-
79
-
80
-
81
-
82
-
83
-
84
-
85
-
86
-
87
-
88
-
89
-
90
-
91
-
92
-
93
-
94
-
95
-
96
-
97
-
98
-
99
-
100
-
101
-
102
-
103
-
104
-
105
-
106
-
107
-
108
-
109
-
110
-
111
-
112
-
113
-
114
-
115
-
116
 |
 |
