Husqvarna XciteZ380 Owner Manual - Page 22
To do an emergency start of the engine, To connect the jumper cables
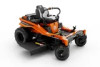 |
View all Husqvarna XciteZ380 manuals
Add to My Manuals
Save this manual to your list of manuals |
Page 22 highlights
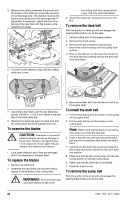
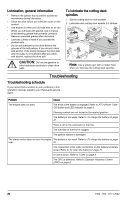
CAUTION: Do not use a boost charger or start booster. A boost charger or a start booster will cause damage to the electrical system of the product. • Always disconnect the battery charger before you start the engine. To do an emergency start of the engine If the battery is too weak to start the engine, you can use jumper cables to do an emergency start. This product has a 12 V system with negative ground. The product that is used for the emergency start must also have a 12 V system with negative ground. To connect the jumper cables WARNING: Risk of explosion because of explosive gas that comes from the battery. Do not connect the negative terminal of the fully charged battery to or near the negative terminal of the weak battery. 4. Connect the other end of the black cable to a CHASSIS GROUND (D), away from the fuel tank and the battery. To remove the jumper cables Note: Remove the jumper cables in the opposite sequence to how you connect them. 1. Remove the BLACK cable from the chassis. 2. Remove the BLACK cable from the fully charged battery. 3. Remove the RED cable from the 2 batteries. To remove and install the battery 1. Remove the battery compartment cover below the seat. 2. Remove the 2 screws (A) from the battery bracket (B) and remove the battery bracket. CAUTION: Do not use the battery of the product to start other vehicles. 1. Connect one end of the red cable to the POSITIVE battery terminal (+) on the weak battery (A). C B D A 2. Connect the other end of the red cable to the POSITIVE battery terminal (+) on the fully charged battery (B). WARNING: Do not short circuit the ends of the red cable against the chassis. 3. Connect one end of the black cable to the NEGATIVE battery terminal (-) on the fully charged battery (C). A B 3. Use a wrench to disconnect the black battery cable from the negative (-) terminal on the battery. 4. Use a wrench to disconnect the red battery cable from the positive (+) terminal on the battery. 5. Carefully remove the battery from the product. 6. Install in the opposite sequence. To adjust the tracking speed If the product does not move straight forward, the tracking speed must be adjusted. WARNING: Always adjust the tracking speed in an open area without bystanders. 1. Do a check of the tire pressure. Refer to Tire pressure on page 23. 2. Turn the tracking controls fully in. Refer to Product overview on page 3 for the location of the tracking controls. 3. Turn the tracking controls out 4 turns. 22 1922 - 002 - 03.11.2022
-
 1
1 -
2
-
3
-
4
-
5
-
6
-
7
-
8
-
9
-
10
-
11
-
12
-
13
-
14
-
15
-
16
-
 17
17 -
 18
18 -
 19
19 -
 20
20 -
 21
21 -
 22
22 -
 23
23 -
 24
24 -
 25
25 -
 26
26 -
 27
27 -
28
-
29
-
30
-
31
-
32
-
33
-
34
-
35
-
36
-
37
-
38
-
39
-
40
-
41
-
42
-
43
-
44
-
45
-
46
-
47
-
48
-
49
-
50
-
51
-
52
-
53
-
54
-
55
-
56
-
57
-
58
-
59
-
60
-
61
-
62
-
63
-
64
-
65
-
66
-
67
-
68
-
69
-
70
-
71
-
72
-
73
-
74
-
75
-
76
-
77
-
78
-
79
-
80
-
81
-
82
-
83
-
84
-
85
-
86
-
87
-
88
-
89
-
90
-
91
-
92
-
93
-
94
-
95
-
96
-
97
-
98
-
99
-
100
-
101
-
102
-
103
-
104
-
105
-
106
-
107
-
108
-
109
-
110
-
111
-
112
-
113
-
114
-
115
-
116
 |
 |
