IBM 8668 Hardware Maintenance Manual - Page 73
Memory modules, Notes, Save Settings.
 |
UPC - 087944723158
View all IBM 8668 manuals
Add to My Manuals
Save this manual to your list of manuals |
Page 73 highlights
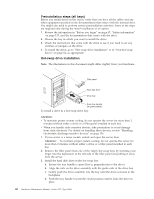
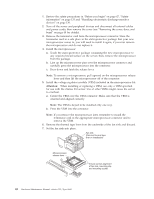
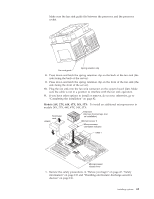
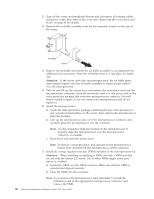
5. Slide the hot-swap expansion option into the bays, and attach it to the server with the screws provided in the kit. 6. Refer to the documentation provided with the option to complete the installation of the option. (See "System board internal cable connectors" on page 41 for locations of the cable connectors on the system board.) 7. If you have other options to install or remove, do so now; otherwise, go to "Completing the installation" on page 82. Memory modules Adding memory to your server is an easy way to make programs run faster. You can increase the amount of memory in your server by installing options called memory-module kits. Each kit contains one industry-standard, dual inline memory module (DIMM). Your server supports a two-way interleaved memory configuration. You must install matched pairs of memory kits. The set in slots 1 and 4 do not need to be the same size as the set in slots 2 and 3. Notes: 1. Your server comes with two DIMMs installed in DIMM connectors 1 and 4. Install additional DIMMs as instructed in the documentation that comes with your option. 2. Your xSeries 232 server supports 128 MB, 256 MB, 512 MB, and 1 GB DIMMs. You must install the DIMMs in pairs of the same size. Place pair 1 in slots 1 and 4 and pair 2 in slots 2 and 3. Refer to the ServerProven® list on the World Wide Web at http://www.ibm.com/pc/compat/ for information about memory modules for use with your server. 3. Installing or removing DIMMs changes the configuration information in the server. Therefore, after installing or removing a DIMM, you must save the new configuration information in the Configuration/Setup Utility program. When you restart the server, the system displays a message indicating that the memory configuration has changed. Start the Configuration/Setup Utility program and select Save Settings. Note: The illustrations in this document might differ slightly from your hardware. DIMM 1 DIMM 2 To install a DIMM: DIMM connector 4 (J4) DIMM connector 3 (J3) DIMM connector 2 (J2) DIMM connector 1 (J1) Installing options 65
-
 1
1 -
2
-
3
-
4
-
5
-
6
-
7
-
8
-
9
-
10
-
11
-
12
-
13
-
14
-
15
-
16
-
17
-
18
-
19
-
20
-
21
-
22
-
23
-
24
-
25
-
26
-
27
-
28
-
29
-
30
-
31
-
32
-
33
-
34
-
35
-
36
-
37
-
38
-
39
-
40
-
41
-
42
-
43
-
44
-
45
-
46
-
47
-
48
-
49
-
50
-
51
-
52
-
53
-
54
-
55
-
56
-
57
-
58
-
59
-
60
-
61
-
62
-
63
-
64
-
65
-
66
-
67
-
 68
68 -
 69
69 -
 70
70 -
 71
71 -
 72
72 -
 73
73 -
 74
74 -
 75
75 -
 76
76 -
 77
77 -
 78
78 -
79
-
80
-
81
-
82
-
83
-
84
-
85
-
86
-
87
-
88
-
89
-
90
-
91
-
92
-
93
-
94
-
95
-
96
-
97
-
98
-
99
-
100
-
101
-
102
-
103
-
104
-
105
-
106
-
107
-
108
-
109
-
110
-
111
-
112
-
113
-
114
-
115
-
116
-
117
-
118
-
119
-
120
-
121
-
122
-
123
-
124
-
125
-
126
-
127
-
128
-
129
-
130
-
131
-
132
-
133
-
134
-
135
-
136
-
137
-
138
-
139
-
140
-
141
-
142
-
143
-
144
-
145
-
146
-
147
-
148
-
149
-
150
-
151
-
152
-
153
-
154
-
155
-
156
-
157
-
158
-
159
-
160
-
161
-
162
-
163
-
164
-
165
-
166
-
167
-
168
-
169
-
170
-
171
-
172
-
173
-
174
-
175
-
176
-
177
-
178
 |
 |
