IBM 8863 Service Guide - Page 93
System-error, messages
 |
UPC - 000435474667
View all IBM 8863 manuals
Add to My Manuals
Save this manual to your list of manuals |
Page 93 highlights
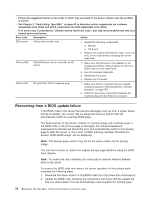
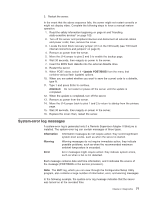
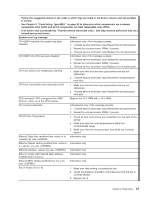
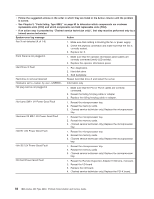
3. Restart the server. In the event that the above sequence fails, the server might not restart correctly or might not display video. Complete the following steps to force a manual restore operation: 1. Read the safety information beginning on page vii and "Handling static-sensitive devices" on page 100. 2. Turn off the server and peripheral devices and disconnect all external cables and power cords; then, remove the cover. 3. Locate the boot block recovery jumper (J14 on the I/O board) (see "I/O board internal connectors and jumpers" on page 8). 4. Remove ac power from the server. 5. Move the J14 jumper to pins 2 and 3 to enable the backup page. 6. Wait 30 seconds, then reapply ac power to the server. 7. Insert the BIOS flash diskette into the external diskette drive. 8. Restart the server. 9. When POST starts, select 1 - Update POST/BIOS from the menu that contains various flash (update) options. 10. When you are asked whether you want to save the current code to a diskette, type N. 11. Type 1 and press Enter to continue. Attention: Do not restart or power-off the server until the update is completed. 12. When the update is completed, turn off the server. 13. Remove ac power from the server. 14. Move the J14 jumper back to pins 1 and 2 to return to startup from the primary page. 15. Wait 30 seconds, then reapply ac power to the server. 16. Replace the cover; then, restart the server. System-error log messages A system-error log is generated only if a Remote Supervisor Adapter II SlimLine is installed. The system-error log can contain messages of three types: Information Information messages do not require action; they record significant system-level events, such as when the server is started. Warning Warning messages do not require immediate action; they indicate possible problems, such as when the recommended maximum ambient temperature is exceeded. Error Error messages might require action; they indicate system errors, such as when a fan is not detected. Each message contains date and time information, and it indicates the source of the message (POST/BIOS or the service processor). Note: The BMC log, which you can view through the Configuration/Setup Utility program, also contains a large number of information, error, and warning messages. In the following example, the system-error log message indicates that the server was turned on at the recorded time. Chapter 2. Diagnostics 77
-
 1
1 -
2
-
3
-
4
-
5
-
6
-
7
-
8
-
9
-
10
-
11
-
12
-
13
-
14
-
15
-
16
-
17
-
18
-
19
-
20
-
21
-
22
-
23
-
24
-
25
-
26
-
27
-
28
-
29
-
30
-
31
-
32
-
33
-
34
-
35
-
36
-
37
-
38
-
39
-
40
-
41
-
42
-
43
-
44
-
45
-
46
-
47
-
48
-
49
-
50
-
51
-
52
-
53
-
54
-
55
-
56
-
57
-
58
-
59
-
60
-
61
-
62
-
63
-
64
-
65
-
66
-
67
-
68
-
69
-
70
-
71
-
72
-
73
-
74
-
75
-
76
-
77
-
78
-
79
-
80
-
81
-
82
-
83
-
84
-
85
-
86
-
87
-
 88
88 -
 89
89 -
 90
90 -
 91
91 -
 92
92 -
 93
93 -
 94
94 -
 95
95 -
 96
96 -
 97
97 -
 98
98 -
99
-
100
-
101
-
102
-
103
-
104
-
105
-
106
-
107
-
108
-
109
-
110
-
111
-
112
-
113
-
114
-
115
-
116
-
117
-
118
-
119
-
120
-
121
-
122
-
123
-
124
-
125
-
126
-
127
-
128
-
129
-
130
-
131
-
132
-
133
-
134
-
135
-
136
-
137
-
138
-
139
-
140
-
141
-
142
-
143
-
144
-
145
-
146
-
147
-
148
-
149
-
150
-
151
-
152
-
153
-
154
-
155
-
156
-
157
-
158
-
159
-
160
-
161
-
162
-
163
-
164
-
165
-
166
-
167
-
168
-
169
-
170
-
171
-
172
 |
 |