IBM HS40 User Guide - Page 61
Installing, blade, server, BladeCenter
 |
UPC - 000435160188
View all IBM HS40 manuals
Add to My Manuals
Save this manual to your list of manuals |
Page 61 highlights
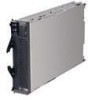
Attention: To help ensure proper cooling and system reliability the air baffle must be correctly positioned and fully seated. 4. Make sure that the air baffle covering microprocessor 1 and microprocessor 4, is positioned and pushed down so that both heat sink captive mounting screws are through the holes in the air baffle. Air baffle Microprocessor 1 and 4 heat sink captive mounting screws 5. Lower the cover so that the slots at the rear slide down onto the cover pins at the rear of the blade server, as shown in the illustration. 6. Pivot the cover to the closed position as shown in the illustration, until it clicks into place. Installing the blade server in the BladeCenter unit Note: The illustrations used in this procedure depict the installation process on a BladeCenter HS40 blade server in a BladeCenter Type 8677 unit. These illustrations might differ slightly from your hardware. However, this installation process is the same regardless of the BladeCenter unit. Blade server Filler blade Complete the following steps to install a blade server in the BladeCenter unit. Chapter 3. Installing options 47
-
 1
1 -
2
-
3
-
4
-
5
-
6
-
7
-
8
-
9
-
10
-
11
-
12
-
13
-
14
-
15
-
16
-
17
-
18
-
19
-
20
-
21
-
22
-
23
-
24
-
25
-
26
-
27
-
28
-
29
-
30
-
31
-
32
-
33
-
34
-
35
-
36
-
37
-
38
-
39
-
40
-
41
-
42
-
43
-
44
-
45
-
46
-
47
-
48
-
49
-
50
-
51
-
52
-
53
-
54
-
55
-
 56
56 -
 57
57 -
 58
58 -
 59
59 -
 60
60 -
 61
61 -
 62
62 -
 63
63 -
 64
64 -
 65
65 -
 66
66 -
67
-
68
-
69
-
70
-
71
-
72
-
73
-
74
-
75
-
76
-
77
-
78
-
79
-
80
-
81
-
82
-
83
-
84
-
85
-
86
-
87
-
88
-
89
-
90
-
91
-
92
-
93
-
94
-
95
-
96
-
97
-
98
-
99
-
100
-
101
-
102
-
103
-
104
-
105
-
106
-
107
-
108
-
109
-
110
-
111
-
112
-
113
-
114
-
115
-
116
-
117
-
118
-
119
-
120
 |
 |
