Insignia NS-R5101 User Manual (English) - Page 19
Modifying the speaker settings - problem
 |
View all Insignia NS-R5101 manuals
Add to My Manuals
Save this manual to your list of manuals |
Page 19 highlights
Insignia NS-R5101 5.1 Surround Sound A/V Receiver Input Video 1 Video 2 CD Default optical coaxial 1 coaxial 2 Note If DIGITAL IN is assigned to two input sources or more, when these input sources are selected, the digital audio signals can be heard from the same DIGITAL IN. Modifying auto surround Depending on how to select a surround mode, you can select the auto surround mode or the manual surround mode. • OFF (Manual surround mode)-You can select from the different surround modes selectable for the signal being input by using the SURROUND MODE ( / or >/
-
 1
1 -
2
-
3
-
4
-
5
-
6
-
7
-
8
-
9
-
10
-
11
-
12
-
13
-
 14
14 -
 15
15 -
 16
16 -
 17
17 -
 18
18 -
 19
19 -
 20
20 -
 21
21 -
 22
22 -
 23
23 -
 24
24 -
25
-
26
-
27
-
28
-
29
-
30
-
31
-
32
-
33
-
34
-
35
-
36
-
37
-
38
-
39
-
40
-
41
-
42
-
43
-
44
-
45
-
46
-
47
-
48
-
49
-
50
-
51
-
52
-
53
-
54
-
55
-
56
-
57
-
58
-
59
-
60
-
61
-
62
-
63
-
64
-
65
-
66
-
67
-
68
-
69
-
70
-
71
-
72
-
73
-
74
-
75
-
76
-
77
-
78
-
79
-
80
-
81
-
82
-
83
-
84
-
85
-
86
-
87
-
88
-
89
-
90
-
91
-
92
-
93
-
94
-
95
-
96
-
97
-
98
-
99
-
100
-
101
-
102
-
103
-
104
-
105
-
106
-
107
-
108
 |
 |

19
Insignia NS-R5101 5.1 Surround Sound A/V Receiver
www.insignia-products.com
Modifying auto surround
Depending on how to select a surround mode,
you can select the auto surround mode or the
manual surround mode.
•
OFF
(Manual surround mode)—You can
select from the different surround modes
selectable for the signal being input by using
the SURROUND MODE (
/
or >/<)
buttons. (For details, refer to “Enjoying
surround sound” on page 26.)
•
ON
(Auto surround mode)—The optimum
surround mode will be automatically selected
depending on the signal format being input.
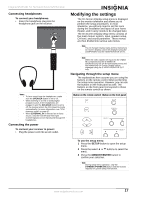
Modifying the speaker settings
After you have installed this receiver and
connected all the components, you should adjust
the speaker settings for the optimum sound
acoustics according to your environment and
speaker layout.
When you change speakers, speaker positions,
or the layout of your listening environment, you
should also adjust the speaker settings.
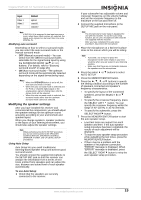
Using Auto Setup
Auto Setup lets you avoid troublesome
listening-based speaker setup and achieve good
surround sound.
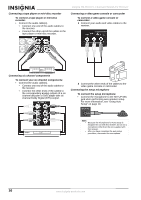
You should connect the supplied microphone to
the SETUP MIC jack so that this receiver can
analyze the information from a series of test
tones emitted from speakers and can adjust the
size, distance and sound level of each speaker
automatically.
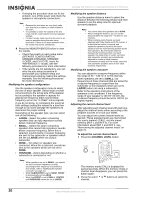
To use Auto Setup:
1
Check that the speakers are securely
connected to the receiver.
If your subwoofer has adjustable volume and
crossover frequency, set the volume halfway
and set the crossover frequency to the
maximum or the low pass filter off.
2
Connect the supplied microphone to the
SETUP MIC jack on the rear panel.
3
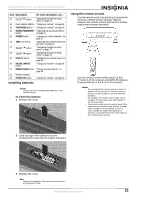
Place the microphone on a flat level surface
close to the area in which you will be sitting.
4
Press the select
or
buttons to select
AUTO SETUP.
5
Press the MEMORY/ENTER button.
6
Press the
,
,
, or
buttons to specify
the setting condition according to the number
of speakers connected and speaker’s
frequency characteristics.
•
To specify the layout of the connected
speakers, press the SELECT
or
button.
•
To specify the crossover frequency, press
the SELECT LEFT
button. You can
specify the crossover frequency within the
range of 40~130 Hz in 10 Hz intervals.
•
To specify the subwoofer, press the
SELECT RIGHT
button.
7
Press the MEMORY/ENTER button to start
the auto speaker setup.
•
Loud test tones are output from each
speaker and then. if the auto speaker
setup procedure has been completed, the
results of each adjustment will be
displayed.
•
To stop the auto speaker setup procedure
while outputting the test tones, press the
MEMORY/ENTER button.
•
If there may be a problem with the
speaker or microphone connection,
“ERROR” message is displayed. When
“ERROR” message is displayed, press
the SELECT RIGHT
button to retry the
auto speaker setup procedure.
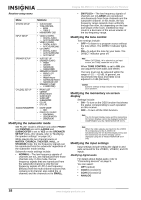
Input
Default
Video 1
optical
Video 2
coaxial 1
CD
coaxial 2
Note
If DIGITAL IN is assigned to two input sources or
more, when these input sources are selected, the
digital audio signals can be heard from the same
DIGITAL IN.
Notes
•
When the
SPEAKER
button is set to off, the
auto surround mode is invalid.
•
When the auto surround mode is selected and
the PCM (2 channel) digital signal or the
analog stereo signal is being input, only the
stereo mode will be selected.
•
When the auto surround mode is selected, the
surround modes other than the optimum
surround mode cannot be selected.
Note
When performing the AUTO SETUP procedure,
you do not need to perform the SPEAKER
CONFIGURATION, SPEAKER DISTANCE,
SPEAKER X-OVER, and CH LEVEL SETUP
procedures.
Note
The microphone for Auto Setup is designed for
use with this receiver. To use the auto setup
function, do not use a microphone other than the
one supplied with this receiver.
After you have completed the auto setup
procedure, disconnect the microphone.
Note
•
If possible, use a tripod to place the
microphone at the same height as your ears
would be when you are seated in your listening
position.
•
Make sure that there are no obstacles between
the speakers and the microphone.