Insignia NS-R5101 User Manual (English) - Page 20
LARGE, SMALL, YES/NONE, To adjust the current channel level, CHANNEL LEVEL - user manual
 |
View all Insignia NS-R5101 manuals
Add to My Manuals
Save this manual to your list of manuals |
Page 20 highlights
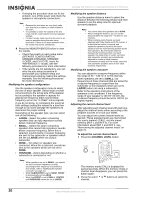
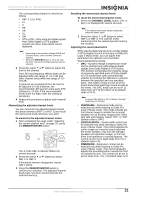
Insignia NS-R5101 5.1 Surround Sound A/V Receiver • If retrying the procedure dose not fix the problem, turn off the power and check the speaker or microphone connections. Note • • • Because the test tones are very loud, make sure that there no infants or small children in the room. It is possible to lower the volume of the test tones, but this could result in incorrect speaker settings. For best results, make sure that the room is as quiet as possible during the auto setup procedure. If there is too much ambient noise, the results may not be satisfactory. 8 Press the MEMORY/ENTER button to view the results. • Check the results on each setup menu (SPEAKER CONFIGURATION, SPEAKER DISTANCE, SPEAKER X-OVER, and CH LEVEL menu for "REFERENCE 1" mode). See the following procedures for more information. • If the results are not satisfactory, you can retry the auto setup procedure or personalize your speaker setup and channel level setup by making the settings manually. See the following procedures for more information. Modifying the speaker configuration Use the speaker configuration menu to select the size of each speaker. Select large or small not according to the actual size of the speaker but according to the speaker's capacity for playing low frequency (bass sound below frequency set on the "X-OVER" menu) signals. If you do not know, try comparing the sound at both settings (setting the volume to a level low enough so as not to damage the speakers) to determine the proper setting. Depending on the speaker type, you can select one of the following: • LARGE-Select this when connecting speakers that can fully reproduce sounds below crossover frequency. • SMALL-Select this when connecting speakers that cannot fully reproduce sounds below crossover frequency. When this is selected, sounds below crossover frequency are sent to the subwoofer or speakers which are set to LARGE when not using a subwoofer. • NONE- this when no speakers are connected. When this is selected, sounds are sent to the speakers which are not set to NONE. • YES/NONE-Select depending on whether a subwoofer is connected or not. Notes • When speakers are set to SMALL, you should set their crossover frequency correctly according to their frequency characteristics. (For details, refer to "Modifying the speaker crossover" on page 20.) • When SUBWOOFER is set to NONE, FRONT is automatically set to LARGE. • When the FRONT is set to SMALL, CENTER and SURROUND cannot be set to LARGE. Modifying the speaker distance Use the speaker distance menu to select the distance between the listening position and each speaker to set the delay time for optimum surround playback. Notes • You cannot select the speakers set to NONE. • When setting the distance, you can set the distance within the range of 0 ~ 30 feet in 1 foot intervals. • When enjoying multi-channel surround playback with Dolby Digital and DTS sources, it is ideal that the center, surround, and subwoofer speakers should be the same distance from the main listening position as the front speakers. By entering the distance between the listening position and each speaker, the delay times of center, surround, and subwoofer speakers are automatically adjusted to create an ideal listening environment virtually as if the center, surround, and subwoofer speakers were at their ideal locations respectively. Modifying the speaker crossover You can adjust the crossover frequency within the range of 40 ~ 130 Hz in 10 Hz intervals. When speakers are set to SMALL, low frequencies in those channels that are below the crossover frequency to output from the subwoofer or front speakers which are set to LARGE (when not using a subwoofer). Refer to the operating instructions of the speakers to be connected. If the frequency range of your speaker is 100 Hz~20 kHz, the crossover frequency should be set to 100 Hz (or slightly higher). Adjusting the current channel level After adjusting each channel level with test tone, adjust the channel levels either according to the program sources or to suit your tastes. You can adjust the current channel levels as desired. These adjusted levels are memorized into user's memory (CALI), not into preset memory (REF 1 and REF 2). For more information about REF 1 and REF 2, see "Memorizing the adjusted channel levels" on page 21. To adjust the current channel level: 1 Press the CHANNEL LEVEL button. OR The memory mode (CAL) is displayed for several seconds. When the memory mode or channel level disappears, you can press this button again. 2 Press the select or buttons to select the channel. 20 www.insignia-products.com
-
 1
1 -
2
-
3
-
4
-
5
-
6
-
7
-
8
-
9
-
10
-
11
-
12
-
13
-
14
-
 15
15 -
 16
16 -
 17
17 -
 18
18 -
 19
19 -
 20
20 -
 21
21 -
 22
22 -
 23
23 -
 24
24 -
 25
25 -
26
-
27
-
28
-
29
-
30
-
31
-
32
-
33
-
34
-
35
-
36
-
37
-
38
-
39
-
40
-
41
-
42
-
43
-
44
-
45
-
46
-
47
-
48
-
49
-
50
-
51
-
52
-
53
-
54
-
55
-
56
-
57
-
58
-
59
-
60
-
61
-
62
-
63
-
64
-
65
-
66
-
67
-
68
-
69
-
70
-
71
-
72
-
73
-
74
-
75
-
76
-
77
-
78
-
79
-
80
-
81
-
82
-
83
-
84
-
85
-
86
-
87
-
88
-
89
-
90
-
91
-
92
-
93
-
94
-
95
-
96
-
97
-
98
-
99
-
100
-
101
-
102
-
103
-
104
-
105
-
106
-
107
-
108
 |
 |