Intel E2180 Design Guide - Page 96
D.5.2, Thermocouple Attachment to the IHS
 |
UPC - 683728169121
View all Intel E2180 manuals
Add to My Manuals
Save this manual to your list of manuals |
Page 96 highlights
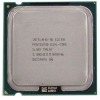
Case Temperature Reference Metrology Figure 7-17. Bending the Tip of the Thermocouple D.5.2 Thermocouple Attachment to the IHS 12. Clean groove and IHS with Isopropyl Alcohol (IPA) and a lint free cloth removing all residues prior to thermocouple attachment. 13. Place the thermocouple wire inside the groove; letting the exposed wire and bead extend about 1.5 mm [0.030 inch] past the end of groove. Secure it with Kapton* tape (Figure 7-18). Clean the IHS with a swab and IPA. 14. Verify under the microscope that the thermocouple wires are straight and parallel in the groove and that the bead is still bent. Figure 7-18. Securing Thermocouple Wires with Kapton* Tape Prior to Attach 15. Lift the wire at the middle of groove with tweezers and bend the front of wire to place the thermocouple in the groove ensuring the tip is in contact with the end and bottom of the groove in the IHS (Figure 7-19-A and B). 96 Thermal and Mechanical Design Guidelines
-
 1
1 -
2
-
3
-
4
-
5
-
6
-
7
-
8
-
9
-
10
-
11
-
12
-
13
-
14
-
15
-
16
-
17
-
18
-
19
-
20
-
21
-
22
-
23
-
24
-
25
-
26
-
27
-
28
-
29
-
30
-
31
-
32
-
33
-
34
-
35
-
36
-
37
-
38
-
39
-
40
-
41
-
42
-
43
-
44
-
45
-
46
-
47
-
48
-
49
-
50
-
51
-
52
-
53
-
54
-
55
-
56
-
57
-
58
-
59
-
60
-
61
-
62
-
63
-
64
-
65
-
66
-
67
-
68
-
69
-
70
-
71
-
72
-
73
-
74
-
75
-
76
-
77
-
78
-
79
-
80
-
81
-
82
-
83
-
84
-
85
-
86
-
87
-
88
-
89
-
90
-
 91
91 -
 92
92 -
 93
93 -
 94
94 -
 95
95 -
 96
96 -
 97
97 -
 98
98 -
 99
99 -
 100
100 -
 101
101 -
102
-
103
-
104
-
105
-
106
-
107
-
108
-
109
-
110
-
111
-
112
-
113
-
114
-
115
-
116
-
117
-
118
-
119
-
120
-
121
-
122
-
123
-
124
-
125
-
126
-
127
-
128
-
129
-
130
-
131
-
132
-
133
-
134
-
135
-
136
-
137
-
138
-
139
-
140
-
141
-
142
-
143
-
144
-
145
-
146
-
147
-
148
 |
 |
