Intel S1200RP Service Guide - Page 84
Processor Configuration, Back to, Serial Port Configuration, USB Configuration
 |
View all Intel S1200RP manuals
Add to My Manuals
Save this manual to your list of manuals |
Page 84 highlights
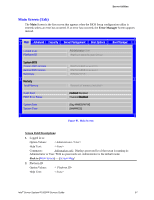
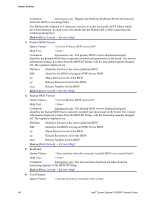
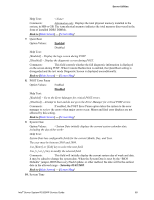
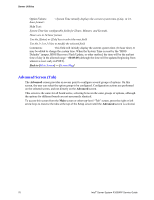
Server Utilities Back to [Advanced Screen] - [Screen Map] 5. Serial Port Configuration Option Values: Help Text: View/Configure serial port information and settings. Comments: Selection only. Select this line and press the key to go to the Serial Port Configuration group of configuration settings. Back to [Advanced Screen] - [Screen Map] 6. USB Configuration Option Values: Help Text: View/Configure USB information and settings. Comments: Selection only. Select this line and press the key to go to the USB Configuration group of configuration settings. Back to [Advanced Screen] - [Screen Map] 7. System Acoustic and Performance Configuration Option Values: Help Text: settings. View/Configure system acoustic and performance information and Comments: Selection only. Select this line and press the key to go to the System Acoustic and Performance Configuration group of configuration settings. Back to [Advanced Screen] - [Screen Map] 8. Network Stack Option Values: Help Text: Network Stack Settings. Comments: Selection only. Select this line and press the key to go to the NetWork Stack group of configuration settings. Back to [Advanced Screen] - [Screen Map] Processor Configuration The Processor Configuration screen displays the processor identification and microcode level, core frequency, cache sizes information for all processors currently installed. It also allows the user to enable or disable a number of processor options. To access this screen from the Main screen, select Advanced > Processor Configuration. To move to another screen, press the key to return to the Advanced screen, then select the desired screen. The Processor Configuration screen displays different fields for single-socket, 2- socket, and 4socket boards shown as the figure below. 72 Intel® Server System R1000RP Service Guide
-
 1
1 -
2
-
3
-
4
-
5
-
6
-
7
-
8
-
9
-
10
-
11
-
12
-
13
-
14
-
15
-
16
-
17
-
18
-
19
-
20
-
21
-
22
-
23
-
24
-
25
-
26
-
27
-
28
-
29
-
30
-
31
-
32
-
33
-
34
-
35
-
36
-
37
-
38
-
39
-
40
-
41
-
42
-
43
-
44
-
45
-
46
-
47
-
48
-
49
-
50
-
51
-
52
-
53
-
54
-
55
-
56
-
57
-
58
-
59
-
60
-
61
-
62
-
63
-
64
-
65
-
66
-
67
-
68
-
69
-
70
-
71
-
72
-
73
-
74
-
75
-
76
-
77
-
78
-
 79
79 -
 80
80 -
 81
81 -
 82
82 -
 83
83 -
 84
84 -
 85
85 -
 86
86 -
 87
87 -
 88
88 -
 89
89 -
90
-
91
-
92
-
93
-
94
-
95
-
96
-
97
-
98
-
99
-
100
-
101
-
102
-
103
-
104
-
105
-
106
-
107
-
108
-
109
-
110
-
111
-
112
-
113
-
114
-
115
-
116
-
117
-
118
-
119
-
120
-
121
-
122
-
123
-
124
-
125
-
126
-
127
-
128
-
129
-
130
-
131
-
132
-
133
-
134
-
135
-
136
-
137
-
138
-
139
-
140
-
141
-
142
-
143
-
144
-
145
-
146
-
147
-
148
-
149
-
150
-
151
-
152
-
153
-
154
-
155
-
156
-
157
-
158
-
159
-
160
-
161
-
162
-
163
-
164
-
165
-
166
-
167
-
168
-
169
-
170
-
171
 |
 |
