Intermec PM43/PM43c PM23c, PM43, and PM43c Mid-Range Printer User Manual - Page 48
Settings > Printing > Cutter, Automatic, After the printer finishes starting up, press
 |
View all Intermec PM43/PM43c manuals
Add to My Manuals
Save this manual to your list of manuals |
Page 48 highlights
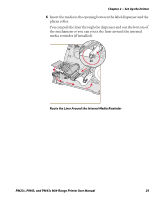
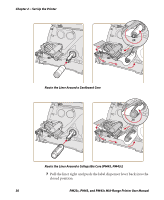
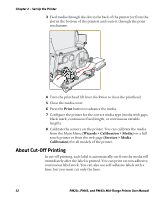
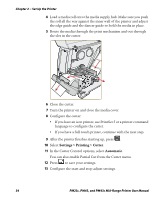
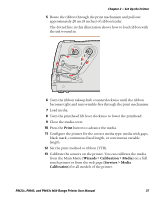
Chapter 2 - Set Up the Printer 4 Load a media roll onto the media supply hub. Make sure you push the roll all the way against the inner wall of the printer and adjust the edge guide and the dancer guide to hold the media in place. 5 Route the media through the print mechanism and out through the slot in the cutter. 6 Close the cutter. 7 Turn the printer on and close the media cover. 8 Configure the cutter: • If you have an icon printer, use PrintSet 5 or a printer command language to configure the cutter. • If you have a full touch printer, continue with the next step. 9 After the printer finishes starting up, press . 10 Select Settings > Printing > Cutter. 11 In the Cutter Control options, select Automatic. You can also enable Partial Cut from the Cutter menu. 12 Press to save your settings. 13 Configure the start and stop adjust settings. 34 PM23c, PM43, and PM43c Mid-Range Printer User Manual
-
 1
1 -
2
-
3
-
4
-
5
-
6
-
7
-
8
-
9
-
10
-
11
-
12
-
13
-
14
-
15
-
16
-
17
-
18
-
19
-
20
-
21
-
22
-
23
-
24
-
25
-
26
-
27
-
28
-
29
-
30
-
31
-
32
-
33
-
34
-
35
-
36
-
37
-
38
-
39
-
40
-
41
-
42
-
 43
43 -
 44
44 -
 45
45 -
 46
46 -
 47
47 -
 48
48 -
 49
49 -
 50
50 -
 51
51 -
 52
52 -
 53
53 -
54
-
55
-
56
-
57
-
58
-
59
-
60
-
61
-
62
-
63
-
64
-
65
-
66
-
67
-
68
-
69
-
70
-
71
-
72
-
73
-
74
-
75
-
76
-
77
-
78
-
79
-
80
-
81
-
82
-
83
-
84
-
85
-
86
-
87
-
88
-
89
-
90
-
91
-
92
-
93
-
94
-
95
-
96
-
97
-
98
-
99
-
100
-
101
-
102
-
103
-
104
-
105
-
106
-
107
-
108
-
109
-
110
-
111
-
112
-
113
-
114
-
115
-
116
-
117
-
118
-
119
-
120
-
121
-
122
-
123
-
124
-
125
-
126
-
127
-
128
-
129
-
130
-
131
-
132
-
133
-
134
-
135
-
136
-
137
-
138
-
139
-
140
-
141
-
142
-
143
-
144
-
145
-
146
-
147
-
148
-
149
-
150
-
151
-
152
-
153
-
154
-
155
-
156
-
157
-
158
-
159
-
160
-
161
-
162
-
163
-
164
-
165
-
166
-
167
-
168
 |
 |
