Intermec PM43/PM43c PM23c, PM43, and PM43c Mid-Range Printer User Manual - Page 53
About Test Labels, Print a Test Label with the Icon Printer
 |
View all Intermec PM43/PM43c manuals
Add to My Manuals
Save this manual to your list of manuals |
Page 53 highlights
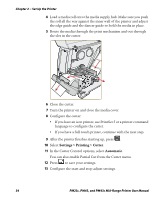
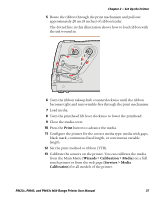
Chapter 2 - Set Up the Printer About Test Labels Print a test label after you have loaded media and ribbon to verify that you have installed everything correctly and also to get some important information about your printer. The way you print a test label is slightly different between the full touch and the icon printer. Please use the procedure for your printer. Print a Test Label with the Icon Printer When you turn on the icon printer, all of the LEDs on the display light up including the Ready-to-Work indicator. One by one, the LEDs turn off as the printer starts up. The first LED to turn off is the Ready-to-Work indicator. The LEDs then turn off following a sequence from the top left LED to the bottom right LED. 1 Connect the printer to power and turn on the printer. 2 The printer goes through its startup sequence and all of the LEDs light up. When the last two LEDs are lit (Printhead Hot and Maintenance), press and hold the Print button until the test label starts to print. 3 Release the Print button. The series of three test labels prints out. Print a Test Label with the Full Touch Printer The first time you turn on the full touch printer or reset to factory defaults, the printer runs a startup wizard to let you enter basic setup information. After the startup wizard finishes, the printer enters Ready mode where you can choose to access the Main Menu and print a test label. 1 Connect the printer to power and turn on the printer. 2 After the startup sequence finishes, the startup wizard begins. After you enter all of the information on the wizard screens, click No when prompted to run other wizards. 3 From the Ready screen, tap the Main Menu button on the status bar. PM23c, PM43, and PM43c Mid-Range Printer User Manual 39
-
 1
1 -
2
-
3
-
4
-
5
-
6
-
7
-
8
-
9
-
10
-
11
-
12
-
13
-
14
-
15
-
16
-
17
-
18
-
19
-
20
-
21
-
22
-
23
-
24
-
25
-
26
-
27
-
28
-
29
-
30
-
31
-
32
-
33
-
34
-
35
-
36
-
37
-
38
-
39
-
40
-
41
-
42
-
43
-
44
-
45
-
46
-
47
-
 48
48 -
 49
49 -
 50
50 -
 51
51 -
 52
52 -
 53
53 -
 54
54 -
 55
55 -
 56
56 -
 57
57 -
 58
58 -
59
-
60
-
61
-
62
-
63
-
64
-
65
-
66
-
67
-
68
-
69
-
70
-
71
-
72
-
73
-
74
-
75
-
76
-
77
-
78
-
79
-
80
-
81
-
82
-
83
-
84
-
85
-
86
-
87
-
88
-
89
-
90
-
91
-
92
-
93
-
94
-
95
-
96
-
97
-
98
-
99
-
100
-
101
-
102
-
103
-
104
-
105
-
106
-
107
-
108
-
109
-
110
-
111
-
112
-
113
-
114
-
115
-
116
-
117
-
118
-
119
-
120
-
121
-
122
-
123
-
124
-
125
-
126
-
127
-
128
-
129
-
130
-
131
-
132
-
133
-
134
-
135
-
136
-
137
-
138
-
139
-
140
-
141
-
142
-
143
-
144
-
145
-
146
-
147
-
148
-
149
-
150
-
151
-
152
-
153
-
154
-
155
-
156
-
157
-
158
-
159
-
160
-
161
-
162
-
163
-
164
-
165
-
166
-
167
-
168
 |
 |
