JVC DD-3 Instructions - Page 160
Confirm the values displayed in, Click [Cancel]., Slide the remote con, trol mode selector to, AUDIO].
 |
UPC - 046838029998
View all JVC DD-3 manuals
Add to My Manuals
Save this manual to your list of manuals |
Page 160 highlights
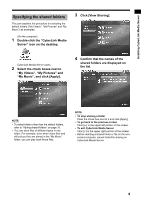
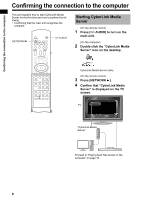
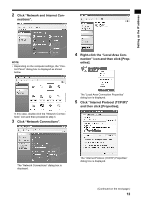
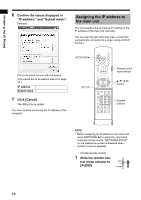
Setting up the IP address 6 Confirm the values displayed in "IP address:" and "Subnet mask:". Example: Assigning the IP address to the main unit This part explains the procedure for setting up the IP address of the main unit manually. You can skip this part when the main unit and the computer are connected to a router using a DHCP function. Fill out the blank column with the values. (The values are to be used in step 8 on page 15.) IP address Subnet mask . . . . . . 7 Click [Cancel]. The dialog box is closed. You have finished confirming the IP address of the computer. Remote control mode selector Number buttons NOTE • Before assigning the IP address to the main unit, press [NETWORK 3] to select the connected computer as the source. "NETWORK SETUP" on the preference screen is disabled when another source is selected. (On the remote control) 1 Slide the remote con- trol mode selector to [AUDIO]. 13
-
 1
1 -
2
-
3
-
4
-
5
-
6
-
7
-
8
-
9
-
10
-
11
-
12
-
13
-
14
-
15
-
16
-
17
-
18
-
19
-
20
-
21
-
22
-
23
-
24
-
25
-
26
-
27
-
28
-
29
-
30
-
31
-
32
-
33
-
34
-
35
-
36
-
37
-
38
-
39
-
40
-
41
-
42
-
43
-
44
-
45
-
46
-
47
-
48
-
49
-
50
-
51
-
52
-
53
-
54
-
55
-
56
-
57
-
58
-
59
-
60
-
61
-
62
-
63
-
64
-
65
-
66
-
67
-
68
-
69
-
70
-
71
-
72
-
73
-
74
-
75
-
76
-
77
-
78
-
79
-
80
-
81
-
82
-
83
-
84
-
85
-
86
-
87
-
88
-
89
-
90
-
91
-
92
-
93
-
94
-
95
-
96
-
97
-
98
-
99
-
100
-
101
-
102
-
103
-
104
-
105
-
106
-
107
-
108
-
109
-
110
-
111
-
112
-
113
-
114
-
115
-
116
-
117
-
118
-
119
-
120
-
121
-
122
-
123
-
124
-
125
-
126
-
127
-
128
-
129
-
130
-
131
-
132
-
133
-
134
-
135
-
136
-
137
-
138
-
139
-
140
-
141
-
142
-
143
-
144
-
145
-
146
-
147
-
148
-
149
-
150
-
151
-
152
-
153
-
154
-
 155
155 -
 156
156 -
 157
157 -
 158
158 -
 159
159 -
 160
160 -
 161
161 -
 162
162 -
 163
163 -
 164
164 -
 165
165 -
166
-
167
-
168
 |
 |
