JVC DD-3 Instructions - Page 18
Press [ENTER]., Press [SETTING].
 |
UPC - 046838029998
View all JVC DD-3 manuals
Add to My Manuals
Save this manual to your list of manuals |
Page 18 highlights
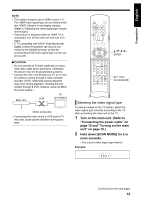
Preparation English Preparation (continued) Do not turn on the power until you complete the connection. For the locations of the remote control buttons, refer to page 12. 3 Press 2 or 3 to select the video signal type suitable for the TV. • When the TV is connected to the [VIDEO] terminal or the [S-VIDEO] terminal, the video signal type can be selected as instructed below. - Select "480I" for a TV only compatible with interlaced video siginal. - Select "480P" for a TV equipped with a component terminal and compatible with progressive video signal. • When the TV is connected to the [HDMI] terminal, the video signal type can be selected as instructed below. - Select "AUTO" for normal usage (the initial setting). - Select "480P" or "720P" as needed. NOTE • "480" and "720" refer to the number of the scanning lines. Generally, the larger the number, the better picture that can be obtained. • "I" refers to the interlaced format. "P" refers to the progressive format. A better picture can be obtained in the progressive format than in the interlaced format. • When an HDMI video signal is output, the "HDMI" indicator lights up in the display window. • When an HD video signal (720p) is output, the "HD" indicator lights up. • When "480P" or "720P" is selected, the "PROGRESSIVE" indicator lights up in the display window. 4 Press [ENTER]. • The selected video signal type is displayed in the display window for a short time. NOTE • The picture may be distorted when you press [ENTER], but this is not a malfunction of the system. • To check the compatibility of your TV, contact your local JVC customer service center. • All JVC-manufactured progressive TVs and high-definition TVs are fully compatible with this system. • Even if the main unit is turned off, the video signal type setting is stored. Selecting the monitor out type To view an image on the TV, select the monitor out type as well as the video signal type. 1 Press [SETTING]. 2 Press 5 or / to display "M.OUT". 3 Press 2 or 3 to select "HDMI" or "NO HDMI". • When using an HDMI cable to connect a TV to the main unit, select "HDMI". • When an HDMI cable is not connected, select "NO HDMI" (the initial setting). 4 Press [ENTER] or wait for a short time. 13
-
 1
1 -
2
-
3
-
4
-
5
-
6
-
7
-
8
-
9
-
10
-
11
-
12
-
 13
13 -
 14
14 -
 15
15 -
 16
16 -
 17
17 -
 18
18 -
 19
19 -
 20
20 -
 21
21 -
 22
22 -
 23
23 -
24
-
25
-
26
-
27
-
28
-
29
-
30
-
31
-
32
-
33
-
34
-
35
-
36
-
37
-
38
-
39
-
40
-
41
-
42
-
43
-
44
-
45
-
46
-
47
-
48
-
49
-
50
-
51
-
52
-
53
-
54
-
55
-
56
-
57
-
58
-
59
-
60
-
61
-
62
-
63
-
64
-
65
-
66
-
67
-
68
-
69
-
70
-
71
-
72
-
73
-
74
-
75
-
76
-
77
-
78
-
79
-
80
-
81
-
82
-
83
-
84
-
85
-
86
-
87
-
88
-
89
-
90
-
91
-
92
-
93
-
94
-
95
-
96
-
97
-
98
-
99
-
100
-
101
-
102
-
103
-
104
-
105
-
106
-
107
-
108
-
109
-
110
-
111
-
112
-
113
-
114
-
115
-
116
-
117
-
118
-
119
-
120
-
121
-
122
-
123
-
124
-
125
-
126
-
127
-
128
-
129
-
130
-
131
-
132
-
133
-
134
-
135
-
136
-
137
-
138
-
139
-
140
-
141
-
142
-
143
-
144
-
145
-
146
-
147
-
148
-
149
-
150
-
151
-
152
-
153
-
154
-
155
-
156
-
157
-
158
-
159
-
160
-
161
-
162
-
163
-
164
-
165
-
166
-
167
-
168
 |
 |