JVC HR-S9911U Instructions - Page 11
Playback Features, Next Function Memory
 |
UPC - 046838160684
View all JVC HR-S9911U manuals
Add to My Manuals
Save this manual to your list of manuals |
Page 11 highlights
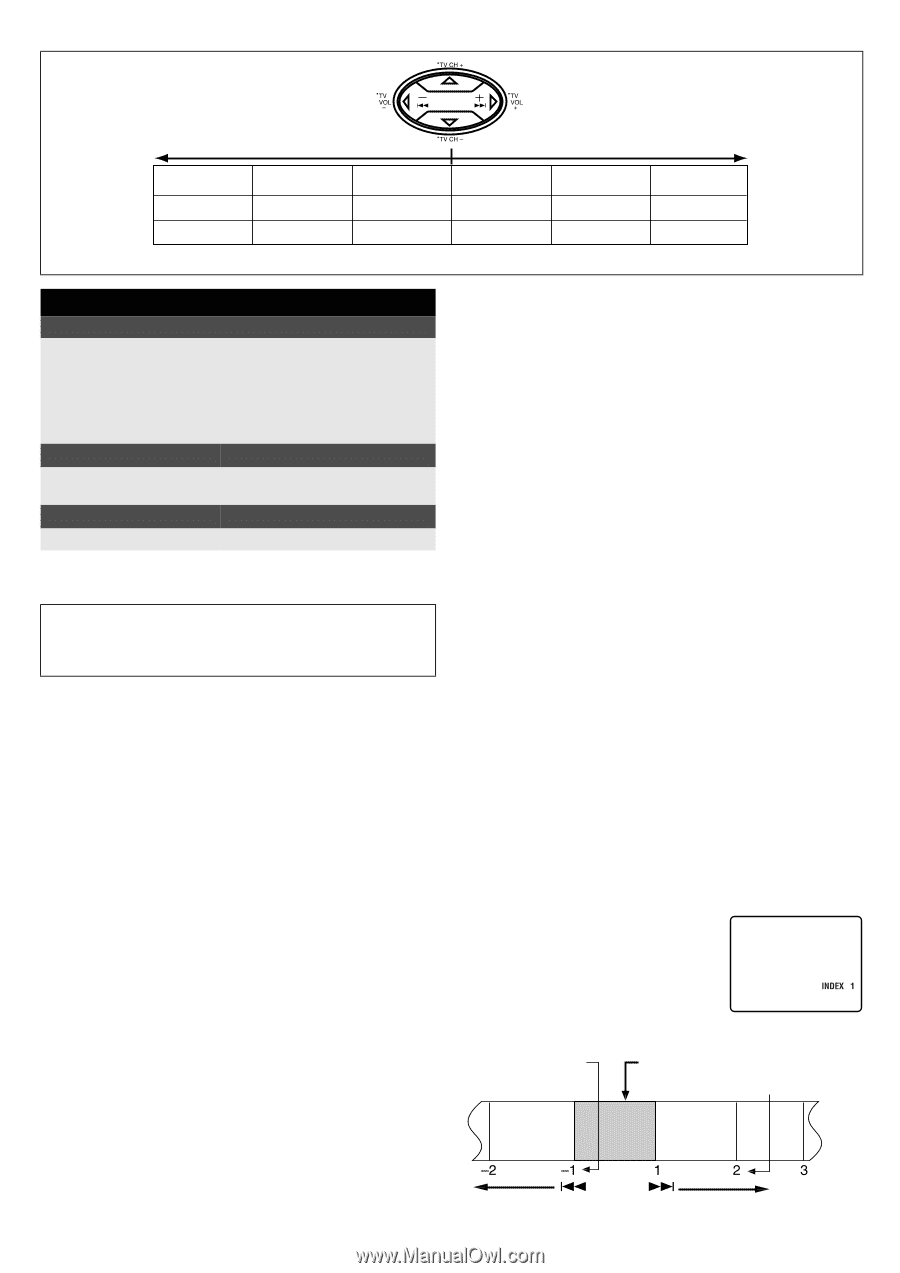
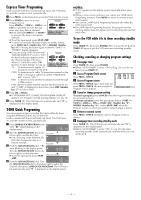
Reverse Forward Reverse search Reverse play SP -11, -7, -5, -3 -1 EP -31, -21, -7, -3 -1 Reverse slow motion -1/6, -1/18 -1/6, -1/18 Slow motion 1/18, 1/6, 1/2 1/18, 1/6, 1/2 ● You can see smooth slow motion picture only during 1/2x slow motion playback. Normal play 1 1 Forward search 2, 3, 5, 7, 11 2, 3, 7, 21, 31 When the tape is not running Rewind/fast-forward On the VCR Turn the ADVANCED JOG dial to the left to rewind the tape, or right to fast-forward the tape. On the Remote Press REW (3) to rewind the tape, or FF (5) to fast-forward the tape. Eject the cassette Press STOP/EJECT (0) on the VCR. ● You can also eject the cassette when the VCR is turned off. Turn off the VCR Press POWER. Playback Features ● Turn on the VCR and TV, and select the VCR channel (or AV mode). ● Set the VCR/TV/CABLE/DBS selector on the Remote to "VCR". Adjusting tracking condition - Tracking Adjustment Automatic tracking adjustment Whenever you insert a tape and start playback, automatic tracking starts working and continuously analyzes the signal to enable optimum picture quality during playback. Manual tracking adjustment If automatic tracking cannot eliminate noises well during playback, follow the procedures below. A Press CH + and - on the VCR simultaneously during playback to activate manual tracking. B Press CH + or - to eliminate the noises. Press it briefly for a fine adjustment, or press and hold for a coarse adjustment. ● Press CH + and - simultaneously again to reactivate automatic tracking. Selecting monitor sound - Audio Monitor While playing back a tape on which stereo sound or SAP sound is recorded, press A.MONITOR on the Remote. Each time you press the button, sound changes. HI-FI: Normally select this. Hi-Fi sound is played back. HI-FI L: Sound on the left Hi-Fi channel is played back. HI-FI R: Sound on the right Hi-Fi channel is played back. NORM: Sound on the normal track is played back. NORM HI-FI: Both sounds on the Hi-Fi track and normal track are mixed and played back. NOTES: ● The above indication appears when "SUPERIMPOSE" is set to "ON" (੬ pg. 20), though the monitor sound changes in sequence. ● You can also use the menu ("AUDIO MONITOR") to select your desired monitor sound. (੬ pg. 20) Automatic operations after rewinding - Next Function Memory The Next Function Memory "tells" the VCR what to do after rewinding is complete. Ensure that the VCR is in stop mode. ● For Automatic Playback Start Press REW (3), then press PLAY (4) within 2 seconds. ● For Automatic Power Off Press REW (3), then press POWER within 2 seconds. ● For Automatic Timer Standby Press REW (3), then press TIMER (#) within 2 seconds. NOTE: It is not possible to select the Automatic Timer Standby function if the cassette's record safety tab is removed. Playing back tape repeatedly (100 times) - Repeat Play During playback, press and hold PLAY (4) for more than 5 seconds. The play indicator ( u) on the display panel starts blinking slowly. To stop playback, press STOP (8) on the Remote or STOP/EJECT (0) on the VCR. Locating beginning of recordings - Index Search When recording on this VCR, index codes are placed on the tape at the beginning of each recording. A While the tape is not running, press 2 or 6 on the Remote to start search. B To access a recording of 2 to 9 index codes away, press 2 or 6 repeatedly until the correct number is displayed on the screen (only if "SUPERIMPOSE" is set to "ON" (੬ pg. 20)). Playback begins automatically when the desired recording is located. Beginning of the current program recorded Current position on the tape Beginning of the 2nd next program recorded Previous program recorded Next program recorded 2nd next - 11 -
-
 1
1 -
2
-
3
-
4
-
5
-
 6
6 -
 7
7 -
 8
8 -
 9
9 -
 10
10 -
 11
11 -
 12
12 -
 13
13 -
 14
14 -
 15
15 -
 16
16 -
17
-
18
-
19
-
20
-
21
-
22
-
23
-
24
-
25
-
26
-
27
-
28
-
29
-
30
-
31
-
32
 |
 |