JVC HR-S9911U Instructions - Page 19
Other Functions, Timer warning display, Checking tape position, Changing display information
 |
UPC - 046838160684
View all JVC HR-S9911U manuals
Add to My Manuals
Save this manual to your list of manuals |
Page 19 highlights
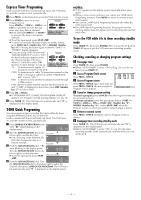
C Select tape number Press rt to move the highlight bar (arrow) to the tape number on which you want to record a program, then press OK. ● The calculated blank space is based on the current tape speed (SP or EP) selected on the VCR. ● If the selected cassette has already been loaded, the VCR searches the beginning of the blank space and goes into the stop mode automatically. D Load cassette Insert the tape of the selected number. ● The VCR searches the beginning of the blank space and goes into the stop mode automatically. Other Functions Timer warning display A warning appears on the TV screen to tell you that the timer-recording is to start in 5 minutes if you are not in the timer recording standby mode at that time. Press TIMER (#) to put the VCR into timer recording standby mode. To clear the display, press CANCEL on the Remote. Checking tape position When you change the VCR operation mode from the stop mode to fast forward or rewind mode, or when you perform an Index Search (੬ pg. 11) or Instant Review (੬ pg. 12), the tape position indicator appears. The position of "q" in relation to "B" (Beginning) or "E" (End) shows you where you are on the tape. ● Set "SUPERIMPOSE" to "ON" (੬ pg. 20). Changing display information Each time you press DISPLAY, the display panel shows the time counter, the channel number, the clock time and the tape remaining time alternatively. ● To reset the time counter, press C.RESET on the Remote. ● During playback, the channel number is not shown. ● When the tape remaining time appears, "z" also lights on the display panel. ● When "SUPERIMPOSE" is set to "ON" (੬ pg. 20) and DISPLAY on the Remote is pressed, the current VCR status appear on the TV screen. Function settings You can use the other useful function settings on the Function Set screen. ● Turn on the VCR and TV, and select the VCR channel (or AV mode). ● Set the VCR/TV/CABLE/DBS selector on the Remote to "VCR". A Access Main Menu screen, then Function Set screen Press MENU on the Remote. Press rt to move the highlight bar (arrow) to "FUNCTION SET", then press OK or e. B Select Function Press rt to move the highlight bar (arrow) to the function you want to set. C Change setting Press OK or e. The default setting is bold in the table below. Press MENU to return to normal screen. After a power failure occurs, Function Settings will be reset to its default setting. Ⅵ S-VHS ET - ON/OFF When this function is set to "ON", you can record on VHS cassettes with S-VHS picture quality. Tapes recorded using this function can be played back on most of S-VHS VCRs or VHS VCRs equipped with the SQPB (S-VHS QUASI PLAYBACK) function. When this function is set to "ON", the S-VHS indicator lights up on the display panel. NOTES: ● Before recording, set "VIDEO CALIBRATION" to "ON". (੬ See below) ● You cannot activate the S-VHS ET function while recording, timer-recording or Instant Timer Recording (੬ pg. 13) or the "VIDEO CALIBRATION" function (੬ See below) is in progress. ● The S-VHS ET function does not work with S-VHS cassettes. ● To keep the highest quality recording and playback pictures over a long period of time, S-VHS recording on S-VHS cassettes is recommended. ● Use of high grade tapes is recommended for S-VHS ET recordings. On some tapes, picture quality will not improve even if the S-VHS ET function is used. Check the recording quality before you start important recordings. Ⅵ VIDEO CALIBRATION - ON/OFF When this function is set to "ON", this VCR checks the condition of the tape in use during playback and recording, and compensates to provide the highest-possible pictures. This takes place whenever you play back a tape or start recording after inserting a tape. NOTE: The VCR checks the tape condition for about 7 seconds, then starts recording. To make sure you record the desired scene or program completely, perform the following steps: A Press and hold PAUSE (9), and press REC (7). After about 7 seconds, the VCR re-enters Record Pause mode. B Press PLAY (4) to start recording. - 19 - CONTINUED ON NEXT PAGE
-
 1
1 -
2
-
3
-
4
-
5
-
6
-
7
-
8
-
9
-
10
-
11
-
12
-
13
-
 14
14 -
 15
15 -
 16
16 -
 17
17 -
 18
18 -
 19
19 -
 20
20 -
 21
21 -
 22
22 -
 23
23 -
 24
24 -
25
-
26
-
27
-
28
-
29
-
30
-
31
-
32
 |
 |
