JVC HR-S9911U Instructions - Page 27
Troubleshooting, Power, Playback, Recording, Timer Recording
 |
UPC - 046838160684
View all JVC HR-S9911U manuals
Add to My Manuals
Save this manual to your list of manuals |
Page 27 highlights
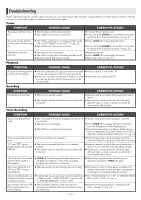
Troubleshooting Before requesting service, use this chart and see if you can repair the trouble yourself. Small problems are often easily corrected, and this can save you from the trouble of sending your VCR off for repair. Power SYMPTOM The power will not come on. POSSIBLE CAUSE ● The AC power cord is disconnected. ● The Child Lock function is activated. The clock works, but the ● The VCR is in the timer recording standby mode VCR's power will not come with "AUTO TIMER" set to "OFF" (੬ pg. 20). on. ● The Child Lock function is activated. The Remote will not function. ● The batteries are discharged. ● The VCR is in the timer recording standby mode. ● Remote control A/B code is wrong. CORRECTIVE ACTION ● Connect the AC power cord. ● Press and hold POWER for more than 10 seconds to release the Child Lock function. (੬ pg. 21) ● Press TIMER (#) to disengage the timer. ● Press and hold POWER for more than 10 seconds to release the Child Lock function. (੬ pg. 21) ● Replace batteries. ● Press TIMER (#) to disengage the timer. ● Reset A/B code. (੬ pg. 22) Playback SYMPTOM POSSIBLE CAUSE CORRECTIVE ACTION The tape is running but the picture will not appear. ● If the RF connection (੬ pg. 6) is used to view the picture, the channel on the TV is set incorrectly. ● If the AV or S-video connection (੬ pg. 6) is used to view the picture, the TV receiver is set to the wrong mode. ● Select channel 3 or 4 on the TV. ● Select the AV mode on the TV. Recording SYMPTOM Recording will not start. POSSIBLE CAUSE ● There is no cassette loaded. ● The loaded cassette has had its record safety tab removed. CORRECTIVE ACTION ● Insert a cassette on which the record safety tab is intact. ● Remove the cassette and cover the hole with adhesive tape, or load a cassette on which the record safety tab is intact. Timer Recording SYMPTOM POSSIBLE CAUSE CORRECTIVE ACTION Timer recording will not work. ● The clock and/or the timer program have been set incorrectly. ● The timer is not engaged. ● The VCR has not been set up properly. ● Set the clock and/or timer program correctly. ● Press TIMER (#) to engage the timer and make sure that # appears on the display panel. ● Re-perform the set-up procedures. Make sure you have compensated for guide channel and VCR or cable box channel number mismatches. (੬ pg. 14) Timer programing will not ● Timer recording is in progress. work. ● Timer programing cannot be performed when timer recording is in progress. Wait until it finishes. "#" and "[" on the display panel will not stop blinking. ● The timer is engaged but there is no cassette loaded. ● The loaded cassette has had its record safety tab removed. ● Insert a cassette on which the record safety tab is intact, or cover the hole with the adhesive tape. ● Remove the cassette and cover the hole with adhesive tape, or load a cassette on which the record safety tab is intact. "#" blinks for 10 seconds ● TIMER (#) has been pressed when there are no and the timer mode is programs in memory, or the timer recording disengaged. program has not been set correctly. ● Check the programed data and set again if necessary, then press TIMER (#) again. The power shuts off and "#" and "[" will not stop blinking. ● The tape reaches its end during timer recording. ● The program may not have been recorded in its entirety. Next time be sure you have enough time on the tape to record the entire broadcast. Timer recording begins as ● Even though you do not use an external cable box ● Set "CABLE BOX SET" to "OFF" or "DBS RECEIVER scheduled, but the channel or DBS receiver, "CABLE BOX SET" is set to "ON" SET" is set to "OFF". (੬ pg. 9) is always incorrect. or "DBS RECEIVER SET" is set to "ON". You moved, and now VCR ● The receivable stations in the new area are Plus+ system does not received on different channels than those in the work properly. previous area. ● Re-perform the procedure in "Changing VCR Plus+® Setting" (੬ pg. 14). - 27 -
-
 1
1 -
2
-
3
-
4
-
5
-
6
-
7
-
8
-
9
-
10
-
11
-
12
-
13
-
14
-
15
-
16
-
17
-
18
-
19
-
20
-
21
-
 22
22 -
 23
23 -
 24
24 -
 25
25 -
 26
26 -
 27
27 -
 28
28 -
 29
29 -
 30
30 -
 31
31 -
 32
32
 |
 |
