JVC HR-S9911U Instructions - Page 25
Audio Dubbing, Insert Editing and AV Dubbing
 |
UPC - 046838160684
View all JVC HR-S9911U manuals
Add to My Manuals
Save this manual to your list of manuals |
Page 25 highlights
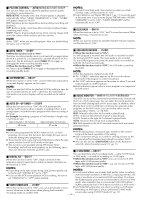
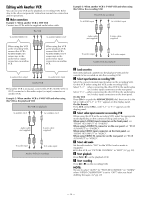
Audio Dubbing Audio Dubbing replaces a previously recorded normal audio track with a new soundtrack. A Make connections Connect an audio cable between the VCR's audio input connectors and the audio component's audio output connectors. ● When connecting a monaural audio component, use only the VCR's AUDIO L input connector. ● Audio Dubbing is possible only by using the audio input connectors on the front panel or on the rear panel. This VCR To AUDIO input To audio output CD player, etc. B Select input location Select "F-1" -when connecting the audio component to the audio input connectors on the front panel. Select "L-1" -when connecting the audio component to the audio input connectors on the rear panel. On the VCR Press CH+/- or push the ADVANCED JOG dial, then turn it to the left or right until "L-1" or "F-1" appears on the display panel. On the Remote Press AUX and/or CH+/- until "L-1" or "F-1" appears on the display panel. C Locate start point, and engage Audio Dubbing mode Load a cassette and press PLAY (4) on the VCR. Press PAUSE (9) at the point where you want to start dubbing, then press A.DUB. ● The VCR enters the Audio Dubbing Pause mode. "o" blinks, "u" and "i" light up on the display panel. D Start dubbing Engage the Play mode on the audio component, then press PLAY (4) on the VCR. Audio Dubbing begins. "o" blinks, and "u" lights up on the display panel. ● To pause dubbing, press PAUSE (9). Press PLAY (4) to resume dubbing. E End Audio Dubbing Press STOP (8) on the Remote or STOP/EJECT (0) on the VCR, then engage the Stop mode of the audio component. NOTES: ● When monitoring the sound during Audio Dubbing, the normal soundtrack is automatically selected. If you wish to hear the Hi-Fi or mixed sound (Hi-Fi + normal soundtracks), press A.MONITOR to select "NORM HI-FI". (੬ pg. 11, "Selecting monitor sound") ● Audio Dubbing stops automatically when the counter reaches "0:00:00", and the VCR enters the Play mode. Check the counter reading before dubbing. ● Audio Dubbing is not possible with a cassette whose record safety tab has been removed. ● When playing back an audio-dubbed tape, press A.MONITOR to select the soundtrack you wish to hear. (੬ pg. 11, "Selecting monitor sound") Insert Editing and AV Dubbing Insert Editing: You can replace a recorded scene with new scene recorded on another tape or with other material. Both the picture and the sound recorded on the Hi-Fi sound track are replaced at the same time. AV Dubbing: You can perform Audio Dubbing and Insert Editing at the same time. This means that the picture and the sounds recorded on the Hi-Fi sound track and on the normal track are replaced at the same time. ● For AV Dubbing, you can edit pictures and sound using different sources; connect a video source to the video input connector, and an audio source to the audio input connectors. A Make connections Connect the supplied audio/video cable between the VCR's audio/ video input connectors and the other component's audio/video output connectors. ● Insert Editing and AV Dubbing are possible only by using the audio/video input connectors on the front panel or on the rear panel. This VCR (for recording) To AUDIO/VIDEO input To S-VIDEO input Audio/video cable (supplied) S-video cable (supplied) To audio/video output To S-video output Another VCR (for playback) B Select input location Select "F-1" -when connecting the other component to the audio/video input connectors on the front panel. Select "L-1" -when connecting the other component to the audio/video input connectors on the rear panel. On the VCR Press CH+/- or push the ADVANCED JOG dial, then turn it to the left or right until "L-1" or "F-1" appears on the display panel. On the Remote Press AUX and/or CH+/- until "L-1" or "F-1" appears on the display panel. C Select video input connector Select the appropriate mode depending on the connector being used (੬ pg. 21). When using S-VIDEO input connector on the front panel, set "FRONT AUX INPUT" to "S-VIDEO". When using S-VIDEO IN connector on the rear panel, set "REAR AUX INPUT" to "S-VIDEO". When using VIDEO input connector on the front panel, set "FRONT AUX INPUT" to "VIDEO". When using VIDEO IN connector on the rear panel, set "REAR AUX INPUT" to "VIDEO". D Select edit mode Set the edit mode to "ON" for the VCRs if such a mode is equipped. ● On this VCR, set "PICTURE CONTROL" to "EDIT" (੬ pg. 20). - 25 - CONTINUED ON NEXT PAGE
-
 1
1 -
2
-
3
-
4
-
5
-
6
-
7
-
8
-
9
-
10
-
11
-
12
-
13
-
14
-
15
-
16
-
17
-
18
-
19
-
 20
20 -
 21
21 -
 22
22 -
 23
23 -
 24
24 -
 25
25 -
 26
26 -
 27
27 -
 28
28 -
 29
29 -
 30
30 -
31
-
32
 |
 |
