JVC HR-S9911U Instructions - Page 23
Editing, Editing from Camcorder - features
 |
UPC - 046838160684
View all JVC HR-S9911U manuals
Add to My Manuals
Save this manual to your list of manuals |
Page 23 highlights
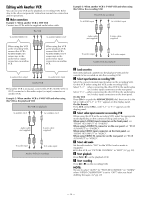
C Change code for VCR Press any key on the Remote. The VCR now responds to B code control signals. ● To set the Remote and the VCR to transmit and respond to A code control signals, repeat above procedure as shown above except press the Number key "1" in step B of 1. To control two VCRs with the same Remote You can control two JVC VCRs by switching the remote control code for the Remote between A and B (੬ step A), keeping two VCRs to different control codes. ● To change only the remote control code for the Remote, DO NOT perform steps B and C. Editing Various connection for editing tapes The following three methods can be used for editing tapes. ● VHS to S-VHS editing (VIDEO-VIDEO connection): Although the picture quality is inherently limited by the original VHS quality, the edited tape has better picture quality than those made by VHS-to-VHS editing. ● S-VHS to VHS editing (VIDEO-VIDEO connection): Since the original source is recorded in S-VHS mode, the edited tape has better picture quality than those made by VHS-to-VHS editing. ● S-VHS to S-VHS (S-VIDEO connection): Original picture quality of S-VHS made can be duplicated with minimal picture degradation. This is the best editing method you can use on S-VHS VCRs. Editing from Camcorder You can use a camcorder as the playback unit and your VCR as the recording VCR. Refer also to the camcorder's instruction manual for connection and its operations. A Make connections This VCR (for recording) To AUDIO/VIDEO input Audio/video cable (supplied) To S-VIDEO input To rear panel REMOTE PAUSE/ AV COMPULINK S-video cable (supplied) B Load cassettes Insert the playback cassette into the camcorder and the cassette to be recorded on into this VCR. C Select input location on this VCR Select the correct external input location on this VCR. Select "L-1" -when connecting the camcorder to the audio/video (or S-video) input connectors on the rear panel. Select "F-1" -when connecting the camcorder to the audio/video (or S-video) input connectors on the front panel. On the VCR Press CH+/- or push the ADVANCED JOG dial, then turn it to the left or right until "L-1" or "F-1" appears on the display panel. On the Remote Press AUX and/or CH+/- until "L-1" or "F-1" appears on the display panel. D Select video input connector Select the appropriate mode depending on the connector being used (੬ pg. 21). When using S-VIDEO input connector on the front panel, set "FRONT AUX INPUT" to "S-VIDEO". When using S-VIDEO IN connector on the rear panel, set "REAR AUX INPUT" to "S-VIDEO". When using VIDEO input connector on the front panel, set "FRONT AUX INPUT" to "VIDEO". When using VIDEO IN connector on the rear panel, set "REAR AUX INPUT" to "VIDEO". E Select edit mode Set "PICTURE CONTROL" to "EDIT" (੬ pg. 20). F Set AV COMPU-LINK mode If your JVC camcorder is equipped with a Master Edit Control, set "AV COMPU-LINK" to "OFF" (੬ pg. 21). The REMOTE PAUSE/ AV COMPULINK connector works as a Remote Pause connector. G Start playback Set the camcorder to its play mode. NOTE: If the camcorder is equipped with a superimpose/OSD disable feature, set it to "OFF" before starting playback. H Start recording On the VCR Press REC (7). On the Remote While holding REC (7), press PLAY (4). ● If you are using a Master Edit Control-equipped JVC camcorder, recording starts automatically on this VCR. (Refer to camcorder's instruction manual.) NOTE: Be sure to select "AUTO" for "PICTURE CONTROL" (or "NORM" when "VIDEO CALIBRATION" is set to "OFF") after you finish dubbing the tapes. (੬ pg. 20) To audio/video output To S-video output Camcorder (for playback) To EDIT Mini-plug cable (not supplied) (JVC camcorder only) ● When the JVC camcorder is equipped with the Master Edit Control, you can control the VCR from the camcorder. Connect the mini-plug cable (not supplied with this VCR) as illustrated. ● If camcorder is monaural, connect the audio output connector on the camcorder to the left audio input connector on this VCR. - 23 -
-
 1
1 -
2
-
3
-
4
-
5
-
6
-
7
-
8
-
9
-
10
-
11
-
12
-
13
-
14
-
15
-
16
-
17
-
 18
18 -
 19
19 -
 20
20 -
 21
21 -
 22
22 -
 23
23 -
 24
24 -
 25
25 -
 26
26 -
 27
27 -
 28
28 -
29
-
30
-
31
-
32
 |
 |
