JVC VN-C205U Instructions - Page 19
Inserting the CF card, Caution, Insert CF card in the direction as indicated, in the diagram
 |
UPC - 046838021497
View all JVC VN-C205U manuals
Add to My Manuals
Save this manual to your list of manuals |
Page 19 highlights
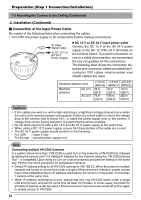
● Alarm Output Terminal VN-C205 OUT Terminal Alarm Device Connection Example DC 12 V IN R Grounding Terminal GND (Alarm Output Equivalent Circuit) Connect this terminal to alarm devices such as an annunciator, indicator, lamp or buzzer. Output Requirements • Equivalent to NPN open collector output (Set output logic using the controller) • Allowed applied voltage: DC12V and below • Allowed input current: 50 mA • Momentary output: 1 to 5000ms (Set duration using the controller) Caution Connect the grounding terminal of VN-C205 to the GND terminal of the alarm device. Ⅵ Inserting the CF card Insert CF card in the direction as indicated in the diagram • Press once if the eject button is protruding • Insert the CF card all the way until you hear a "click" sound * When removing the card, ensure that the power of the camera is turned off before pressing the eject button. Back • San Disk (Industrial) 128MB (SDCFBI-128-201-80) 256MB (SDCFBI-256-201-80) 512MB (SDCFBI-512-201-80) 1024MB (SDCFBI-1024-201-80) Eject Button 19
-
 1
1 -
2
-
3
-
4
-
5
-
6
-
7
-
8
-
9
-
10
-
11
-
12
-
13
-
 14
14 -
 15
15 -
 16
16 -
 17
17 -
 18
18 -
 19
19 -
 20
20 -
 21
21 -
 22
22 -
 23
23 -
 24
24 -
25
-
26
-
27
-
28
-
29
-
30
-
31
-
32
-
33
-
34
-
35
-
36
-
37
-
38
-
39
-
40
 |
 |
