JVC VN-C205U Instructions - Page 28
Setting PC's IP Address [Windows XP], Upon installing the camera
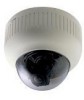 |
UPC - 046838021497
View all JVC VN-C205U manuals
Add to My Manuals
Save this manual to your list of manuals |
Page 28 highlights
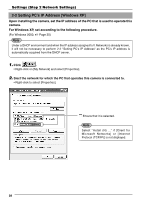
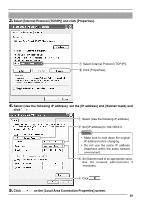
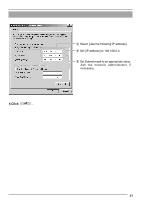
Settings (Step 2 Network Settings) 2-2 Setting PC's IP Address [Windows XP] Upon installing the camera, set the IP address of the PC that is used to operate this camera. For Windows XP, set according to the following procedure. (For Windows 2000, ☞ Page 30) Note Under a DHCP environment and when the IP address assigned to V. Networks is already known, it will not be necessary to perform 2-2 "Setting PC's IP Address" as the PC's IP address is automatically acquired from the DHCP server. 1. Click . • Right-click on [My Network] and select [Properties]. 2. Slect the network for which the PC that operates this camera is connected to. • Right-click to select [Properties]. Ensure that it is selected. Note Select "Install (N) ..." if [Client for Microsoft Networks] or [Internet Protocol (TCP/IP)] is not displayed. 28
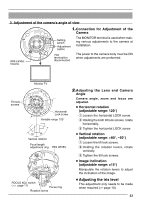
-
 1
1 -
2
-
3
-
4
-
5
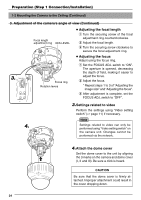
-
6
-
7
-
8
-
9
-
10
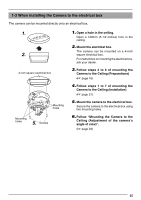
-
11
-
12
-
13
-
14
-
15
-
16
-
17
-
18
-
19
-
20
-
21
-
22
-
 23
23 -
 24
24 -
 25
25 -
 26
26 -
 27
27 -
 28
28 -
 29
29 -
 30
30 -
 31
31 -
 32
32 -
 33
33 -
34
-
35
-
36
-
37
-
38
-
39
-
40
 |
 |
