JVC VN-C205U Instructions - Page 25
When installing the Camera to the electrical box
 |
UPC - 046838021497
View all JVC VN-C205U manuals
Add to My Manuals
Save this manual to your list of manuals |
Page 25 highlights
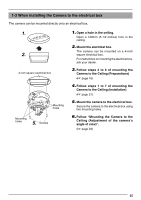
1-3 When installing the Camera to the electrical box The camera can be mounted directly onto an electrical box. 1. 140 (5-1/2) 2. 4 inch square electrical box Mounting holes Mounting holes 5. Screws 1. Open a hole in the ceiling. Open a 140mm (5-1/2 inches) hole in the ceiling. 2. Mount the electrical box. The camera can be mounted on a 4-inch square electrical box. For instructions on mounting the electrical box, ask your dealer. 3. Follow steps 2 to 6 of mounting the Camera to the Ceiling (Preparations) (☞ page 16) 4. Follow steps 1 to 7 of mounting the Camera to the Ceiling (Installation) (☞ page 21) 5. Mount the camera to the electrical box. Secure the camera to the electrical box using two mounting holes. 6. Follow "Mounting the Camera to the Ceiling (Adjustment of the camera's angle of view)". (☞ page 23) 25
-
 1
1 -
2
-
3
-
4
-
5
-
6
-
7
-
8
-
9
-
10
-
11
-
12
-
13
-
14
-
15
-
16
-
17
-
18
-
19
-
 20
20 -
 21
21 -
 22
22 -
 23
23 -
 24
24 -
 25
25 -
 26
26 -
 27
27 -
 28
28 -
 29
29 -
 30
30 -
31
-
32
-
33
-
34
-
35
-
36
-
37
-
38
-
39
-
40
 |
 |
