JVC VN-C205U Instructions - Page 26
Pull out the cables aside and mount, 1-5 White-spot correction
 |
UPC - 046838021497
View all JVC VN-C205U manuals
Add to My Manuals
Save this manual to your list of manuals |
Page 26 highlights
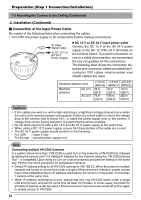
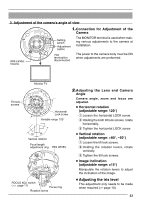
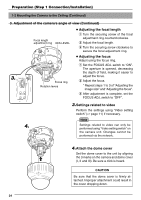
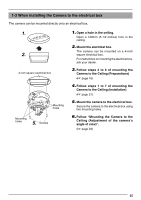
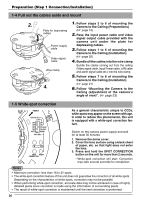
Preparation (Step 1 Connection/Installation) 1-4 Pull out the cables aside and mount 2. 1. Follow steps 3 to 6 of mounting the Camera to the Ceiling (Preparations) Plate for depressing (☞ page 16) cables 2. Pass the input power cable and video signal output cable provided with the Power supply cable Video signal cable camera unit under the plate for depressing cables. 3. Follow steps 1 to 6 of mounting the Camera to the Ceiling (Installation) (☞ page 20) 4. Bundle all the cables into the wire clamp Wire clamp Bundle the cables coming out from the ceiling (Video signal cable, Input Power cable, LAN cable and alarm signal cable etc.) into the wire clamp. 5. Follow steps 7 to 8 of mounting the Camera to the Ceiling (Installation) 4. (☞ page 21) 6. Follow "Mounting the Camera to the Ceiling (adjustment of the camera's angle of view)". (☞ page 23) 1-5 White-spot correction As a general characteristic unique to CCDs, white-spots may appear on the screen with age. In order to reduce this phenomenon, this unit is equipped with a white-spot correction feature. Switch on the camera power supply and wait for at least 30 minutes. 1. Remove the dome cover. 2. Cover the lens surface using a black sheet of paper, etc. so that light does not enter the lens. 3. Press and hold the SPOT CORRECTION button on the unit for more than 2 seconds. * White-spot correction will start. Correction may take several seconds for completion. Notes • Maximum correction: less than 16 to 32 spots • The white-spot correction feature of this unit does not guarantee the correction of all white spots. Depending on the characteristic of white spots, correction may not be possible. • When performing white-spot correction, accurate data may not be achieved in case of highly detailed pixels since correction is made using the information of surrounding pixels. • The result of white-spot correction is maintained until the next correction is performed. 26
-
 1
1 -
2
-
3
-
4
-
5
-
6
-
7
-
8
-
9
-
10
-
11
-
12
-
13
-
14
-
15
-
16
-
17
-
18
-
19
-
20
-
 21
21 -
 22
22 -
 23
23 -
 24
24 -
 25
25 -
 26
26 -
 27
27 -
 28
28 -
 29
29 -
 30
30 -
 31
31 -
32
-
33
-
34
-
35
-
36
-
37
-
38
-
39
-
40
 |
 |
