Kenwood DDX7019BT Instruction Manual - Page 52
Installation procedure
 |
View all Kenwood DDX7019BT manuals
Add to My Manuals
Save this manual to your list of manuals |
Page 52 highlights
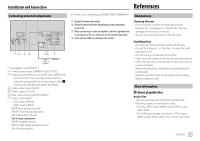
Installation and Connection Parts list for installation Note: • This parts list does not include all the package contents. • Items " is supplied only for DDX7019BT/ DDX7019BTM/DMX7019BT/DMX7019BTM. • Item ] is supplied only for DMX7019BT Australian/ New Zealand models. • Item ' is supplied only for DDX7019BTM/ DMX7019BTM/DMX7019BT Australian/New Zealand models/DDX719WBT/DDX719WBTM/ DMX719WBT/DMX719WBTM. ¥ Wiring harness (× 1) ø Extension parking cable, 2 m (× 1) π Steering wheel remote input cable (× 1) [ Round head screws, M5 × 8 mm (× 6) " Flat head screws, M5 × 8 mm (× 6) ] Trim plate (× 1) ' Microphone, 3 m (× 1) Installation procedure 1 Remove the key from the ignition and disconnect the · battery. 2 Make the proper input and output wire connections for each unit. 3 Connect the speaker wires of the wiring harness. 4 Connect the wires of the wiring harness in the following order: ground, battery, ignition. 5 Connect the wiring harness to the unit. 6 Install the unit in your car. Make sure that the unit is installed securely in place. If the unit is unstable, it may malfunction (e.g., the sound may skip). 7 Reconnect the · battery. 8 Configure . (Page 6) Installing the unit Installing the unit using the mounting bracket removed from the car [ / " [ / " Car bracket Note: Select the appropriate screws (supplied) for the mounting bracket. Installing the trim plate (Only for DMX7019BT Australian/New Zealand models) 50 ENGLISH
-
 1
1 -
2
-
3
-
4
-
5
-
6
-
7
-
8
-
9
-
10
-
11
-
12
-
13
-
14
-
15
-
16
-
17
-
18
-
19
-
20
-
21
-
22
-
23
-
24
-
25
-
26
-
27
-
28
-
29
-
30
-
31
-
32
-
33
-
34
-
35
-
36
-
37
-
38
-
39
-
40
-
41
-
42
-
43
-
44
-
45
-
46
-
 47
47 -
 48
48 -
 49
49 -
 50
50 -
 51
51 -
 52
52 -
 53
53 -
 54
54 -
 55
55 -
 56
56 -
 57
57 -
58
-
59
-
60
-
61
-
62
-
63
-
64
-
65
-
66
-
67
-
68
 |
 |
