Kenwood DDX7019BT Instruction Manual - Page 6
Basic Operations
 |
View all Kenwood DDX7019BT manuals
Add to My Manuals
Save this manual to your list of manuals |
Page 6 highlights
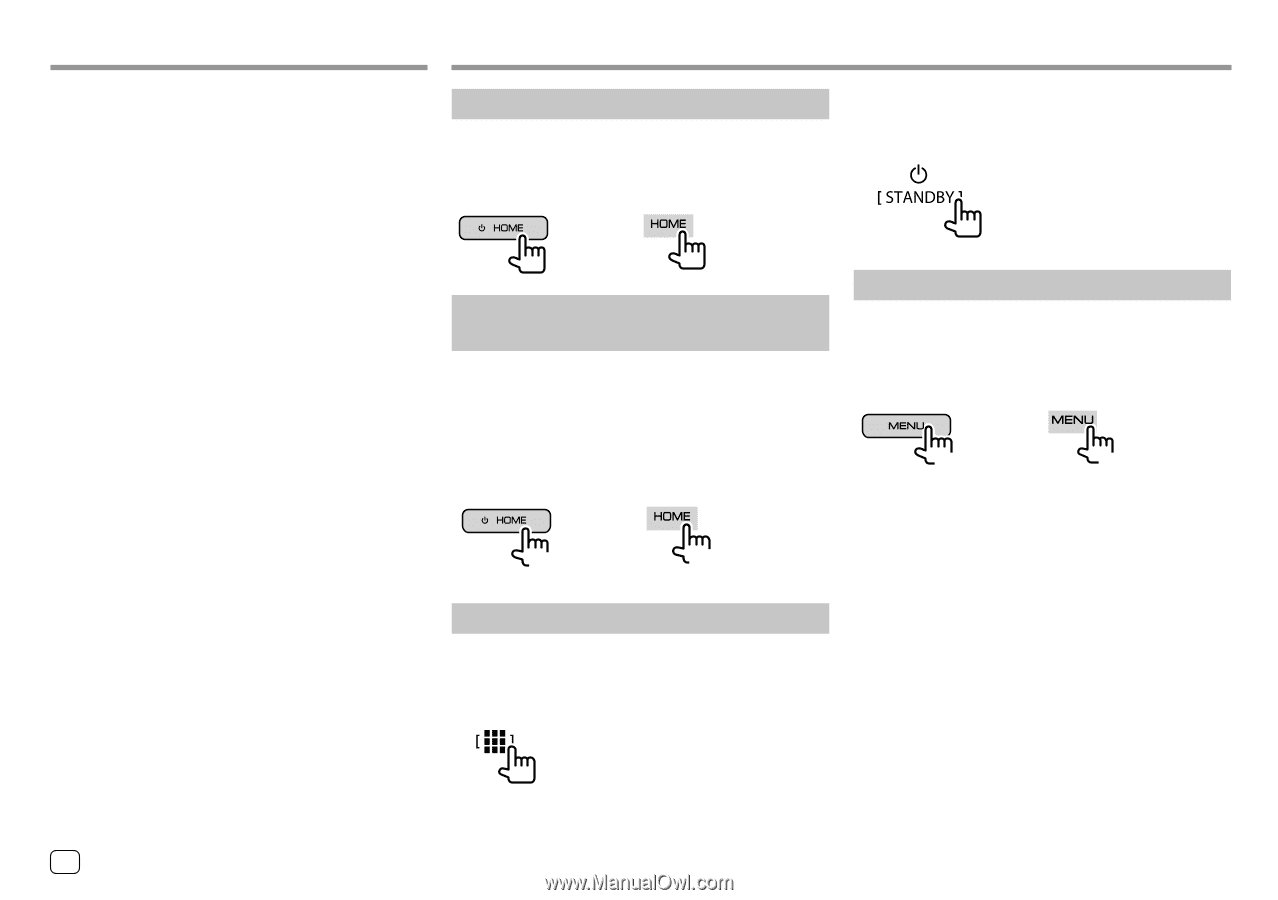
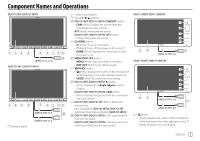
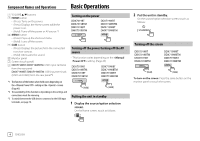
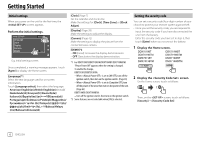
Component Names and Operations Basic Operations 2 VOLUME J/K buttons 3 HOME button • (Press): Turns on the power. • (Press): Displays the Home screen while the power is on. • (Hold): Turns off the power or AV source.*1 4 MENU button • (Press): Pops up the short-cut menu. • (Hold): Turns off the screen. 5 CAM button • (Press): Displays the picture from the connected rear view camera. • (Hold): Attenuates the sound. 6 Monitor panel 7 Screen (touch panel) 8 DDX719WBT/DDX719WBTM: USB1 input terminal from the rear panel DMX719WBT/DMX719WBTM: USB input terminals (USB1 and USB2) from the rear panel*3 Turning on the power DDX7019BT DDX7019BTM DMX7019BT DMX7019BTM DDX719WBT DDX719WBTM DMX719WBT DMX719WBTM Turning off the power/turning off the AV source • This function varies depending on the setting. (Page 43) DDX7019BT DDX7019BTM DMX7019BT DMX7019BTM DDX719WBT DDX719WBTM DMX719WBT DMX719WBTM *1 The function of the button when held varies depending on the setting on the screen. (Page 43) *2 The availability of this function is depending on the settings and connections made for mirroring. *3 To switch between the USB devices connected to the USB input terminals, see page 16. (Hold) (Hold) Putting the unit in standby 1 Display the source/option selection screen. On the Home screen, touch as follows: 2 Put the unit in standby. On the source/option selection screen, touch as follows: Turning off the screen DDX7019BT DDX7019BTM DMX7019BT DMX7019BTM DDX719WBT DDX719WBTM DMX719WBT DMX719WBTM (Hold) (Hold) To turn on the screen: Press the same button on the monitor panel or touch the screen. 4 ENGLISH
-
 1
1 -
 2
2 -
 3
3 -
 4
4 -
 5
5 -
 6
6 -
 7
7 -
 8
8 -
 9
9 -
 10
10 -
 11
11 -
 12
12 -
13
-
14
-
15
-
16
-
17
-
18
-
19
-
20
-
21
-
22
-
23
-
24
-
25
-
26
-
27
-
28
-
29
-
30
-
31
-
32
-
33
-
34
-
35
-
36
-
37
-
38
-
39
-
40
-
41
-
42
-
43
-
44
-
45
-
46
-
47
-
48
-
49
-
50
-
51
-
52
-
53
-
54
-
55
-
56
-
57
-
58
-
59
-
60
-
61
-
62
-
63
-
64
-
65
-
66
-
67
-
68
 |
 |