Konica Minolta C3080P AccurioPress C2070/C3080 Series Daily Maintenance Guide - Page 68
Image position adjustment example
 |
View all Konica Minolta C3080P manuals
Add to My Manuals
Save this manual to your list of manuals |
Page 68 highlights
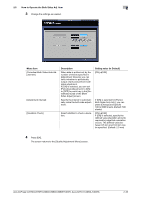
2.5 How to Operate the Both Sides Adj. Item 2 12 Press [Both Sides Adj.]. 13 Check the position error on the back side from the image on the back side of each of the second and third output charts in the job output after the magnification adjustment has been completed. The black line in the figure indicates the back side and the blue dash line indicates the opposite (front) side. If the position of the image on the front side is different from that of the image on the back side, enter the adjustment value in [Up/Down] (crosswise direction) and [Right/Left] (feed direction). To move the image upward or rightward, enter a positive value, and to move downward or leftward, enter a negative value. Image position adjustment example: When the image on the back side is misaligned downward by 0.5 mm and rightward by 0.3 mm against that of the front side, enter [+0.5 mm] in [Up/Down] and [-0.3 mm] in [Right/Left]. The adjustment value is updated in 0.1mm steps. Adjustment range: [Up/Down] -10.0 to +10.0; [Right/Left] -3.0 to +3.0 AccurioPress C2070/C2070P/C2060/C3080/C3080P/C3070, AccurioPrint C2060L/C3070L 2-47
-
 1
1 -
2
-
3
-
4
-
5
-
6
-
7
-
8
-
9
-
10
-
11
-
12
-
13
-
14
-
15
-
16
-
17
-
18
-
19
-
20
-
21
-
22
-
23
-
24
-
25
-
26
-
27
-
28
-
29
-
30
-
31
-
32
-
33
-
34
-
35
-
36
-
37
-
38
-
39
-
40
-
41
-
42
-
43
-
44
-
45
-
46
-
47
-
48
-
49
-
50
-
51
-
52
-
53
-
54
-
55
-
56
-
57
-
58
-
59
-
60
-
61
-
62
-
 63
63 -
 64
64 -
 65
65 -
 66
66 -
 67
67 -
 68
68 -
 69
69 -
 70
70 -
 71
71 -
 72
72 -
 73
73 -
74
-
75
-
76
-
77
-
78
-
79
-
80
-
81
-
82
-
83
-
84
-
85
-
86
-
87
-
88
-
89
-
90
-
91
-
92
-
93
-
94
-
95
-
96
-
97
-
98
-
99
-
100
-
101
-
102
-
103
-
104
-
105
-
106
-
107
-
108
-
109
-
110
-
111
-
112
-
113
-
114
-
115
-
116
-
117
-
118
-
119
-
120
-
121
-
122
-
123
-
124
-
125
-
126
-
127
-
128
-
129
-
130
-
131
-
132
-
133
-
134
-
135
-
136
-
137
-
138
-
139
-
140
-
141
-
142
-
143
-
144
-
145
-
146
-
147
-
148
-
149
-
150
-
151
-
152
-
153
-
154
-
155
-
156
-
157
-
158
-
159
-
160
-
161
-
162
-
163
-
164
-
165
-
166
-
167
-
168
-
169
-
170
-
171
-
172
-
173
-
174
-
175
-
176
-
177
-
178
 |
 |
