Konica Minolta C3080P AccurioPress C2070/C3080 Series Daily Maintenance Guide - Page 88
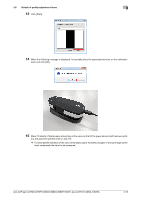
The white portion where it is displayed that nothing is printed is also part of the patch. Do not forget
 |
View all Konica Minolta C3080P manuals
Add to My Manuals
Save this manual to your list of manuals |
Page 88 highlights
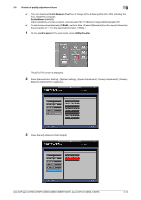
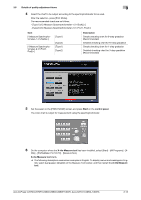
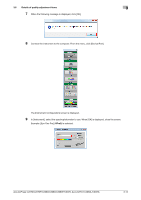
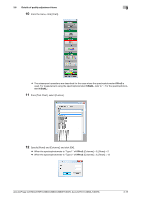
3.6 Details of quality adjustment items 3 16 When the following screen is displayed, place the spectrophotometer on the patch at the top in the up- per left, and press the button for the spectrophotometer. The scanned patch is displayed on the screen, and the scan range frame moves to the next scan position. 17 Continuously, place the spectrophotometer on the next right patch, and press the button for the spec- trophotometer. Measure all the patches in the same operation. % If you place the spectrophotometer on the wrong place (patch), click the the previous patch position. button to go back to % The white portion where it is displayed that nothing is printed is also part of the patch. Do not forget to measure it. If not measured, an error will occur. 18 When you are finished with the chart measurement, click [Close]. % Continuously, go to "Saving the measured data of the density balance" (page 3-19), and save the measurement data. AccurioPress C2070/C2070P/C2060/C3080/C3080P/C3070, AccurioPrint C2060L/C3070L 3-17
-
 1
1 -
2
-
3
-
4
-
5
-
6
-
7
-
8
-
9
-
10
-
11
-
12
-
13
-
14
-
15
-
16
-
17
-
18
-
19
-
20
-
21
-
22
-
23
-
24
-
25
-
26
-
27
-
28
-
29
-
30
-
31
-
32
-
33
-
34
-
35
-
36
-
37
-
38
-
39
-
40
-
41
-
42
-
43
-
44
-
45
-
46
-
47
-
48
-
49
-
50
-
51
-
52
-
53
-
54
-
55
-
56
-
57
-
58
-
59
-
60
-
61
-
62
-
63
-
64
-
65
-
66
-
67
-
68
-
69
-
70
-
71
-
72
-
73
-
74
-
75
-
76
-
77
-
78
-
79
-
80
-
81
-
82
-
 83
83 -
 84
84 -
 85
85 -
 86
86 -
 87
87 -
 88
88 -
 89
89 -
 90
90 -
 91
91 -
 92
92 -
 93
93 -
94
-
95
-
96
-
97
-
98
-
99
-
100
-
101
-
102
-
103
-
104
-
105
-
106
-
107
-
108
-
109
-
110
-
111
-
112
-
113
-
114
-
115
-
116
-
117
-
118
-
119
-
120
-
121
-
122
-
123
-
124
-
125
-
126
-
127
-
128
-
129
-
130
-
131
-
132
-
133
-
134
-
135
-
136
-
137
-
138
-
139
-
140
-
141
-
142
-
143
-
144
-
145
-
146
-
147
-
148
-
149
-
150
-
151
-
152
-
153
-
154
-
155
-
156
-
157
-
158
-
159
-
160
-
161
-
162
-
163
-
164
-
165
-
166
-
167
-
168
-
169
-
170
-
171
-
172
-
173
-
174
-
175
-
176
-
177
-
178
 |
 |
