Konica Minolta C3080P AccurioPress C2070/C3080 Series Daily Maintenance Guide - Page 82
[Density Balance Adjustment] (for i1Pro, i1Pro2, or i1iSisXL)
 |
View all Konica Minolta C3080P manuals
Add to My Manuals
Save this manual to your list of manuals |
Page 82 highlights
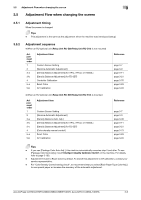
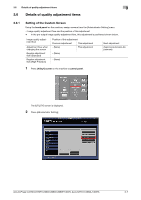
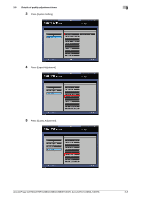
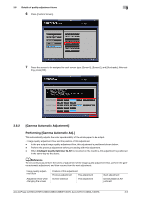
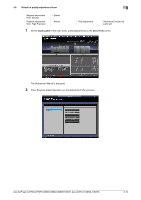
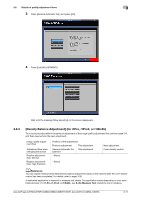
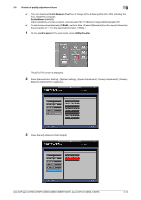
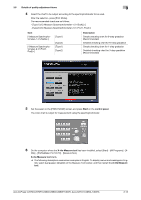
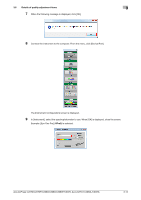
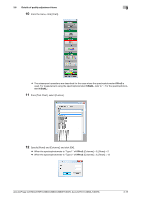
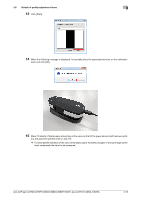
3.6 Details of quality adjustment items 3 3 Press [Gamma Automatic Adj.] and press [OK]. 4 Press [Exit [ADJUSTMENT]]. Wait until the message [Now adjusting] on the screen disappears. 3.6.3 [Density Balance Adjustment] (for i1Pro, i1Pro2, or i1iSisXL) To not continuously perform the series of adjustment of the image quality adjustment flow, perform page 3-9, and then resume from the next adjustment. Image quality adjustment flow Adjustment flow when changing the screen Regular adjustment flow: Normal Regular adjustment flow: High Precision Position of this adjustment Previous adjustment This adjustment Gamma Automatic Ad- This adjustment justment - (None) - (None) Next adjustment Color density control dReference You can register measurement data (density balance adjustment value) on the machine after the color density control has been completed. For details, refer to page 3-32. A dedicated application is required to measure test charts. The application varies depending on your spectrophotometer. For i1-Pro, i1-Pro2, or i1iSisXL, use X-rite Measure Tool. Install the tool in advance. AccurioPress C2070/C2070P/C2060/C3080/C3080P/C3070, AccurioPrint C2060L/C3070L 3-11
-
 1
1 -
2
-
3
-
4
-
5
-
6
-
7
-
8
-
9
-
10
-
11
-
12
-
13
-
14
-
15
-
16
-
17
-
18
-
19
-
20
-
21
-
22
-
23
-
24
-
25
-
26
-
27
-
28
-
29
-
30
-
31
-
32
-
33
-
34
-
35
-
36
-
37
-
38
-
39
-
40
-
41
-
42
-
43
-
44
-
45
-
46
-
47
-
48
-
49
-
50
-
51
-
52
-
53
-
54
-
55
-
56
-
57
-
58
-
59
-
60
-
61
-
62
-
63
-
64
-
65
-
66
-
67
-
68
-
69
-
70
-
71
-
72
-
73
-
74
-
75
-
76
-
 77
77 -
 78
78 -
 79
79 -
 80
80 -
 81
81 -
 82
82 -
 83
83 -
 84
84 -
 85
85 -
 86
86 -
 87
87 -
88
-
89
-
90
-
91
-
92
-
93
-
94
-
95
-
96
-
97
-
98
-
99
-
100
-
101
-
102
-
103
-
104
-
105
-
106
-
107
-
108
-
109
-
110
-
111
-
112
-
113
-
114
-
115
-
116
-
117
-
118
-
119
-
120
-
121
-
122
-
123
-
124
-
125
-
126
-
127
-
128
-
129
-
130
-
131
-
132
-
133
-
134
-
135
-
136
-
137
-
138
-
139
-
140
-
141
-
142
-
143
-
144
-
145
-
146
-
147
-
148
-
149
-
150
-
151
-
152
-
153
-
154
-
155
-
156
-
157
-
158
-
159
-
160
-
161
-
162
-
163
-
164
-
165
-
166
-
167
-
168
-
169
-
170
-
171
-
172
-
173
-
174
-
175
-
176
-
177
-
178
 |
 |
