Konica Minolta bizhub 42 bizhub 36/42 Administrator Operations User Guide - Page 193
Separate Scan]
 |
View all Konica Minolta bizhub 42 manuals
Add to My Manuals
Save this manual to your list of manuals |
Page 193 highlights
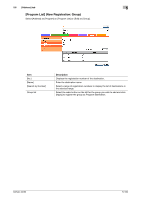
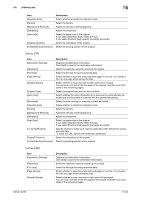
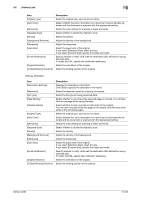
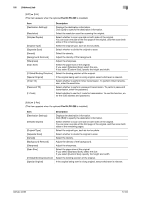
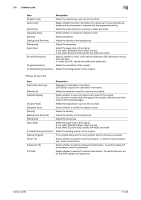
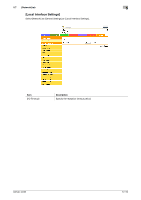
5.6 [Address] tab 5 [Edit] ö [Address Book] Item [Destination Settings] [Resolution] [File Type] [Page Setting] [Subject] [Text] [Simplex/Duplex] [Original Type] [Auto Color] [Monotone] [Separate Scan] [Density] [Background Removal] [Sharpness] [Scan Size] [Original Direction] [2-Sided Binding Direction] [Special Original] [Timer TX] [Password TX] [F-Code] Description Displays the destination information. Click [Edit] to specify the destination information. Select the resolution used for scanning the original. Select the file type for saving scanned data. Select whether to save the whole scanned pages in one file, or to divide a file into one page when saving the data. Specify the subject of the E-mail message. If you select [Not Specified], the default subject is used. Specify the body text of the E-mail message. If you select [Not Specified], the default body text is used. Select whether to scan one side or both sides of the original. You can scan one side of the first page of the original, and then scan both sides of the remaining pages. Select the original type, such as text or photo. Select whether the color information for a document is automatically detected and the document is scanned with the appropriate setting. Select the color setting for scanning in black and white. Select whether to divide the original to scan. Select the density. Adjust the density of the background. Adjust the sharpness. Select the paper size of the original. If you select [Standard Size], select the size. If you select [Custom Size], specify the height and width. Select the orientation of the original. Select the binding position of the original. If the original being sent is a long original, select whichever is relevant. Select whether to perform timer transmission. To perform timer transmission, enter the send time. Select whether to perform password transmission. To perform password transmission, enter the password. Select whether to use the F-code for transmission. To use this function, enter the SUB address and password. [Edit] ö [Group (Scan)] Item [Destination Settings] [Resolution] [File Type] [Page Setting] [Subject] [Text] [Simplex/Duplex] Description Displays the destination information. Click [Edit] to specify the destination information. Select the resolution used for scanning the original. Select the file type for saving scanned data. Select whether to save the whole scanned pages in one file, or to divide a file into one page when saving the data. Specify the subject of the E-mail message. If you select [Not Specified], the default subject is used. Specify the body text of the E-mail message. If you select [Not Specified], the default body text is used. Select whether to scan one side or both sides of the original. You can scan one side of the first page of the original, and then scan both sides of the remaining pages. bizhub 42/36 5-105
-
 1
1 -
2
-
3
-
4
-
5
-
6
-
7
-
8
-
9
-
10
-
11
-
12
-
13
-
14
-
15
-
16
-
17
-
18
-
19
-
20
-
21
-
22
-
23
-
24
-
25
-
26
-
27
-
28
-
29
-
30
-
31
-
32
-
33
-
34
-
35
-
36
-
37
-
38
-
39
-
40
-
41
-
42
-
43
-
44
-
45
-
46
-
47
-
48
-
49
-
50
-
51
-
52
-
53
-
54
-
55
-
56
-
57
-
58
-
59
-
60
-
61
-
62
-
63
-
64
-
65
-
66
-
67
-
68
-
69
-
70
-
71
-
72
-
73
-
74
-
75
-
76
-
77
-
78
-
79
-
80
-
81
-
82
-
83
-
84
-
85
-
86
-
87
-
88
-
89
-
90
-
91
-
92
-
93
-
94
-
95
-
96
-
97
-
98
-
99
-
100
-
101
-
102
-
103
-
104
-
105
-
106
-
107
-
108
-
109
-
110
-
111
-
112
-
113
-
114
-
115
-
116
-
117
-
118
-
119
-
120
-
121
-
122
-
123
-
124
-
125
-
126
-
127
-
128
-
129
-
130
-
131
-
132
-
133
-
134
-
135
-
136
-
137
-
138
-
139
-
140
-
141
-
142
-
143
-
144
-
145
-
146
-
147
-
148
-
149
-
150
-
151
-
152
-
153
-
154
-
155
-
156
-
157
-
158
-
159
-
160
-
161
-
162
-
163
-
164
-
165
-
166
-
167
-
168
-
169
-
170
-
171
-
172
-
173
-
174
-
175
-
176
-
177
-
178
-
179
-
180
-
181
-
182
-
183
-
184
-
185
-
186
-
187
-
 188
188 -
 189
189 -
 190
190 -
 191
191 -
 192
192 -
 193
193 -
 194
194 -
 195
195 -
 196
196 -
 197
197 -
 198
198 -
199
-
200
-
201
-
202
-
203
-
204
-
205
-
206
-
207
-
208
-
209
-
210
-
211
-
212
-
213
-
214
-
215
-
216
-
217
-
218
-
219
-
220
-
221
-
222
-
223
-
224
-
225
-
226
-
227
-
228
-
229
-
230
-
231
-
232
-
233
-
234
-
235
-
236
-
237
-
238
-
239
-
240
-
241
-
242
-
243
-
244
-
245
-
246
-
247
-
248
-
249
-
250
-
251
-
252
-
253
-
254
-
255
-
256
-
257
-
258
-
259
-
260
-
261
-
262
-
263
-
264
-
265
-
266
-
267
-
268
-
269
-
270
-
271
-
272
-
273
-
274
-
275
-
276
-
277
-
278
-
279
-
280
-
281
-
282
-
283
-
284
 |
 |